Escape From Tarkov “The Ticket” Story Chapter Guide
Prapor's Lighthouse camp, the RFID card, all four ending routes, and the Terminal escape.


The Ticket turns your investigation in Escape from Tarkov into a route out of the city. It follows Falling Skies, and the armored case from that chapter determines how much work you need to do before the ending choices open up.
Decide which ending you want before rushing through Mr. Kerman’s conversations. Refusing his first offer, refusing to investigate TerraGroup later, and stopping the evidence hand-ins are three different decisions. They do not lead to the same outcome.

Choose your ending before committing
| Ending | The decisive choice | Final access item |
|---|---|---|
| Savior | Accept Kerman’s help, agree to investigate TerraGroup, and continue gathering major evidence. | Reprogrammed RFID keycard with Mr. Kerman’s hash codes, plus the Alpha-1 evidence container. |
| Debtor | Accept Kerman’s help and his evidence job, but refuse further major evidence after handing over two pieces. | RFID keycard with unknown name from Lightkeeper. |
| Survivor | Refuse Kerman’s initial offer to help activate the card and work with Prapor instead. | Prapor’s letter for the port checkpoint. |
| Fallen | Accept Kerman’s help initially, then refuse his later request to investigate TerraGroup. | Reprogrammed RFID keycard with Prapor’s hash codes. |
These choices can close other ending routes. Finish the conversation you intend to choose, rather than selecting a refusal just to clear a dialogue option.
Start The Ticket through the Intelligence Center
Build Intelligence Center level 1 in your Hideout, then contact Mr. Kerman through its laptop. Wait for him to contact you again, speak to Prapor through the trader menu, and return to Kerman.
The first response can take several hours. Once the conversations move forward, your next step depends on what you did with the armored case during Falling Skies.
Find Prapor’s camp on Lighthouse
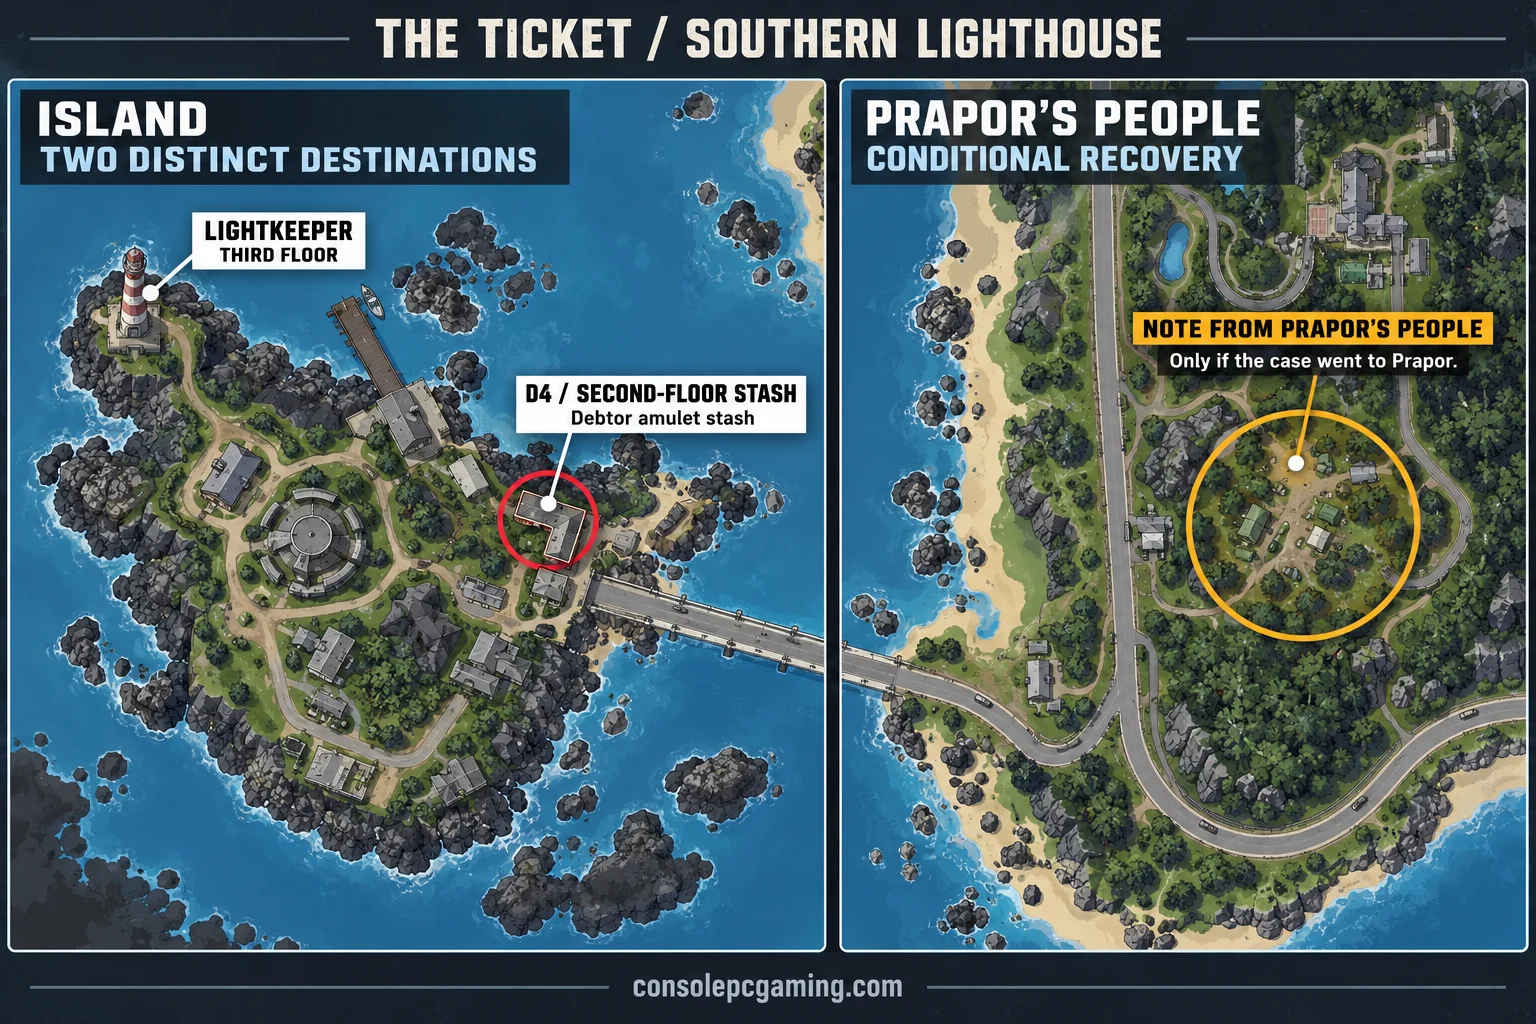
This section applies if you gave the armored case to Prapor. If you kept it, move on to opening the case.
Go to the southern end of Lighthouse and look for Prapor’s camp on the mainland hill near the road approaching the lighthouse island. The camp is on the mainland side. You do not need to cross Lightkeeper’s guarded bridge just to investigate it.
Walk into the camp to register the location, then search for the Note from Prapor’s men. Check the medical boxes and the supply crate. These are two possible positions for the clue, so finding the camp alone is not enough.
Recover the note and return to Kerman through the Intelligence Center laptop. This is the camp-and-clue stage that appears before the Lightkeeper part of the case recovery.
Get the case back through Lightkeeper
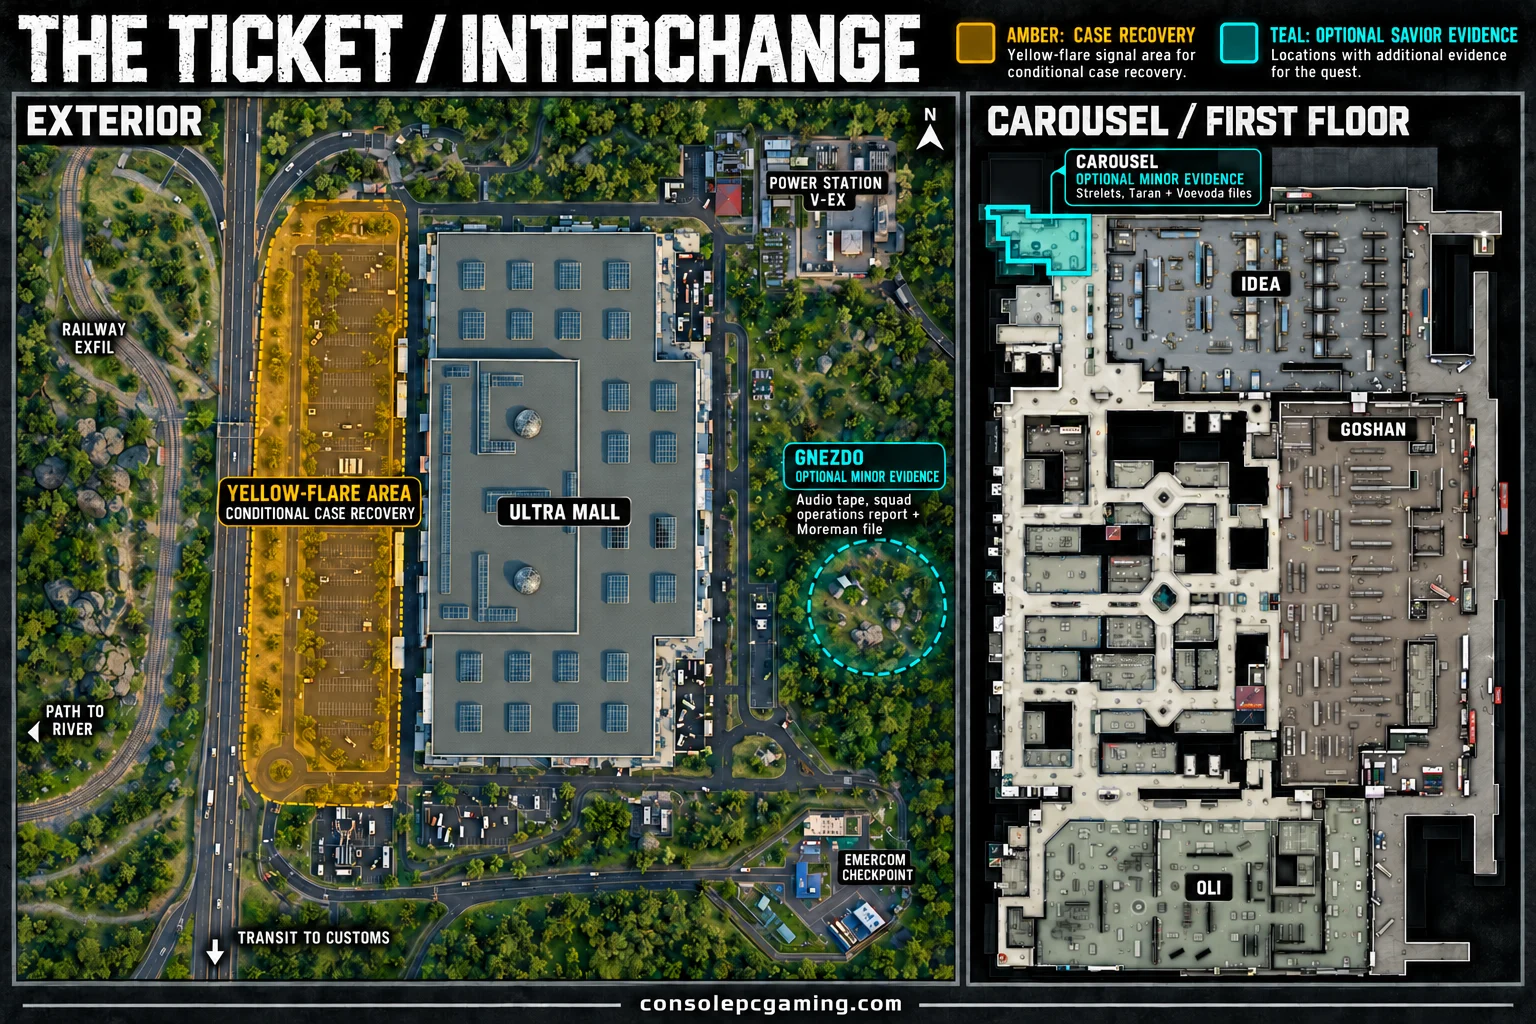
You need legitimate access to Lightkeeper. Use an encoded Digital secure DSP radio transmitter for the island crossing and maintain your good standing with him. Do not treat the island’s bridge or Zryachiy as an ordinary combat encounter.
- Speak to Lightkeeper and collect three TerraGroup “Blue Folders” materials. Found in Raid status is not required for this handover.
- Bring the three folders to Lightkeeper.
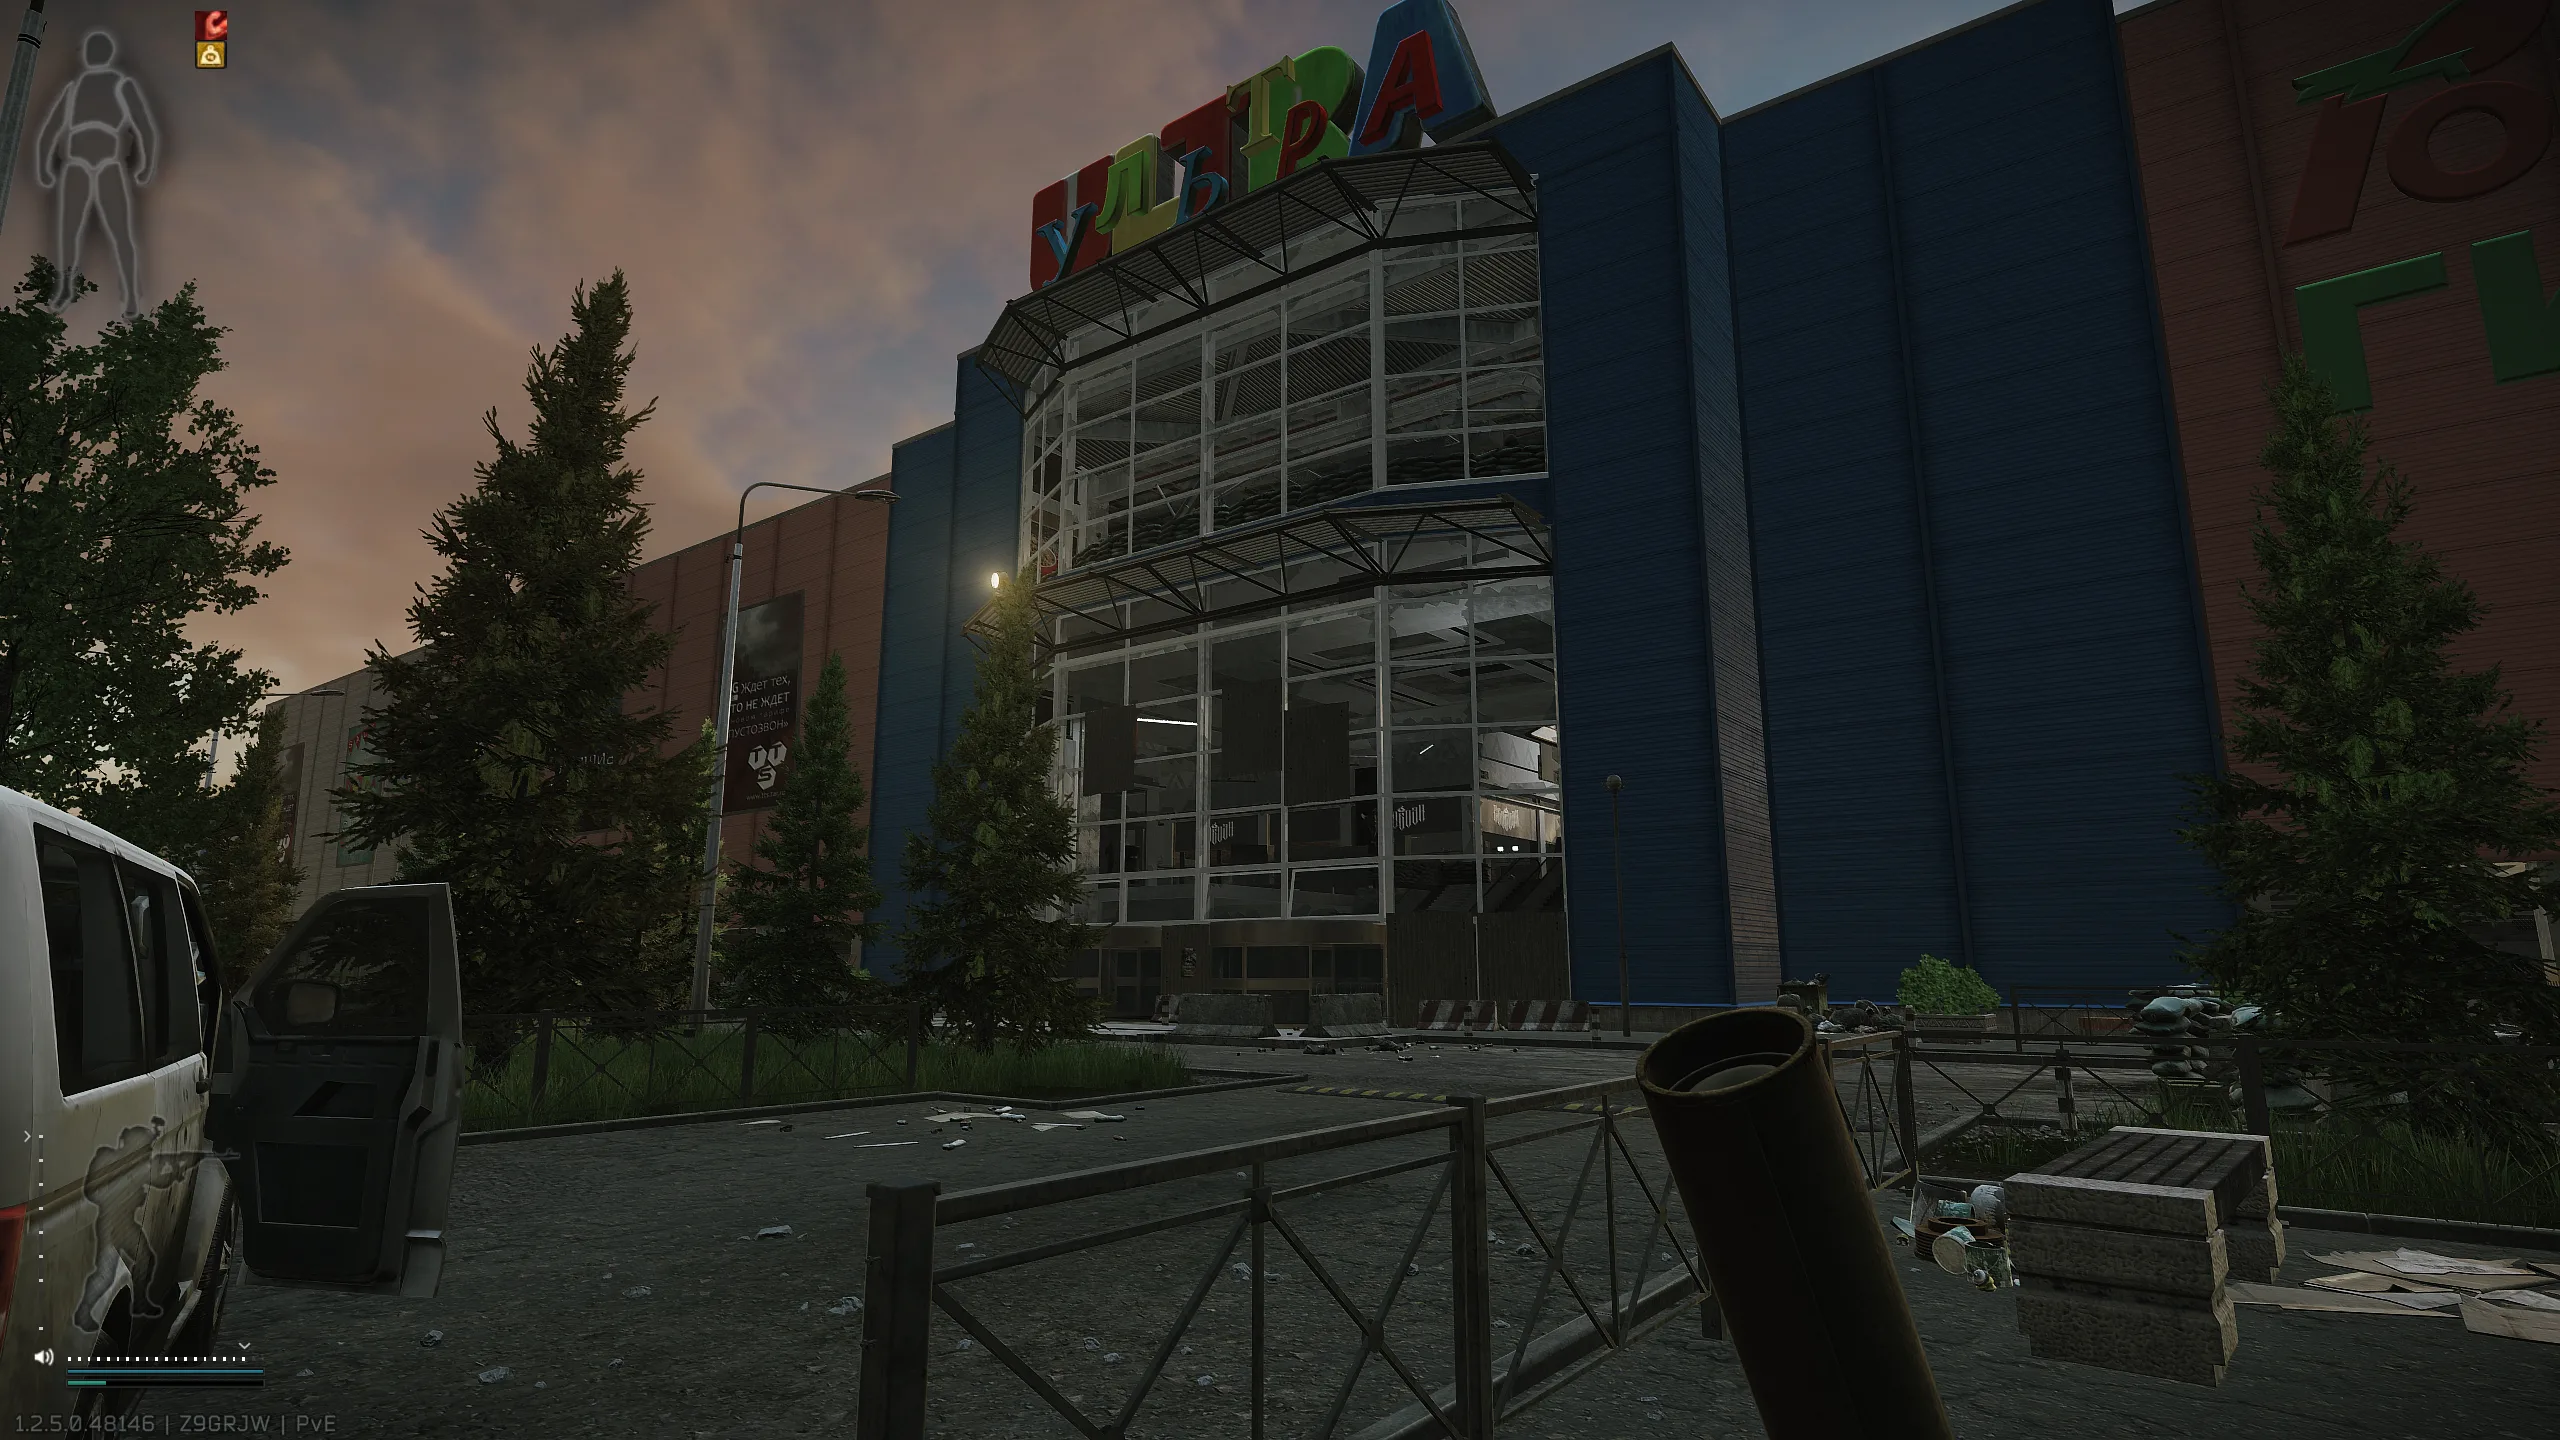
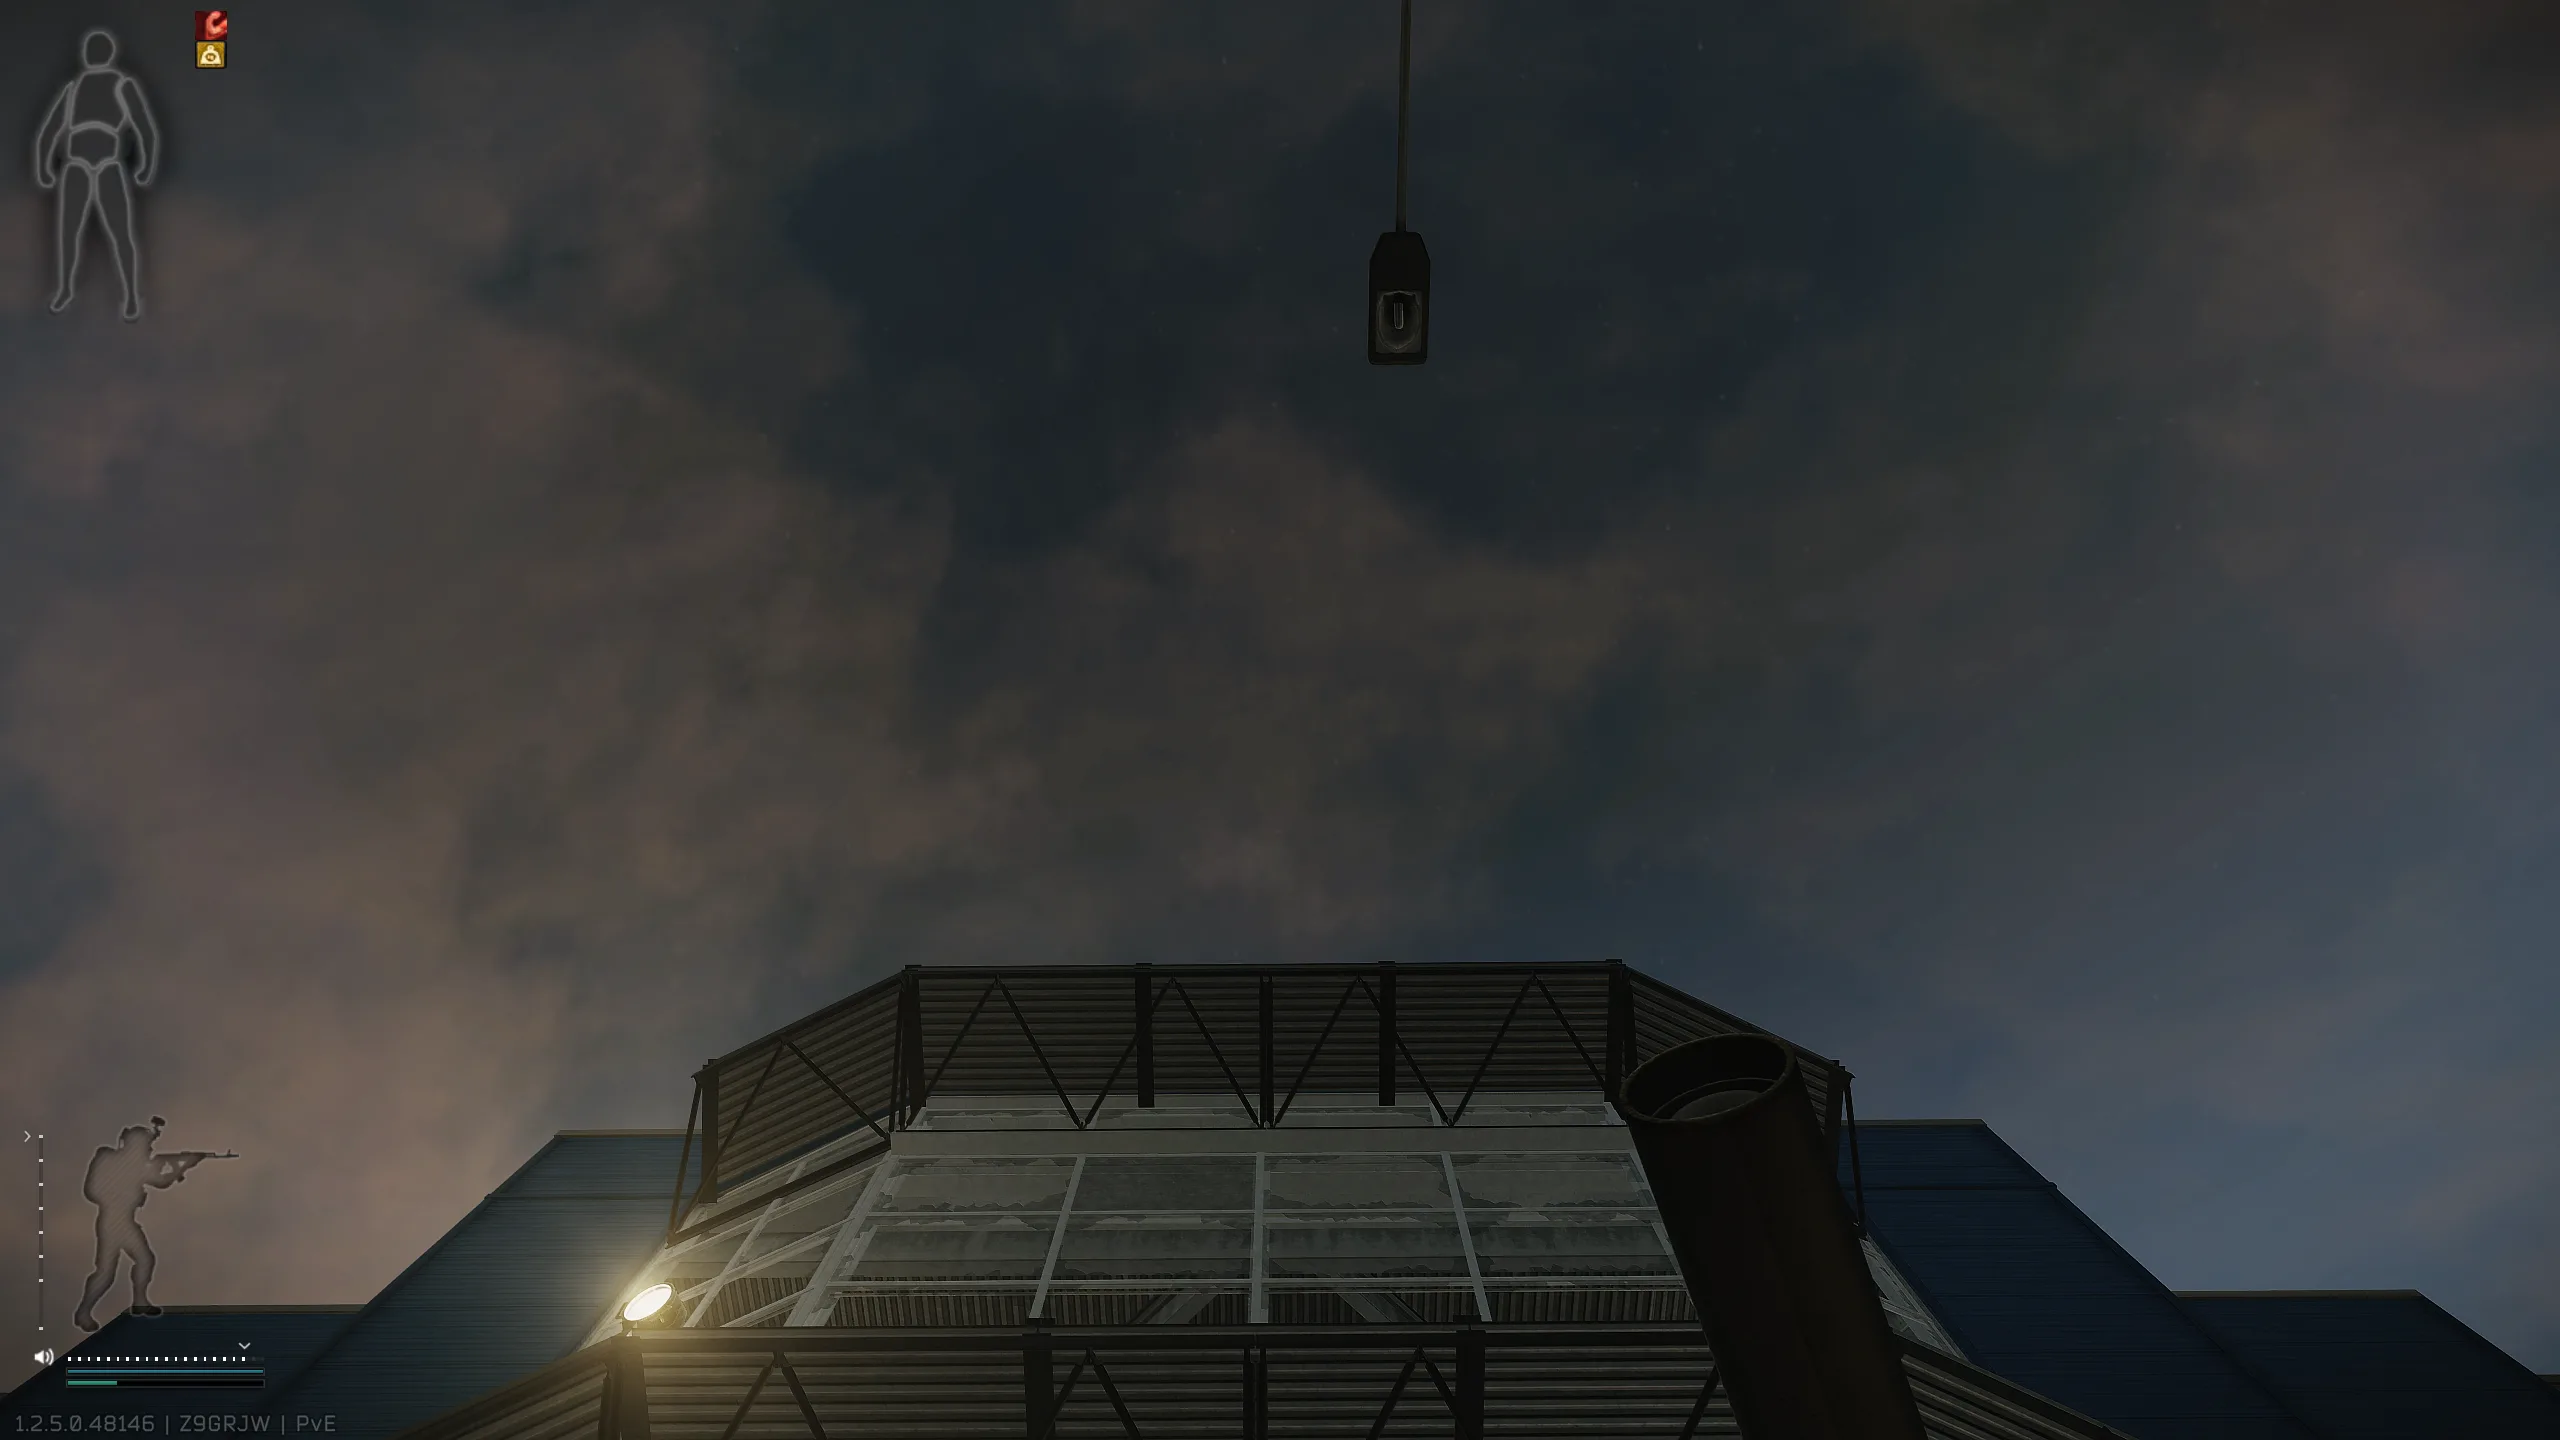
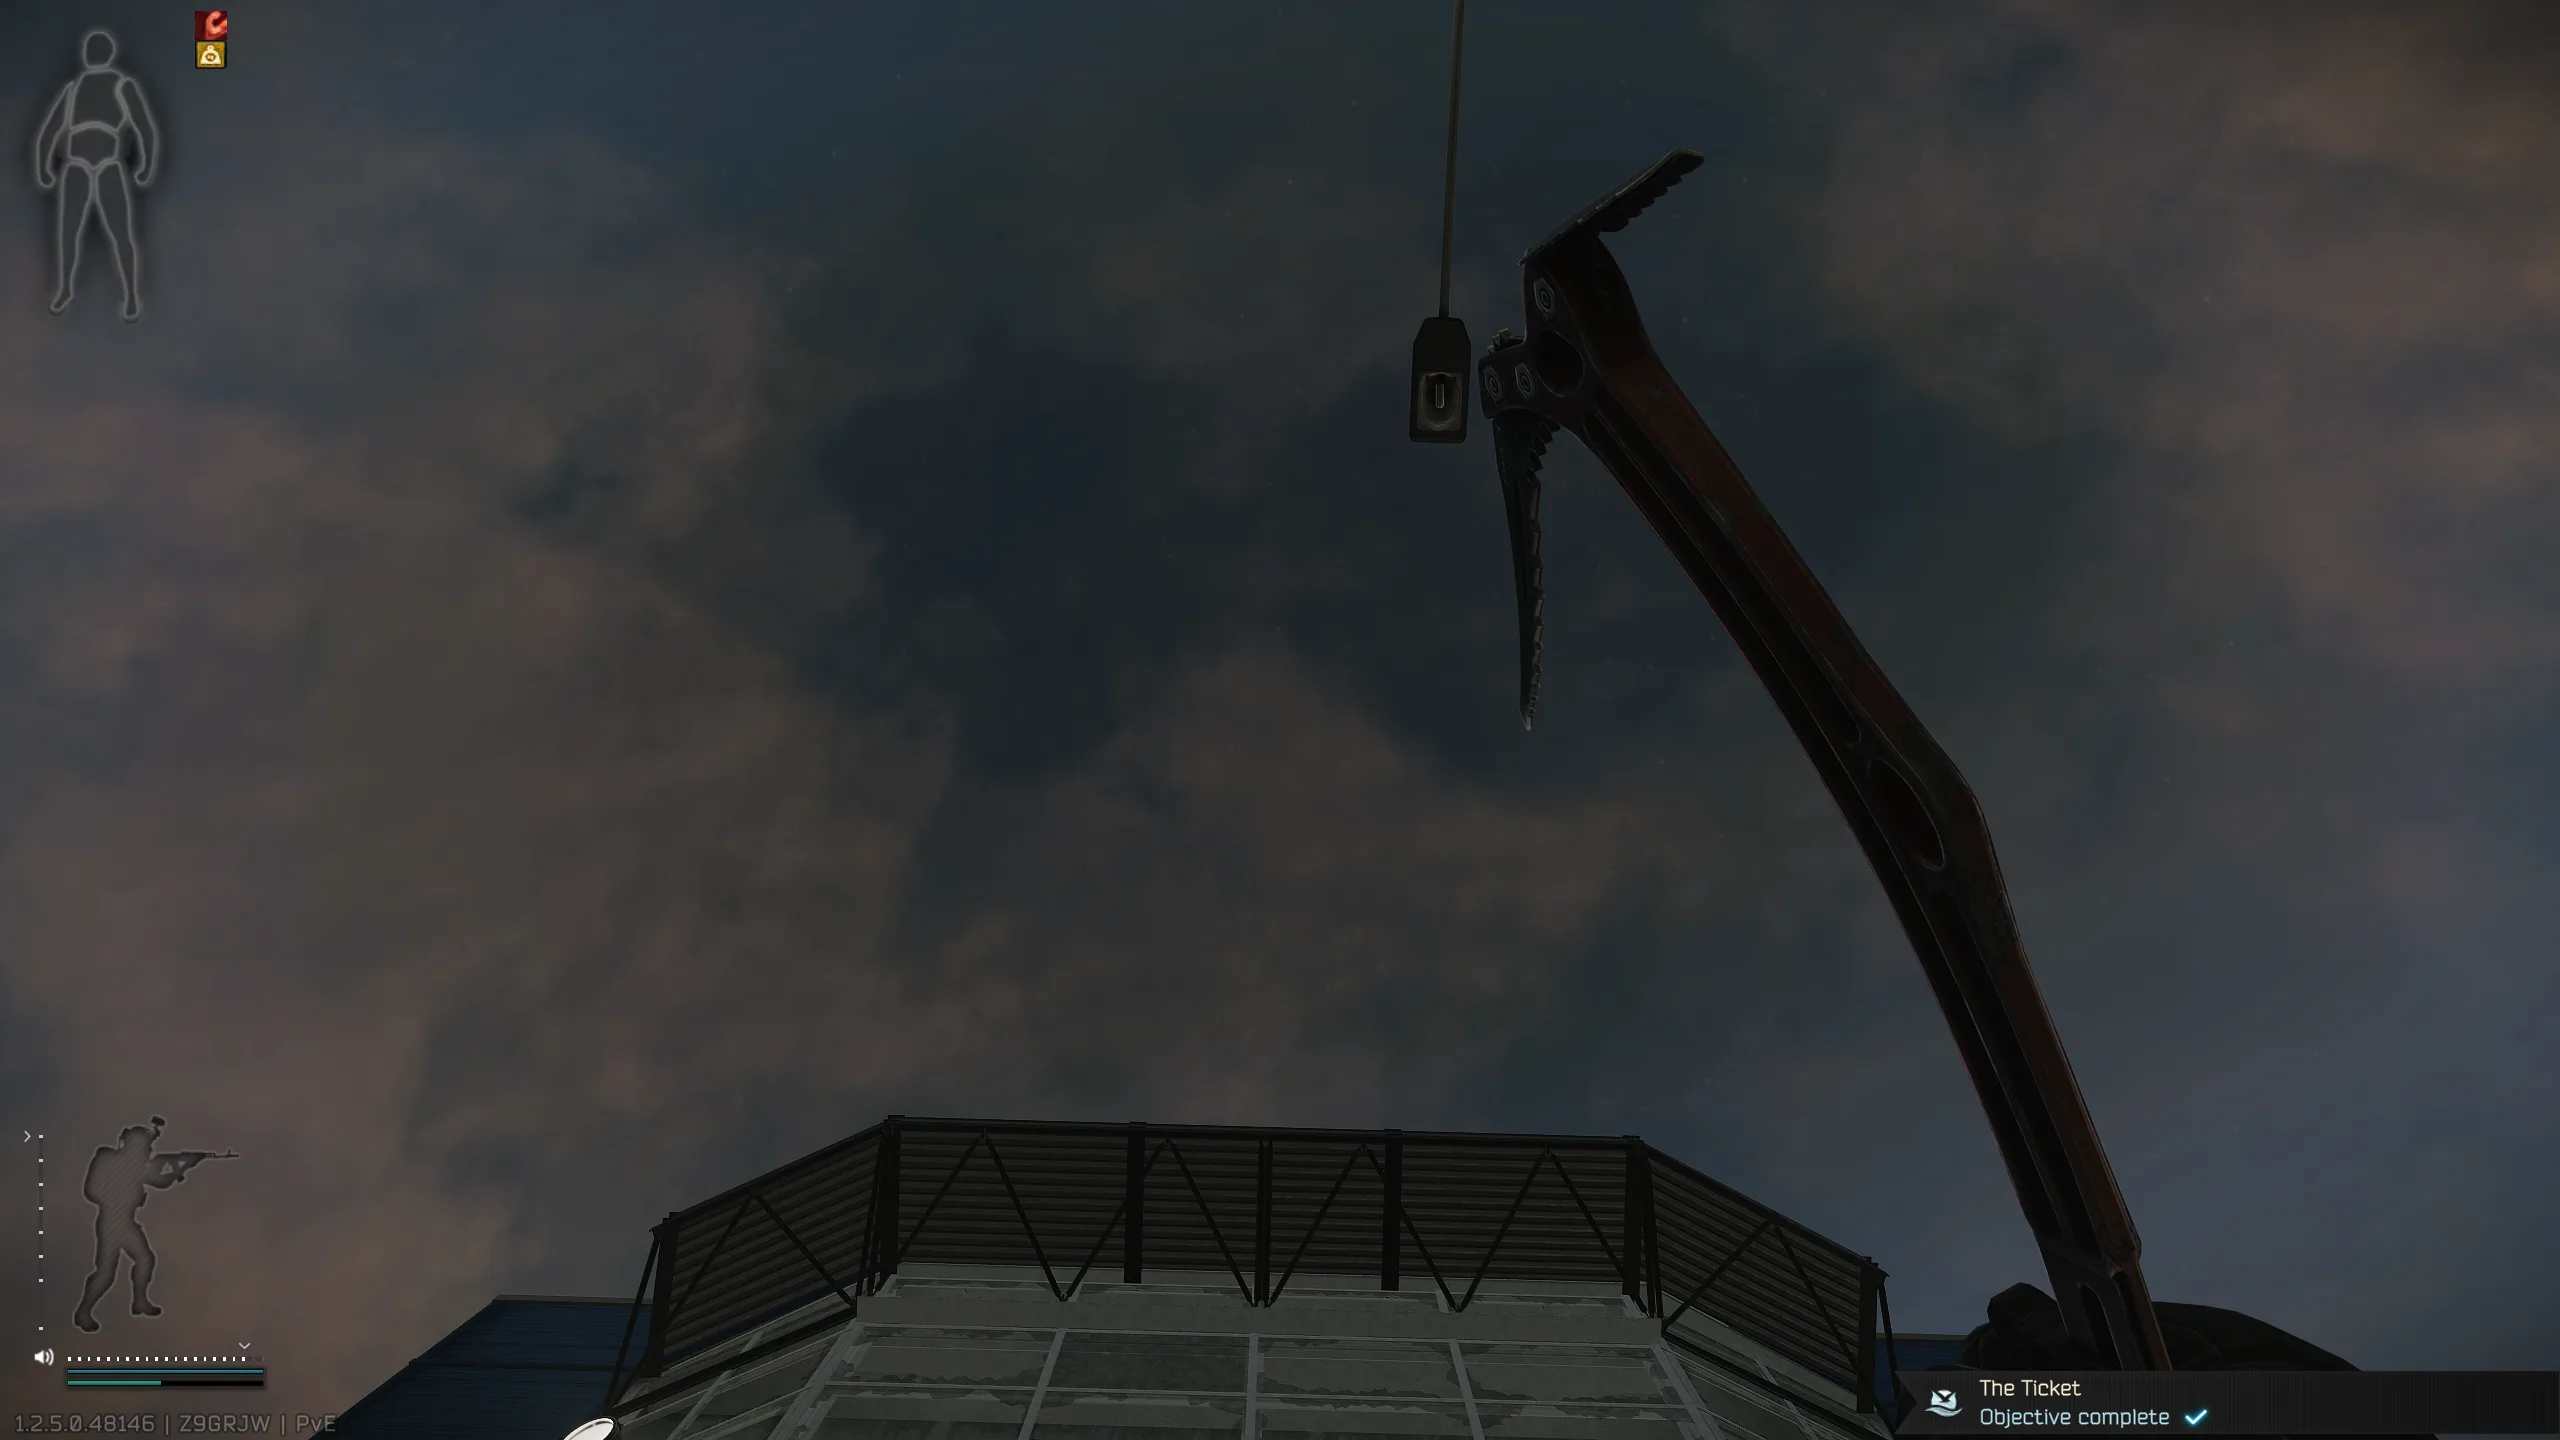
- On Interchange, launch a yellow signal flare in front of ULTRA’s main entrance.
- Eliminate 15 targets on Interchange in one raid. Extracting before reaching the required kills resets this sequence, including the flare step.
- Return to Lightkeeper. Leave a special-item slot empty so you can receive the armored case.
Open the armored case
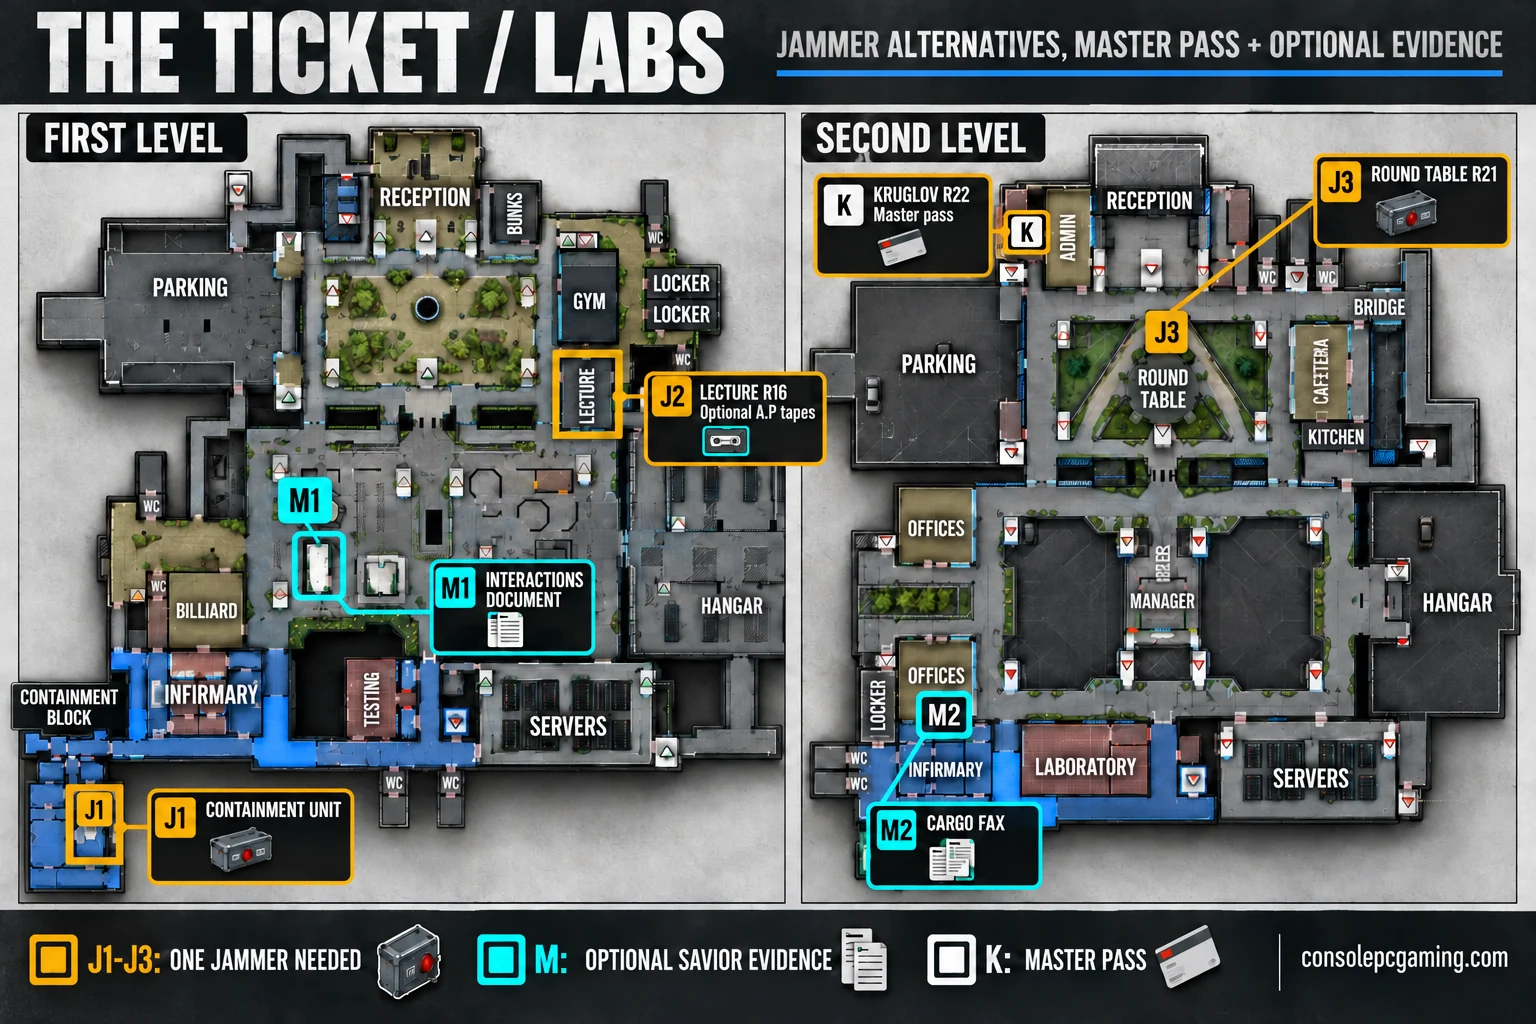
Ask Mechanic for help, then go to The Lab for an Experimental signal jammer. Check the desks in the glass laboratory inside the containment block, the round table in the second-level recreation area, and the lecture hall desks below the kitchen area.
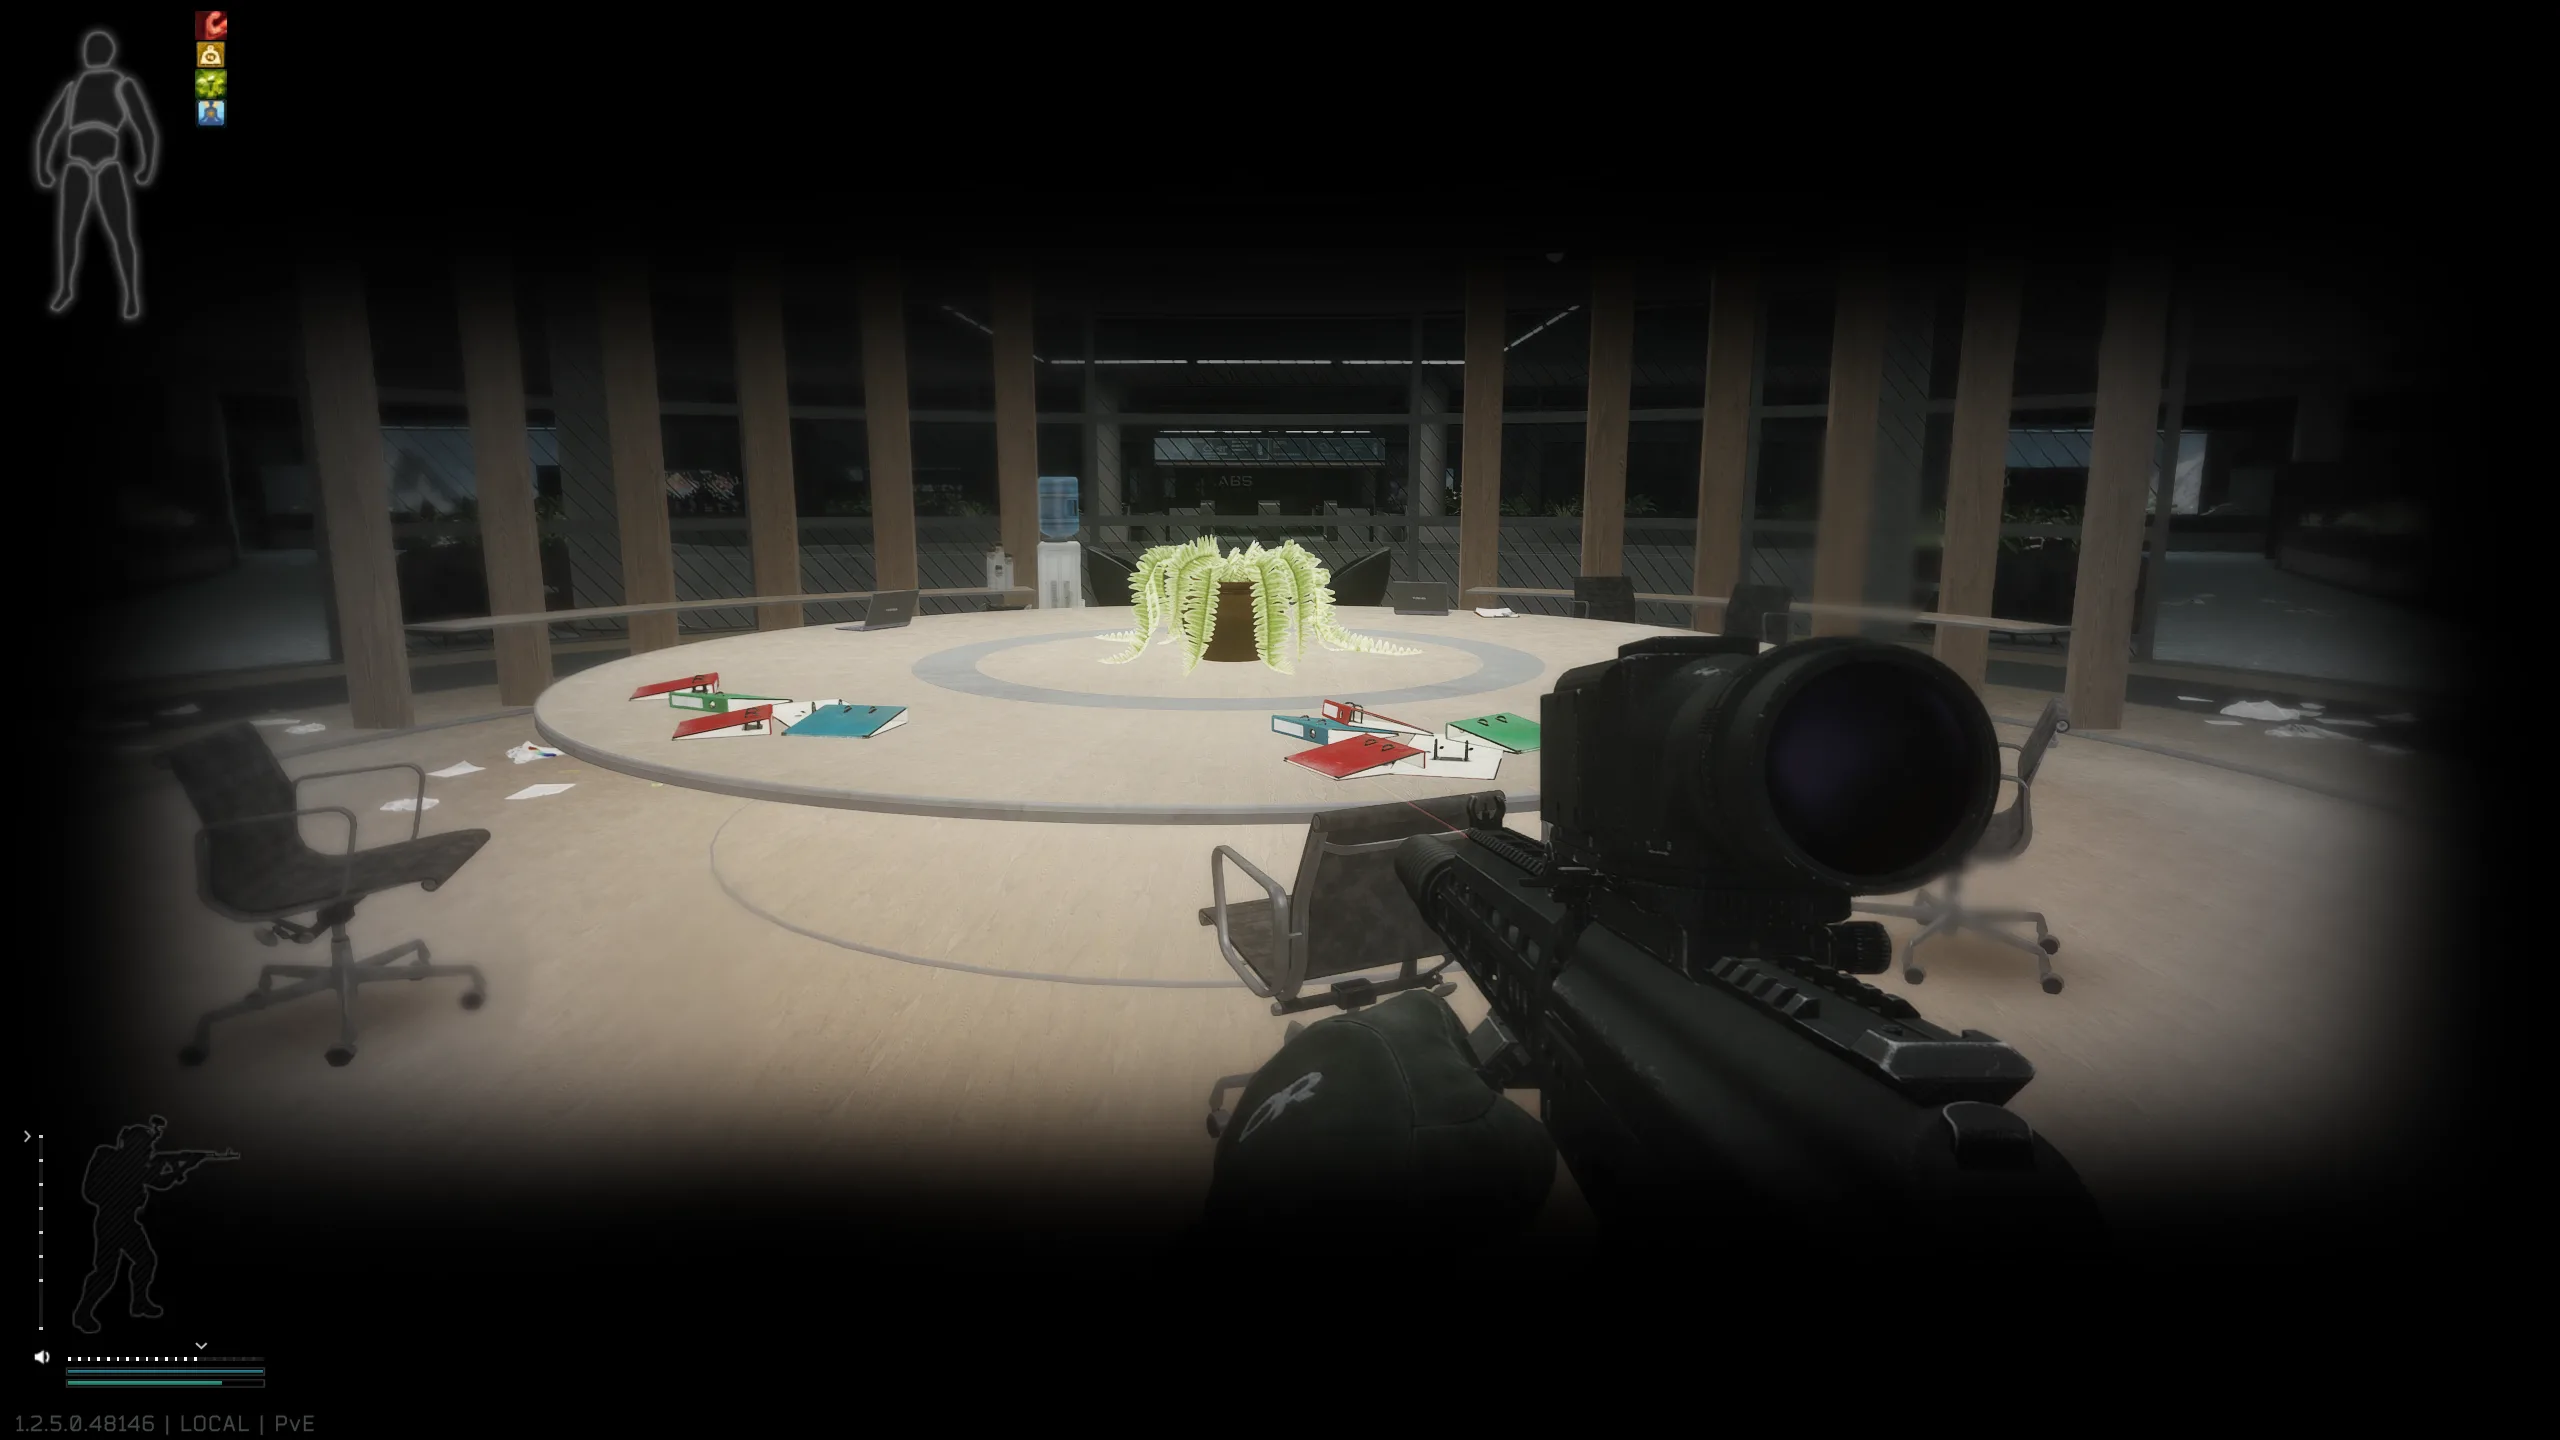
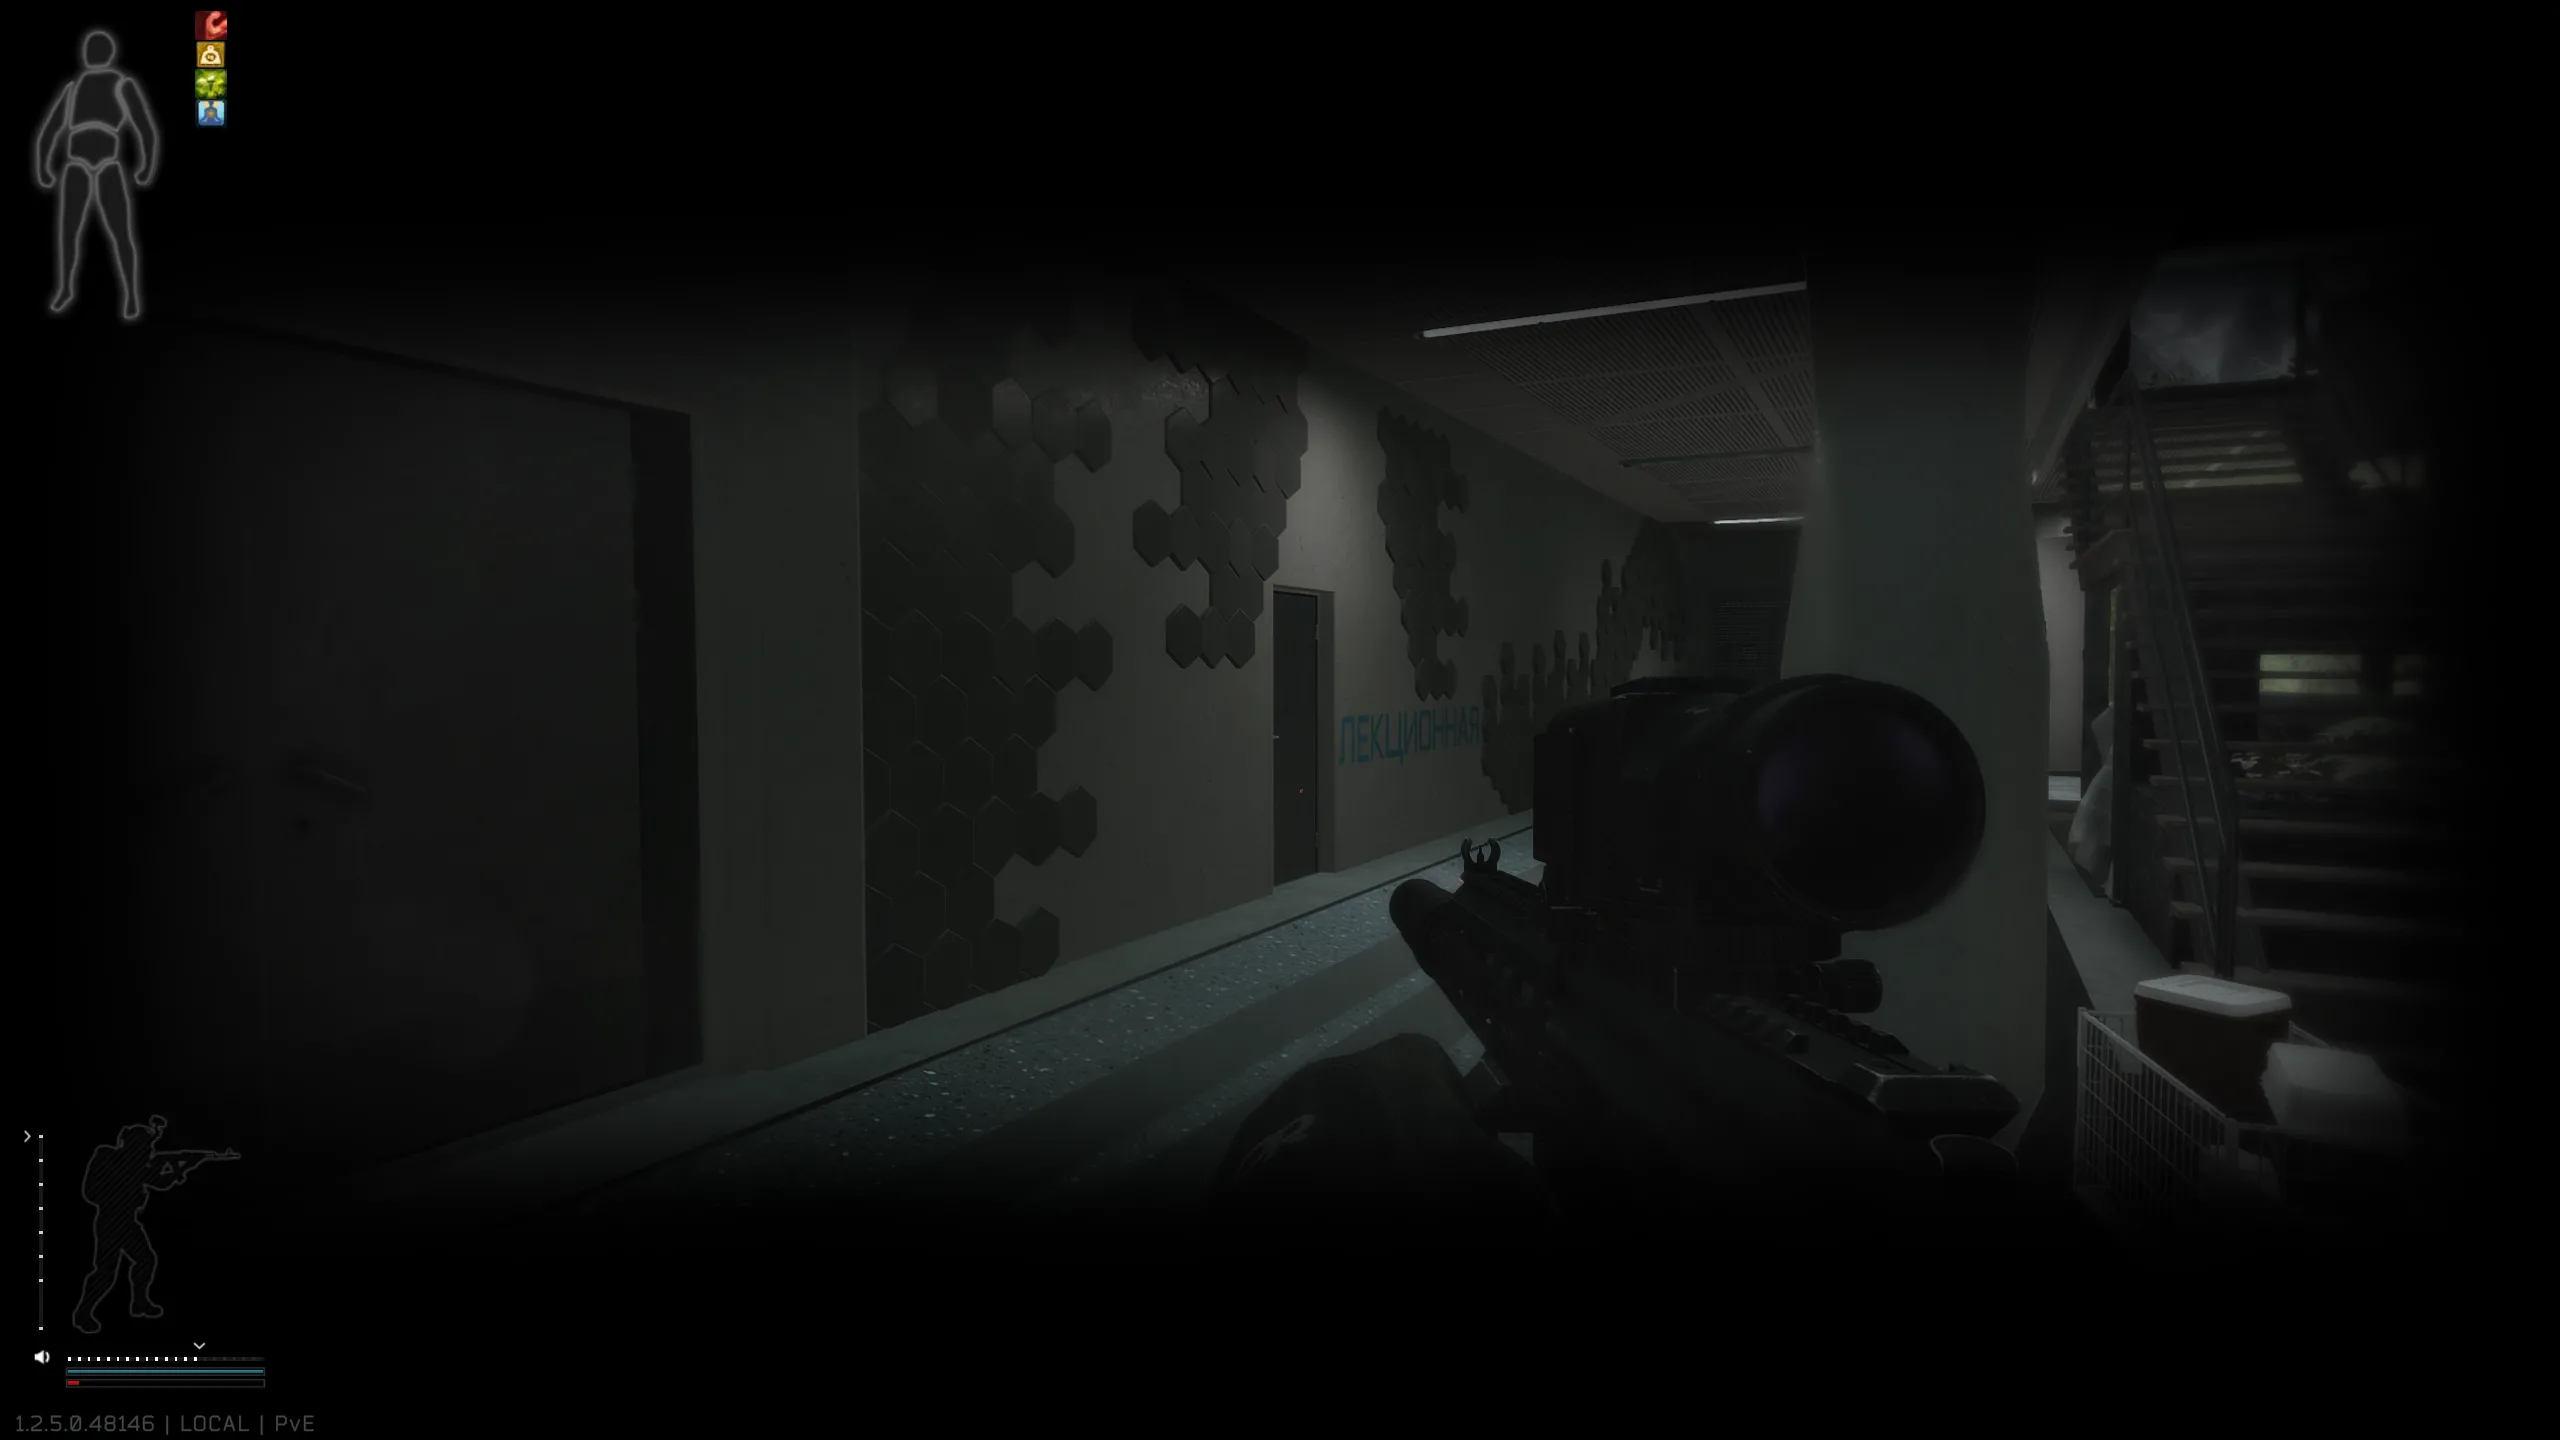
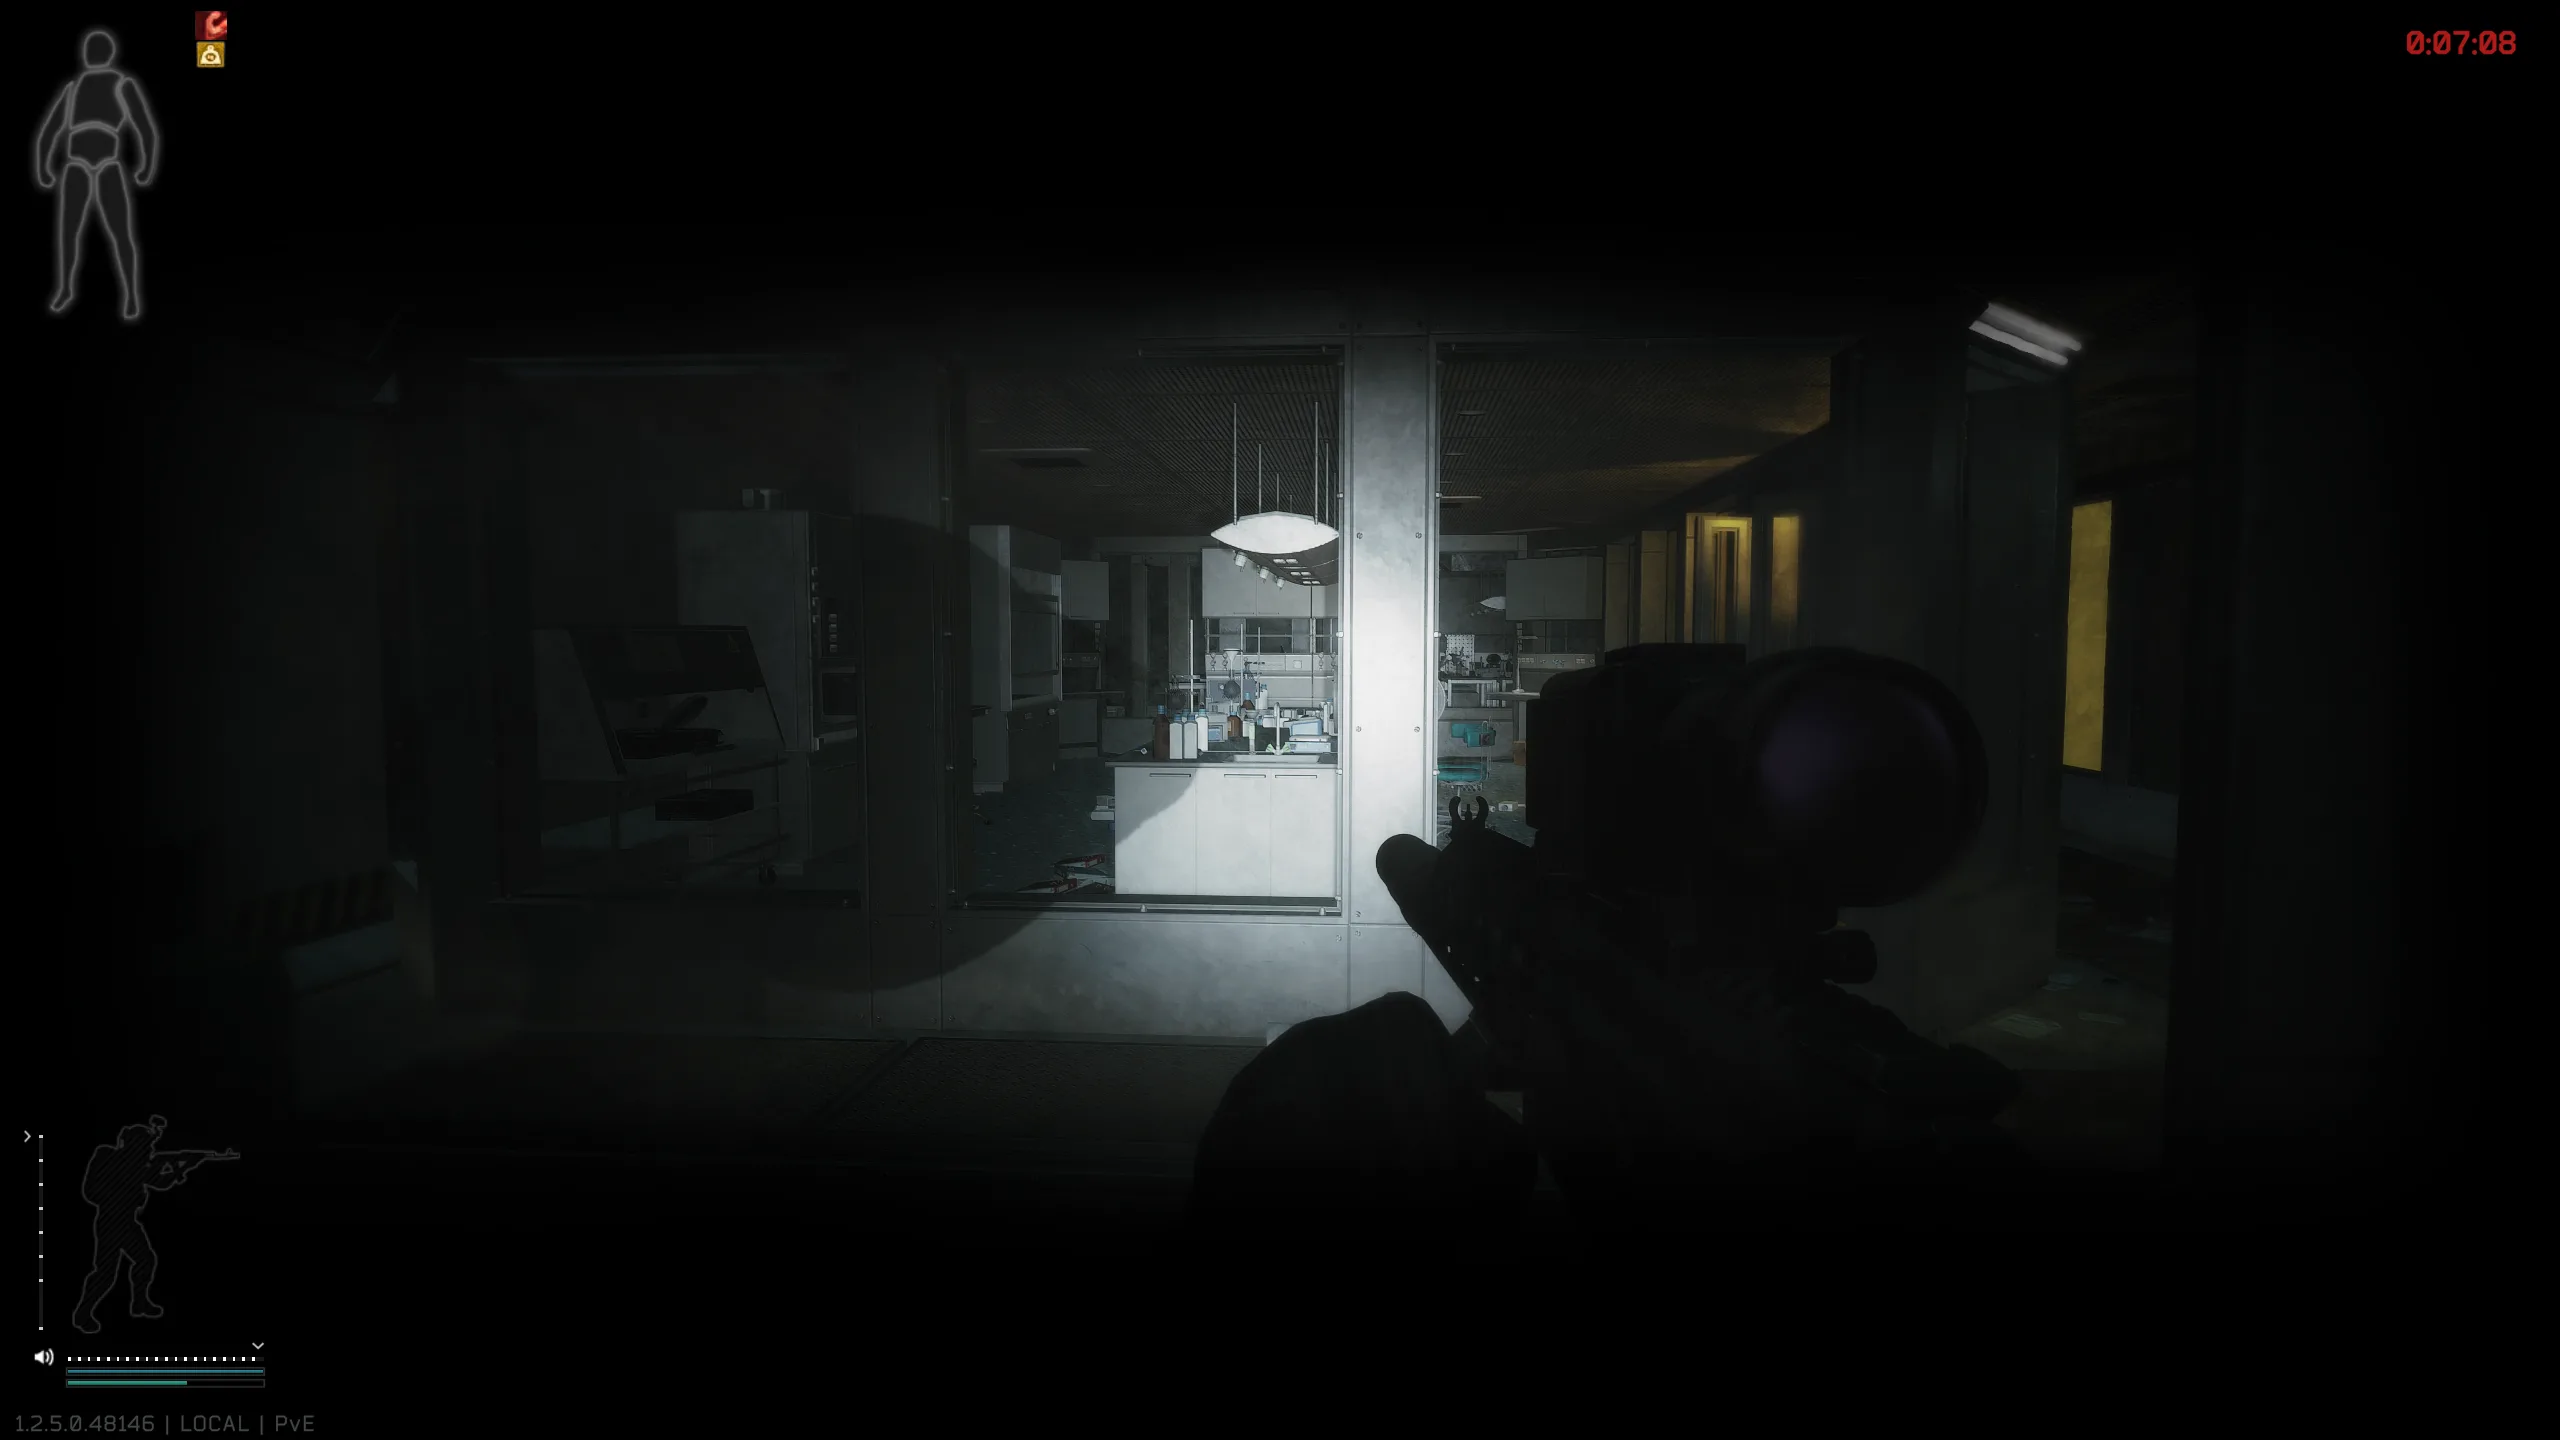
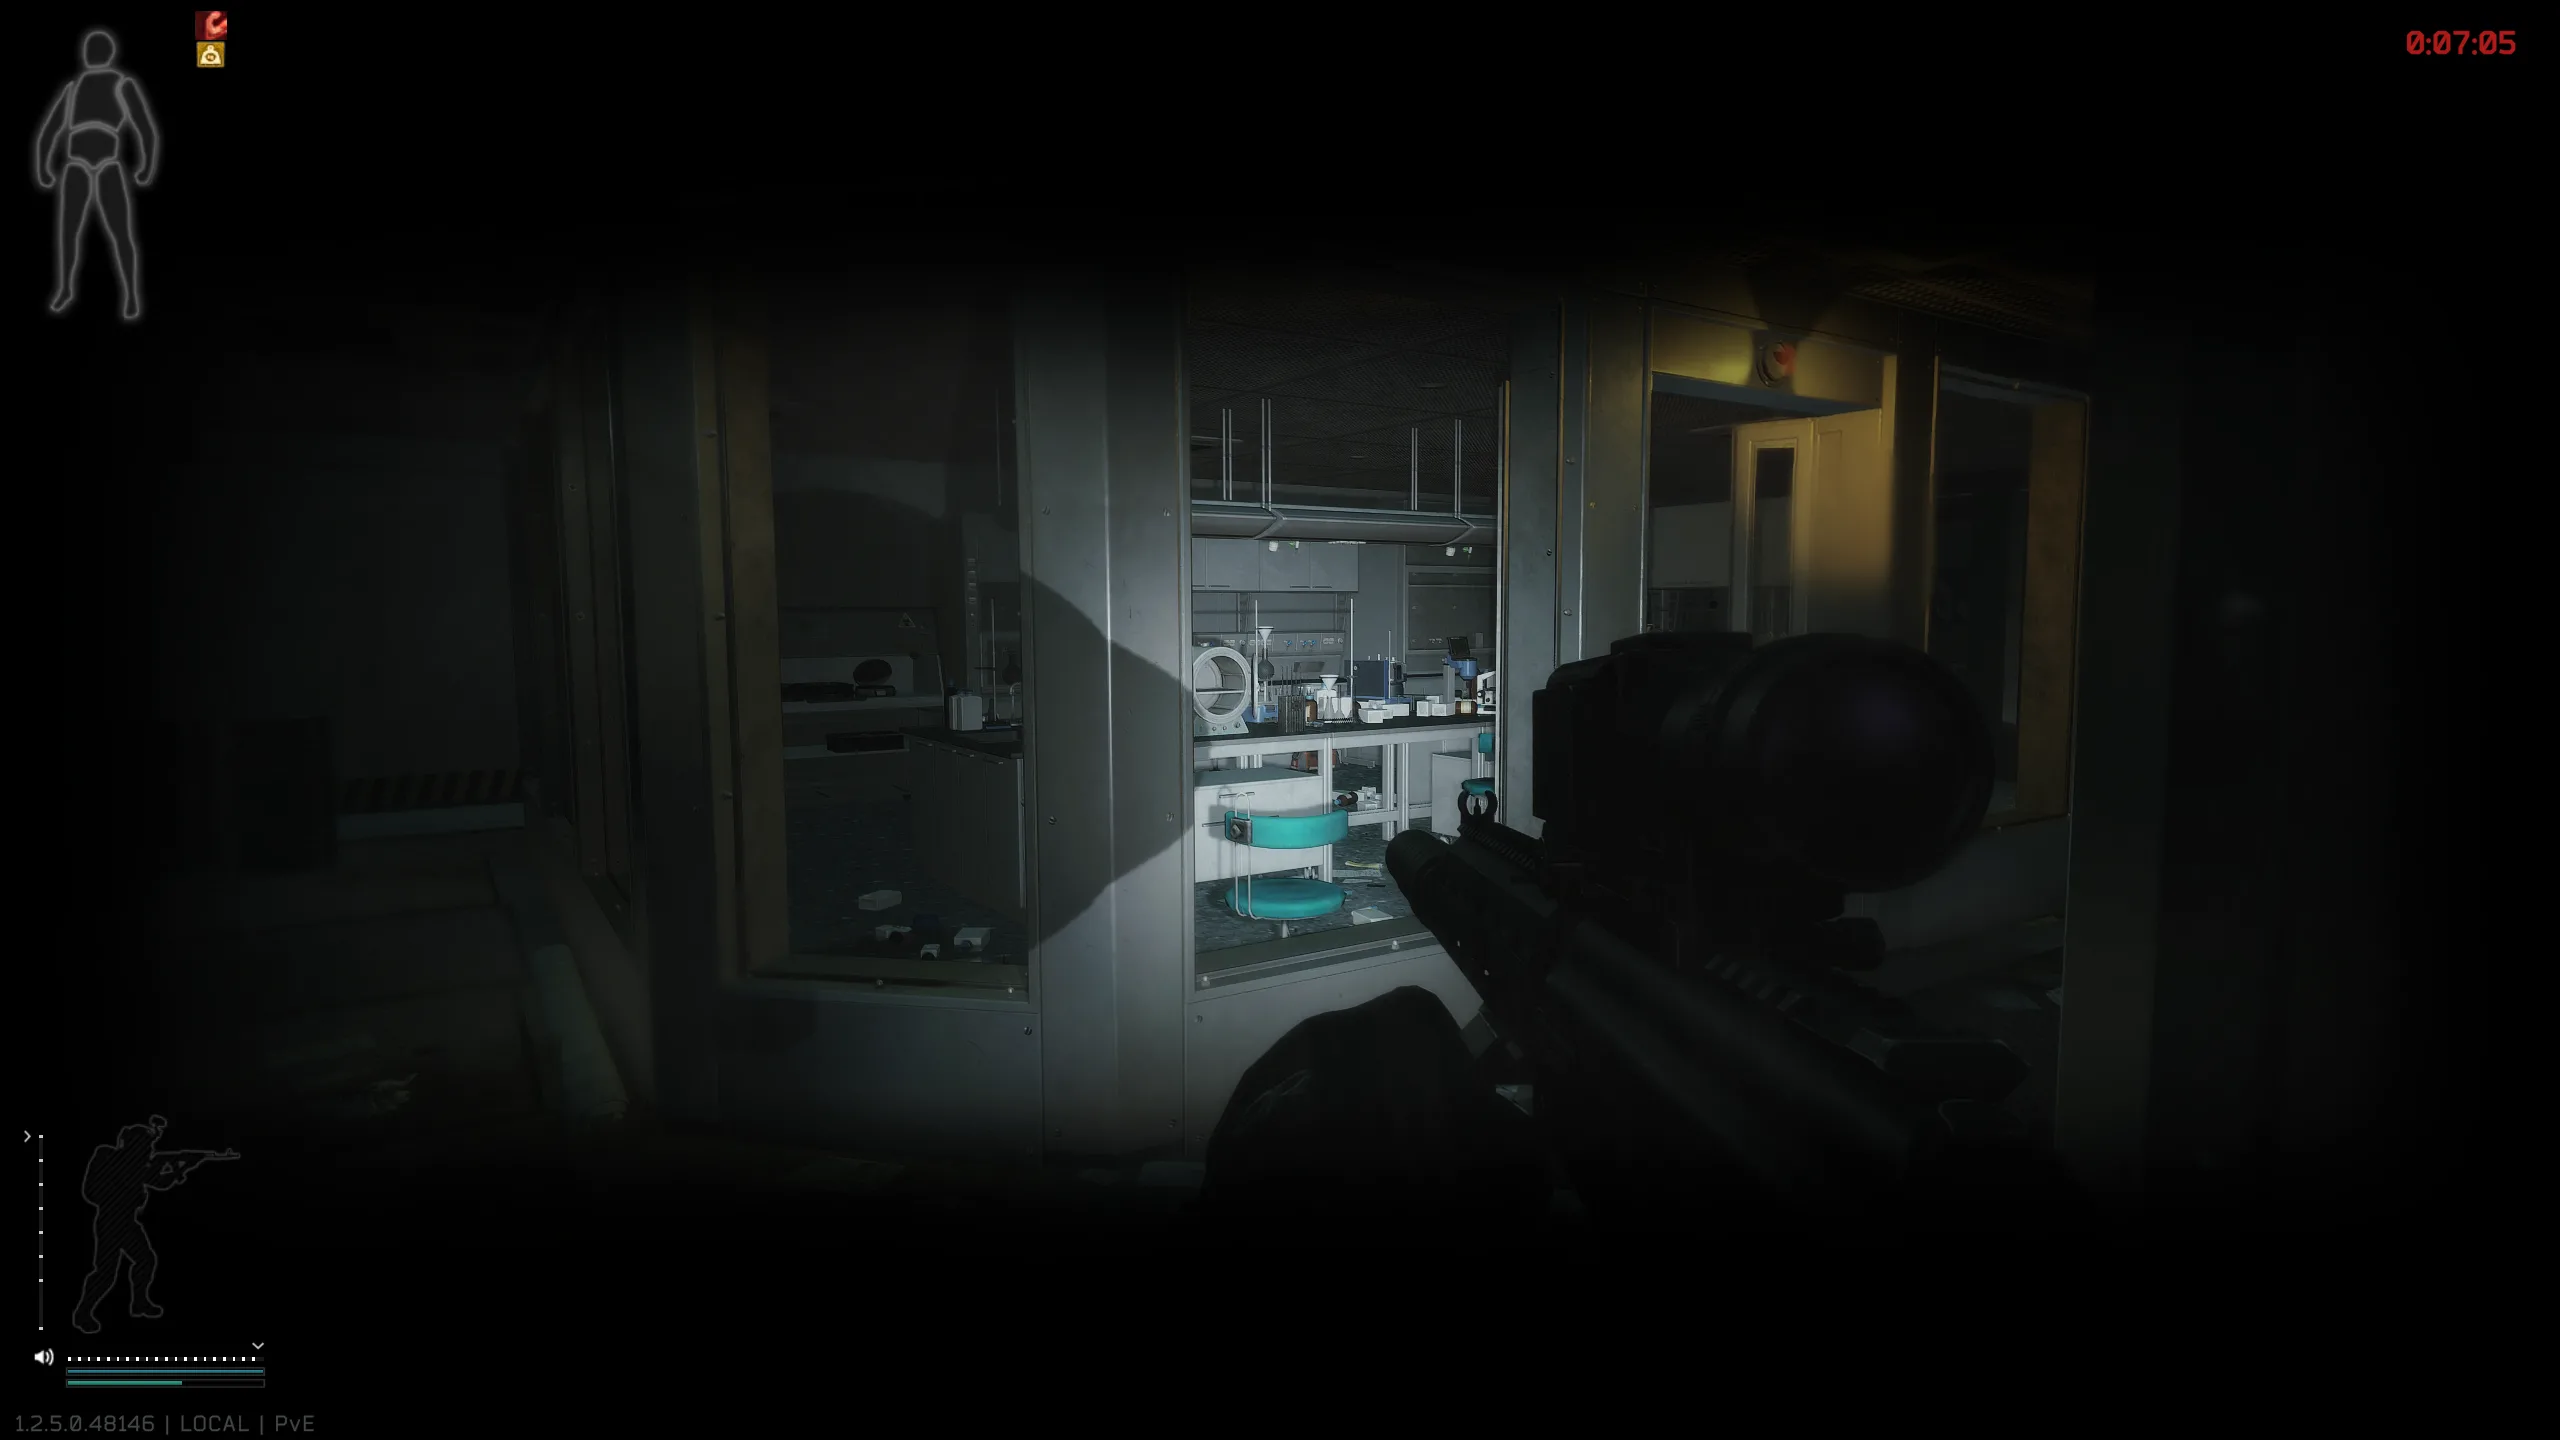
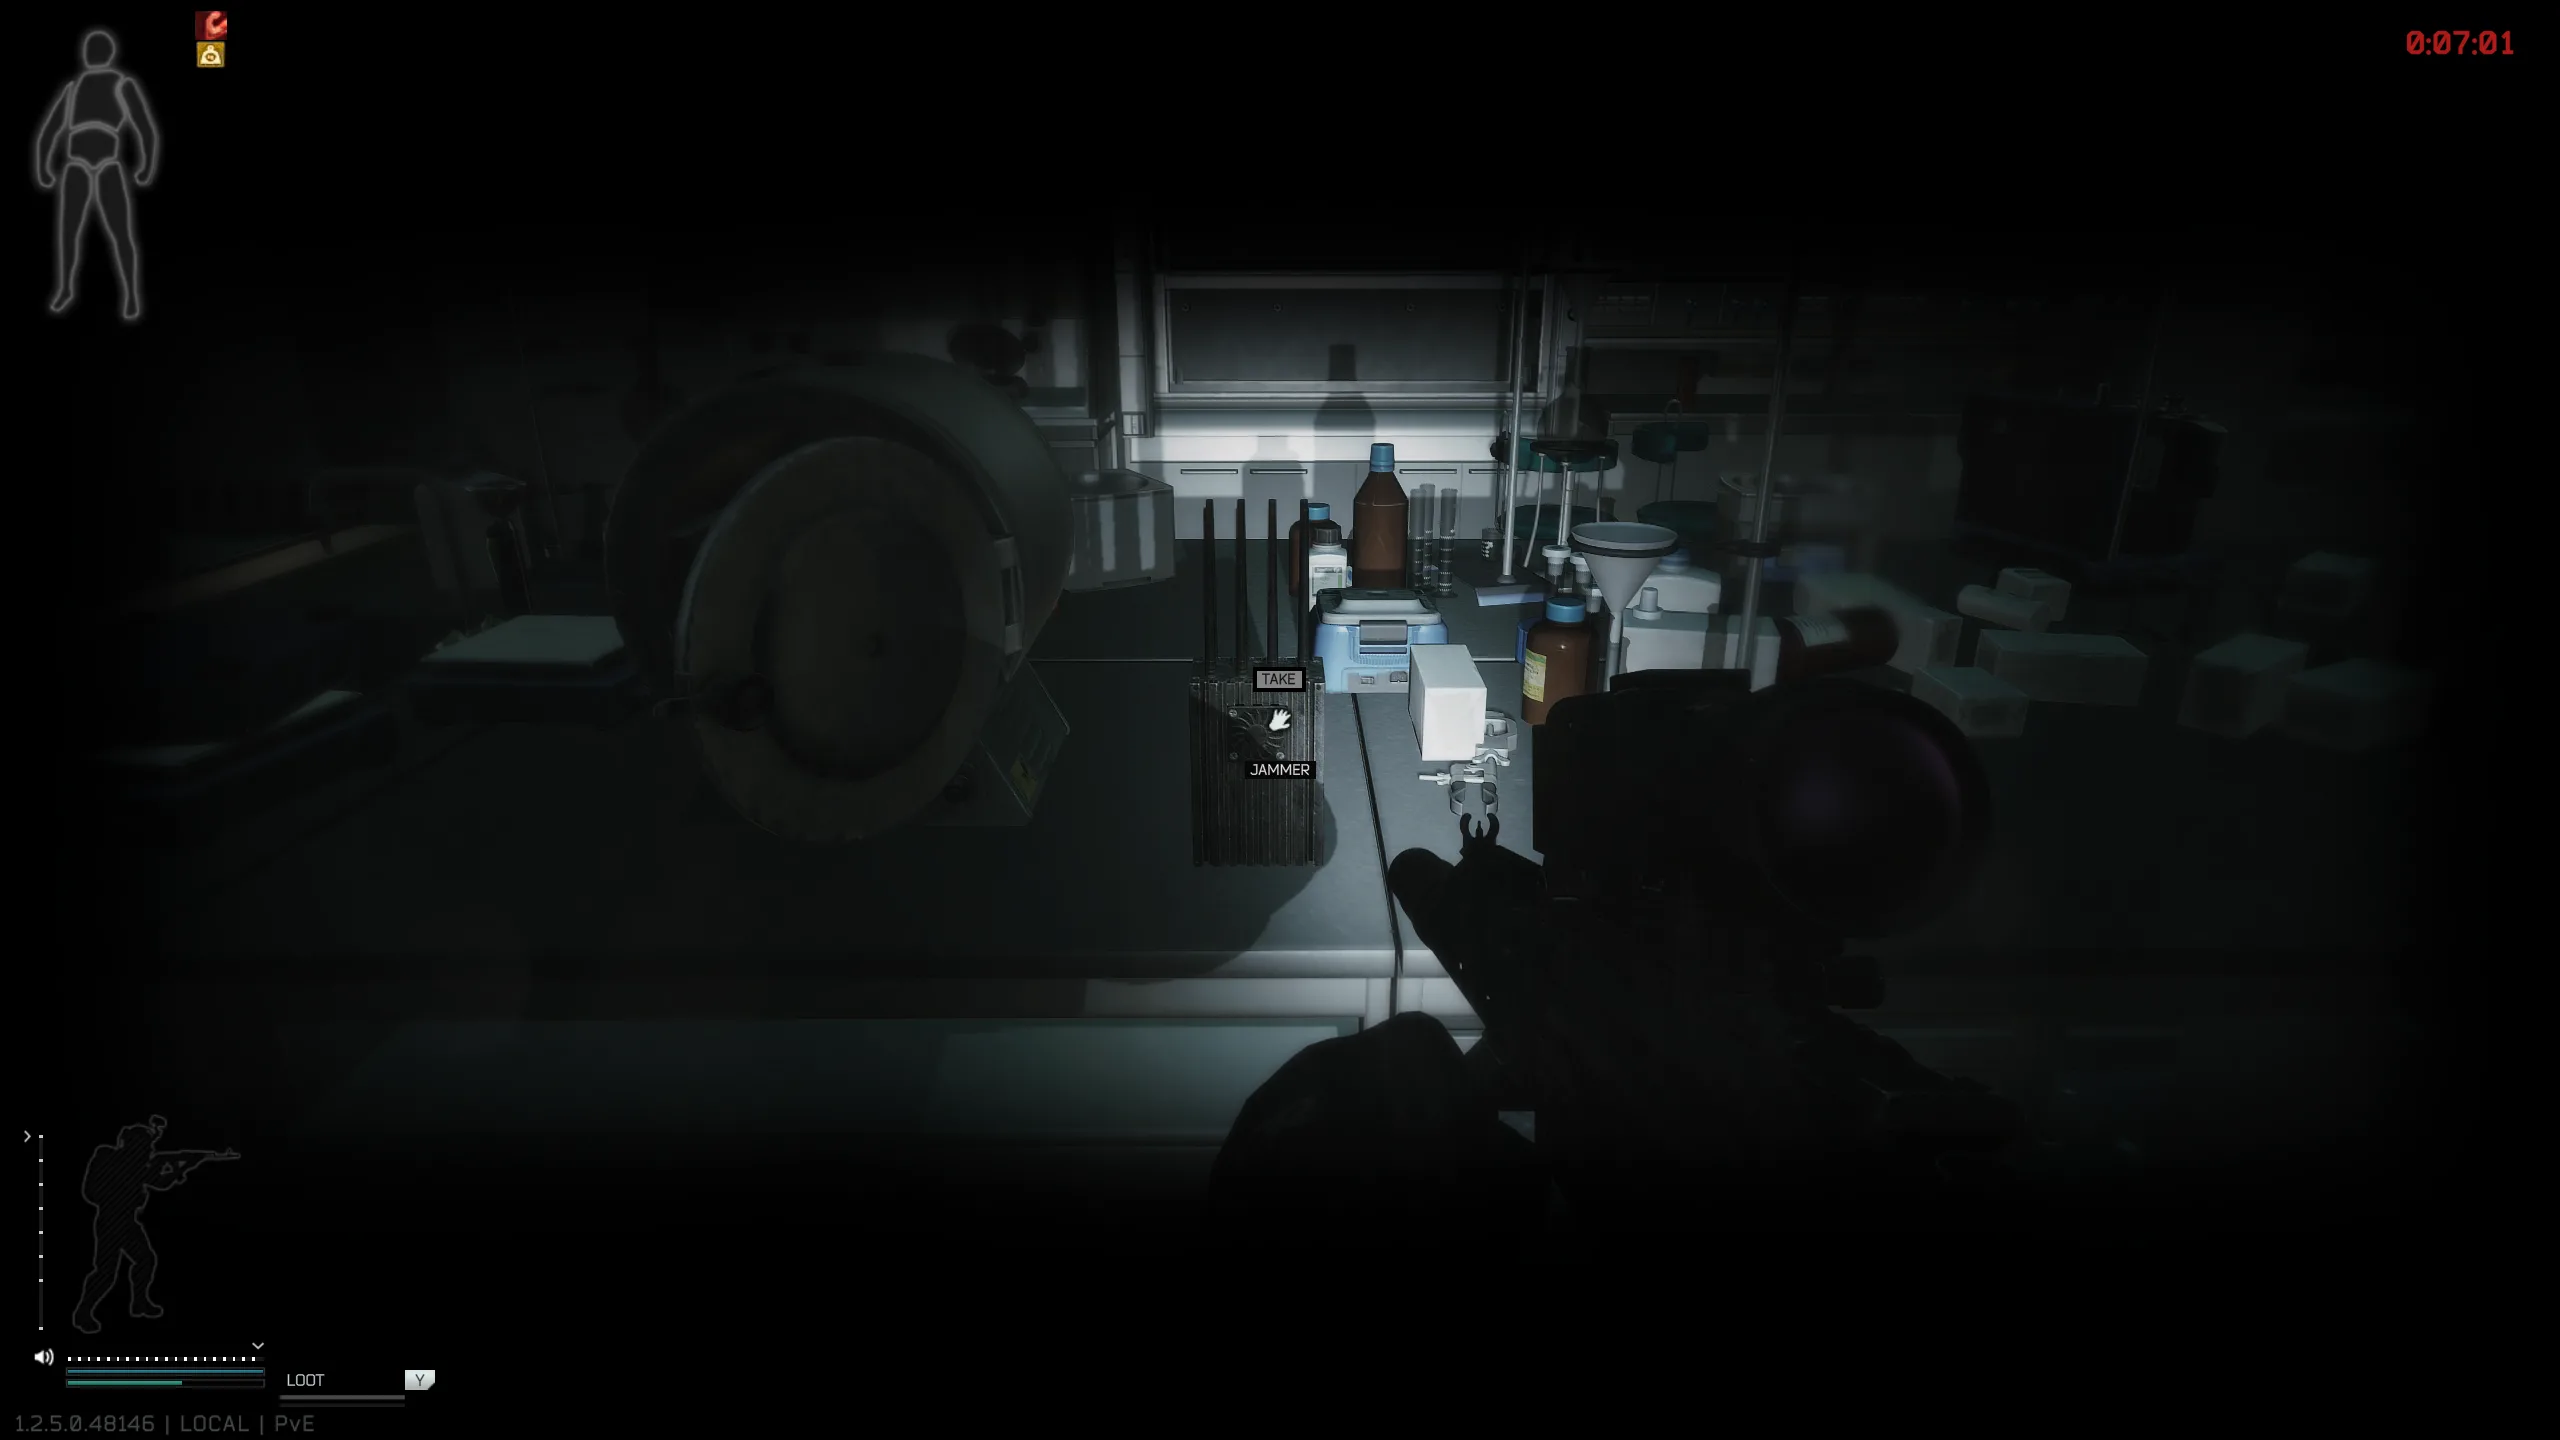
Bring the jammer back and use the unlocked Workbench level 1 recipe to open the armored case. After the craft finishes, right-click the case and unpack it. You receive Kruglov’s RFID keycard and the RFID card manual. Read the manual in your Handbook before returning to Kerman.
You now reach the first major branch. Refusing Kerman’s offer sends you toward Survivor. Accepting it keeps Savior, Debtor, and Fallen available and leads into the activation work below.
Activate Kruglov’s RFID keycard
Follow this section if you accepted Kerman’s offer. The Survivor route uses Prapor’s separate arrangements instead.
- Collect the laboratory master pass. In The Lab, search the safe inside Kruglov’s office in R22. Bring a TerraGroup Labs keycard (Black) with at least two uses for the office and safe.
- Progress the search for an encryption device. This search is scripted to fail after you accumulate at least 30 minutes survived in The Lab. It is not an instruction to keep searching the same rooms indefinitely. Kerman then directs you back to Mechanic.
- Wait for Mechanic’s contact. Speak to him and allow time for his response. The next payment is 40 Physical Bitcoins, handed over together. They do not need Found in Raid status.
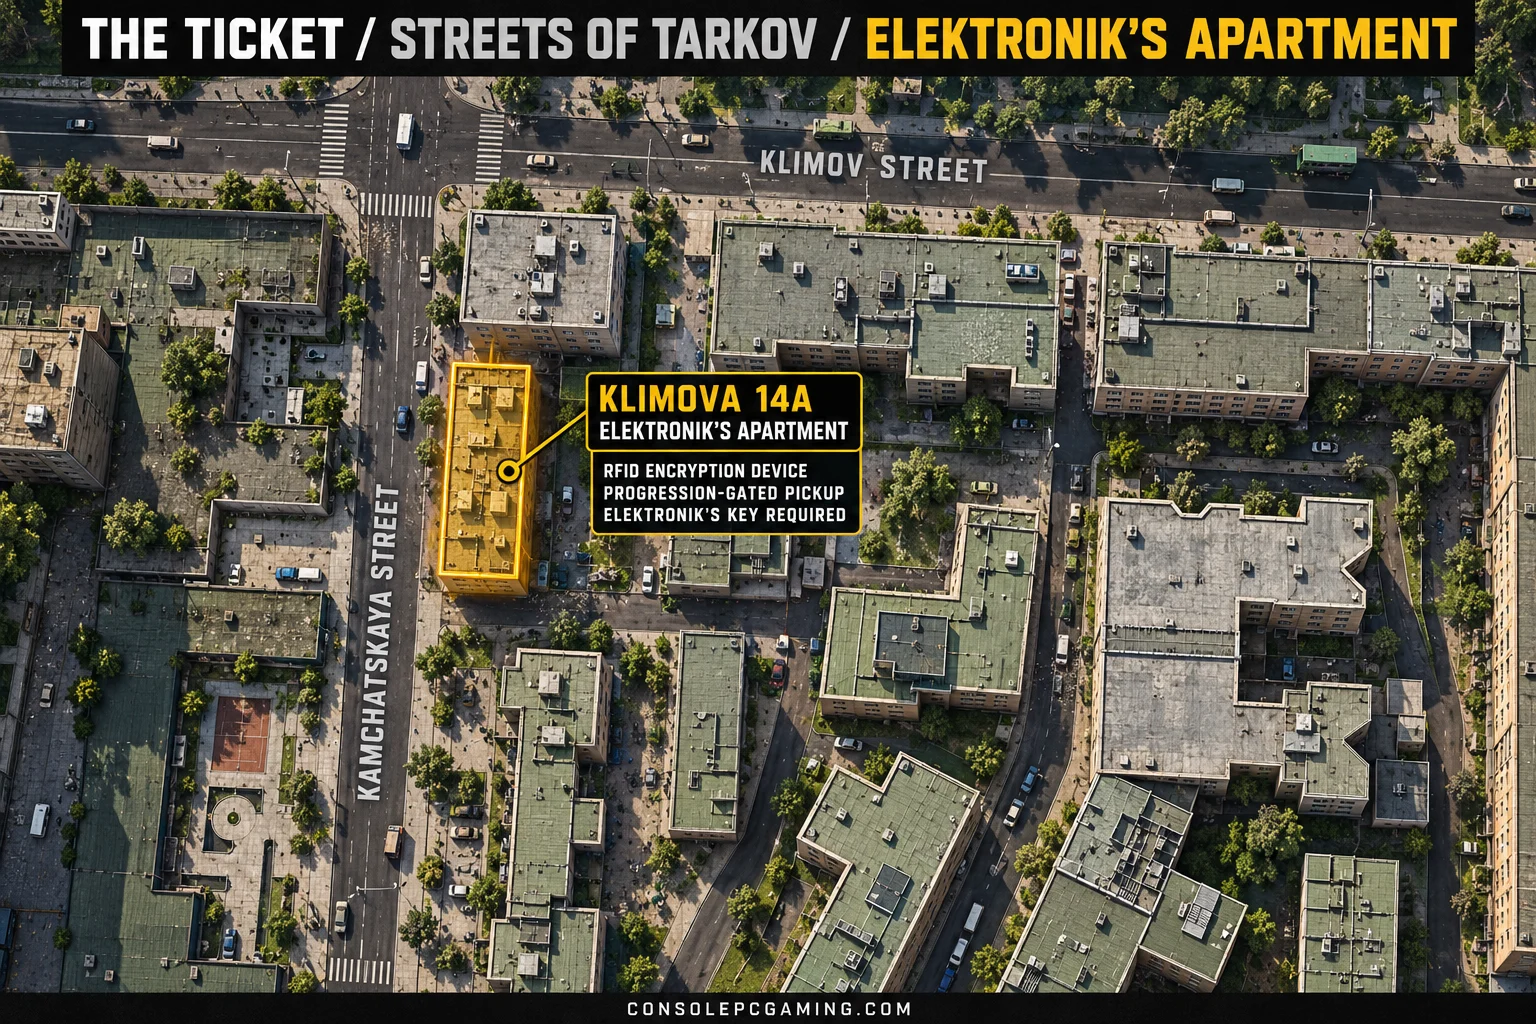
- Get Elektronik’s key. Use it at Elektronik’s apartment in Klimova 14A on Streets of Tarkov. Search under the living-room coffee table for the RFID keycard encryption device. It will not appear before you reach this objective.
- Craft the activated card. At Intelligence Center level 1, use the unlocked recipe with Kruglov’s card, a Blank RFID keycard, the master pass, and the encryption device. Keep the required power running during the craft.
After extracting with a quest item, move it into your off-raid quest inventory when you do not need to carry it into the next raid. Do not risk the master pass or encryption device on unrelated runs.
Take the Activated Kruglov’s RFID keycard to the Terminal intercom on Shoreline and swipe it for the story objective. This is not your final admission to Terminal. Return to Kerman for the conversation about finding evidence against TerraGroup.
Savior route
Accept the evidence investigation and continue past the choice offered after your first two major hand-ins. Build Intelligence Center level 3 so you can deliver the evidence to Kerman.
Collect eight major evidence items
There are nine major pieces available, and you need eight. Preserve the evidence while progressing through the other story chapters.
| Evidence | Where to obtain it |
|---|---|
| Audio tape with incriminating evidence | During Accidental Witness, search the flower bed at Kozlov’s hideout on Shoreline. |
| Agent network deployment report | During Batya, check the red crate inside Lightkeeper’s locked area on Lighthouse. |
| Item #1156 specification | During Blue Fire, open the Rus Post car’s trunk outside the Streets of Tarkov post office with the Rus Post car key. |
| Icebreaker archive data | Help Mechanic decode the hard drives during Boreas, then collect the mail reward. |
| Labyrinth facility research report | During The Labyrinth, search the Shoreline coast beside the pier approach, at the pillar near the evacuation pipe. |
| Document mentioning the Warden | During The Unheard, search the desk in the TerraGroup corporate apartment on Streets. You need the corporate apartment key and the reprogrammed green apartment keycard. |
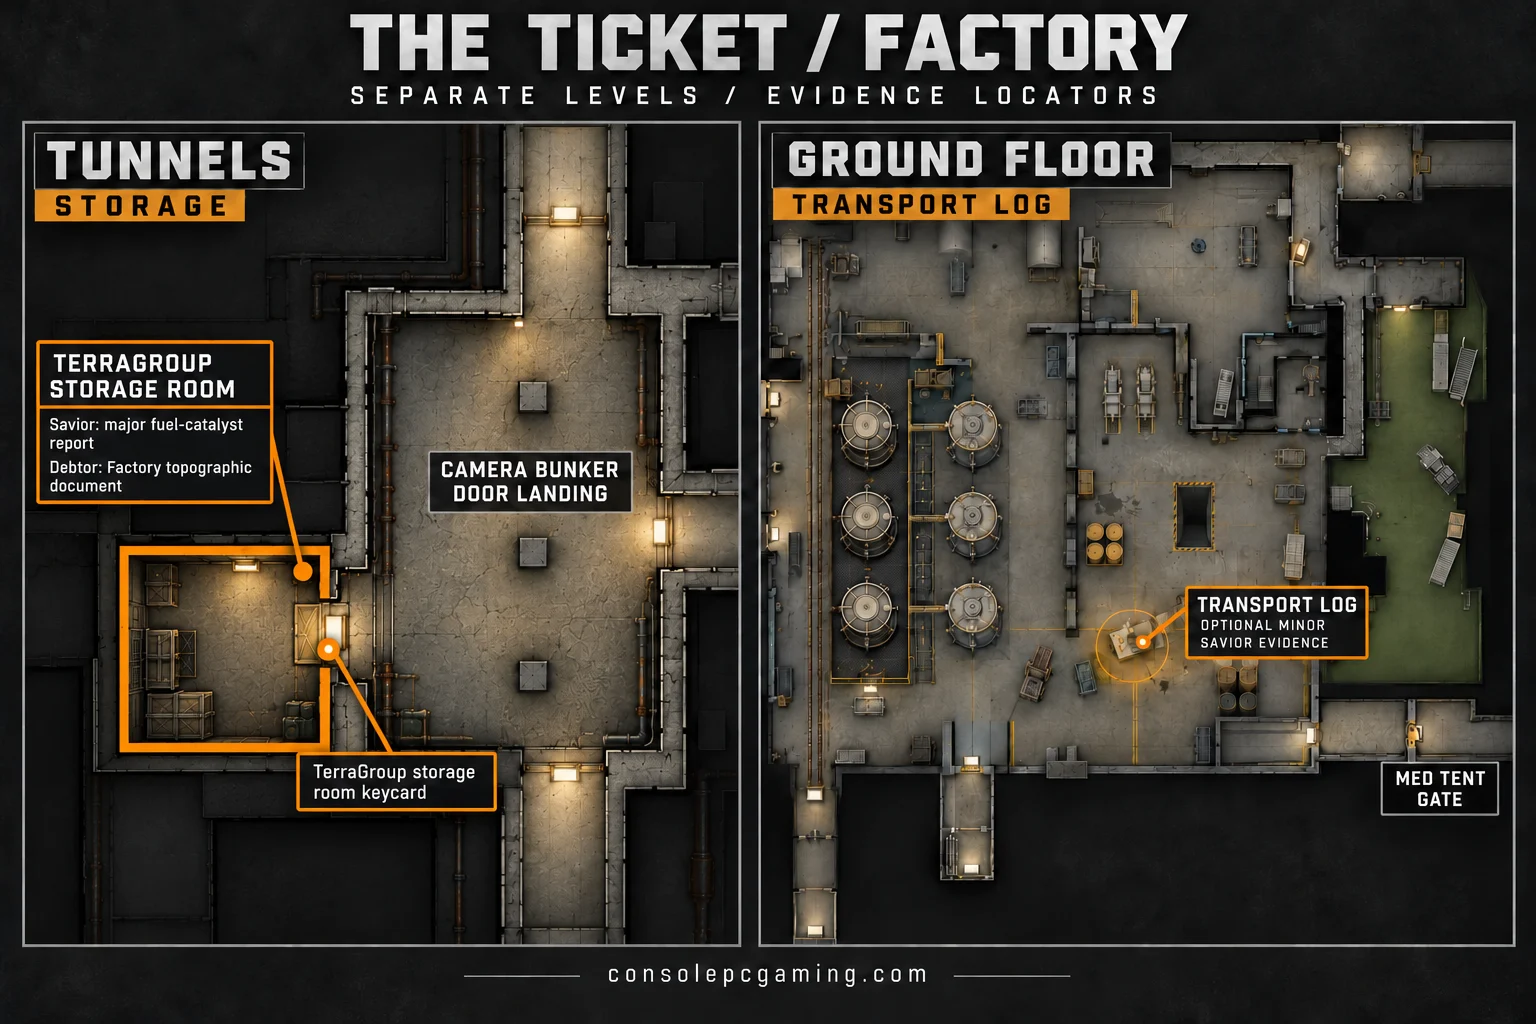
| Fuel catalyst test report | During The Unheard, search Factory’s TerraGroup storage room with its keycard. Check the safe and shelving inside. |
| ARRS system specifications | Collect the in-game mail after completing They Are Already Here. |
| Transcript of conversation with Ms. A. | Search the bedroom safe in the Cardinal apartment on Streets. Bring the Cardinal apartment key and a TerraGroup Labs keycard (Black) for the safe interaction. |
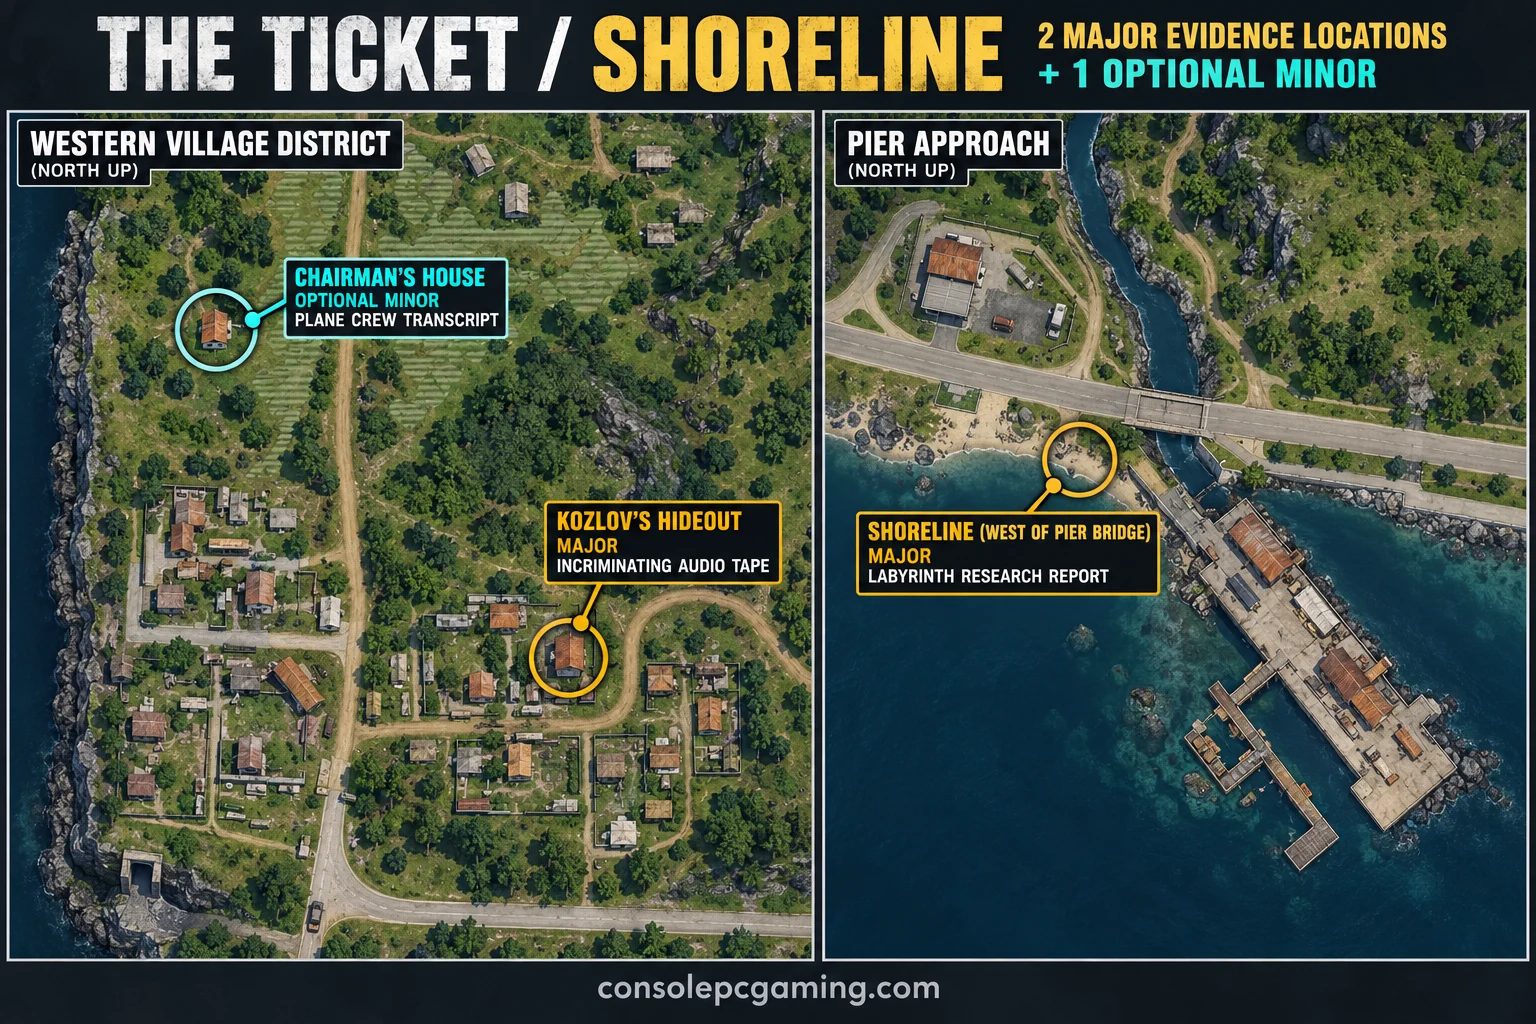
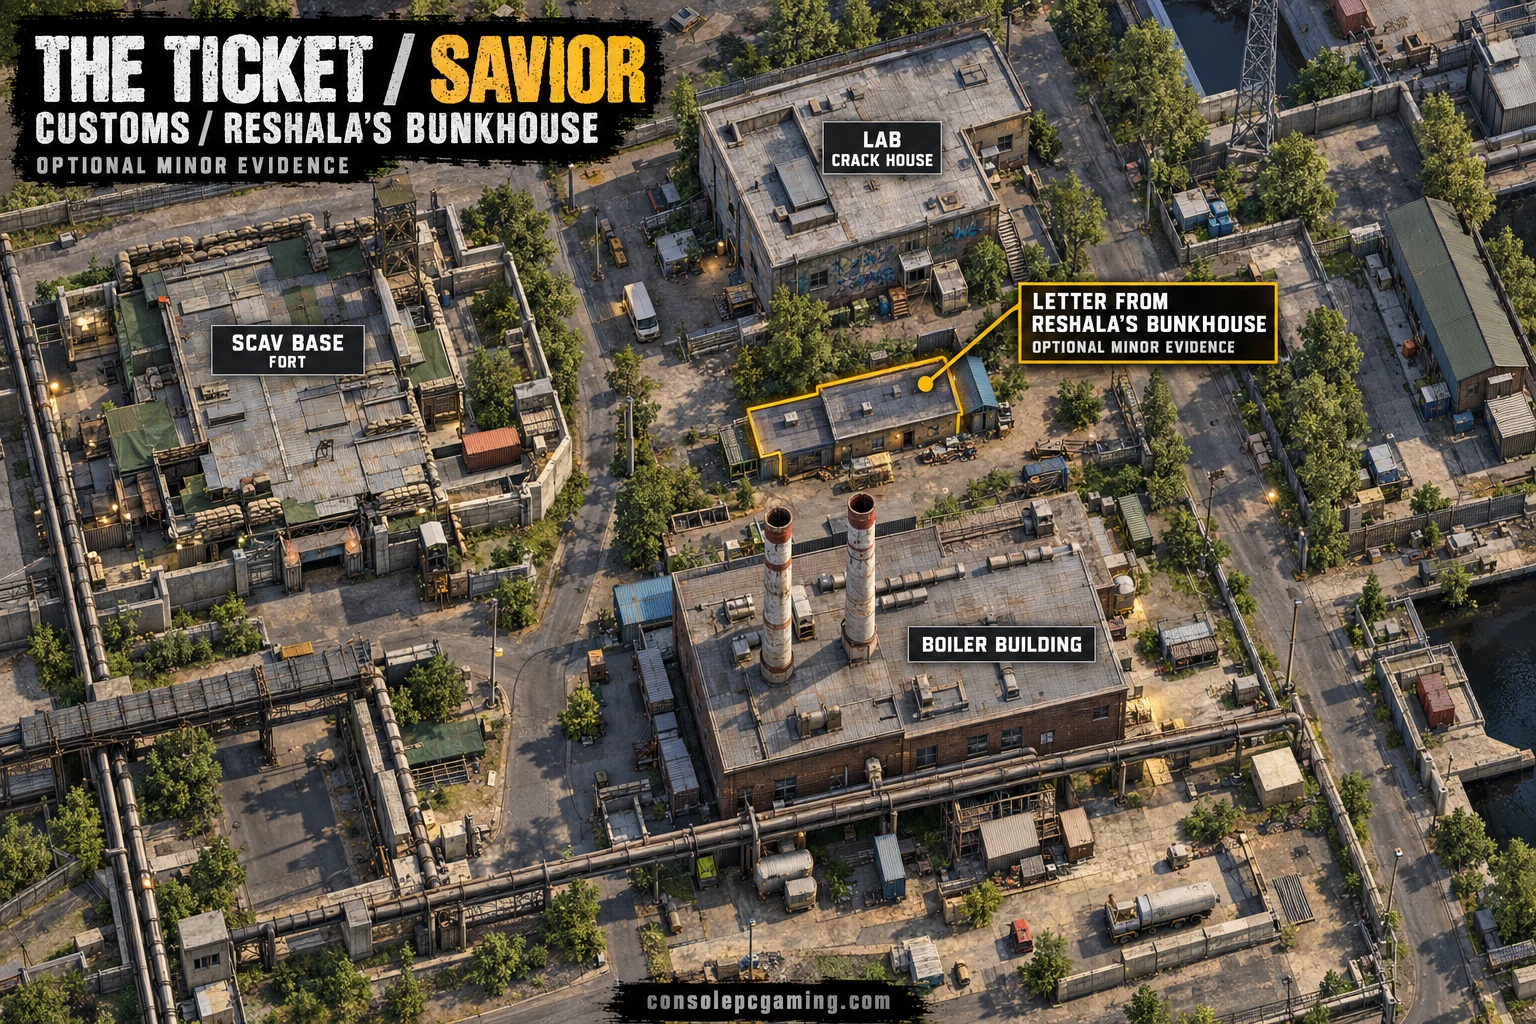
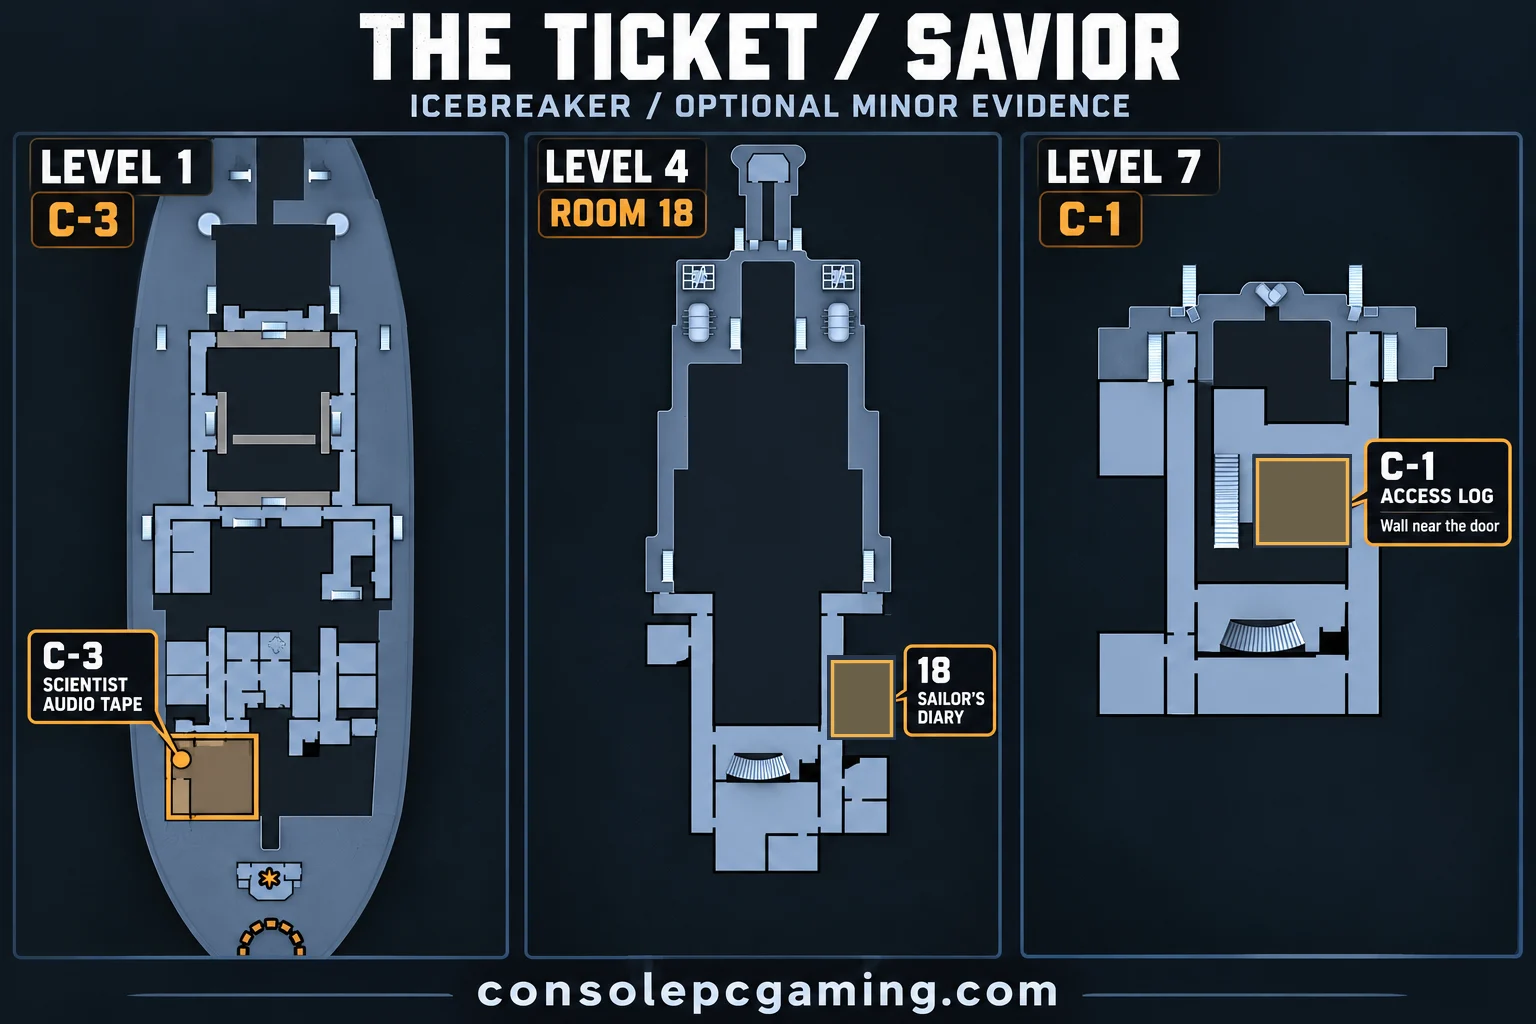
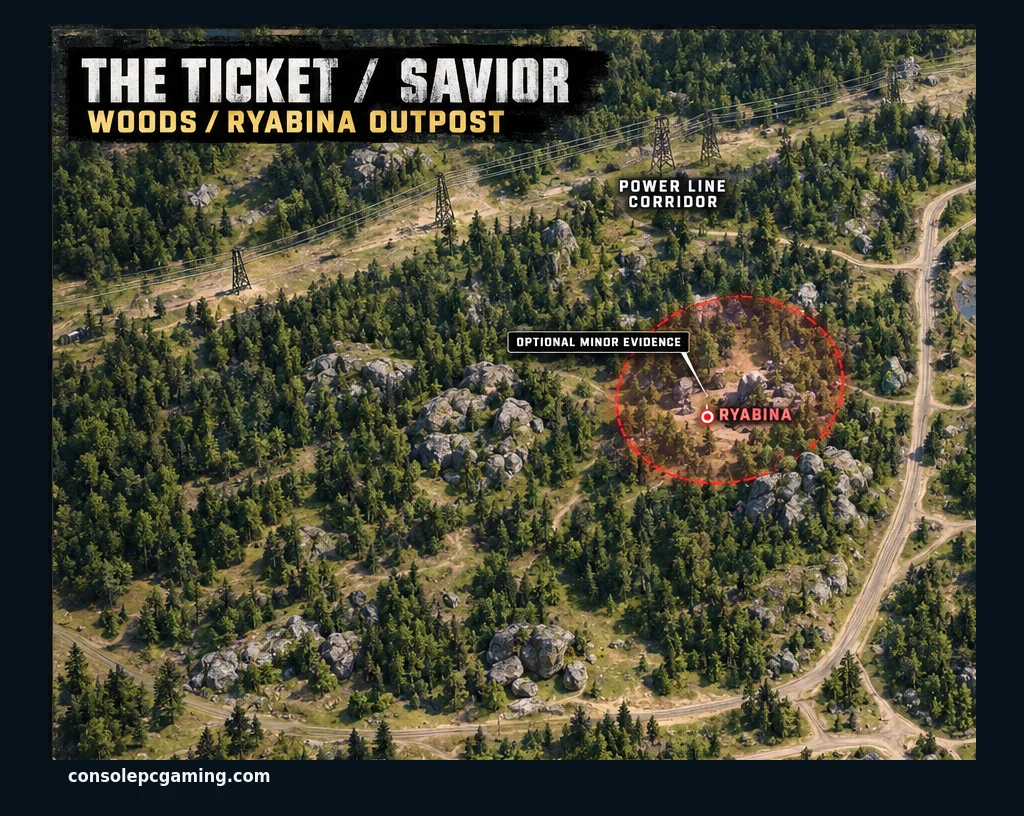
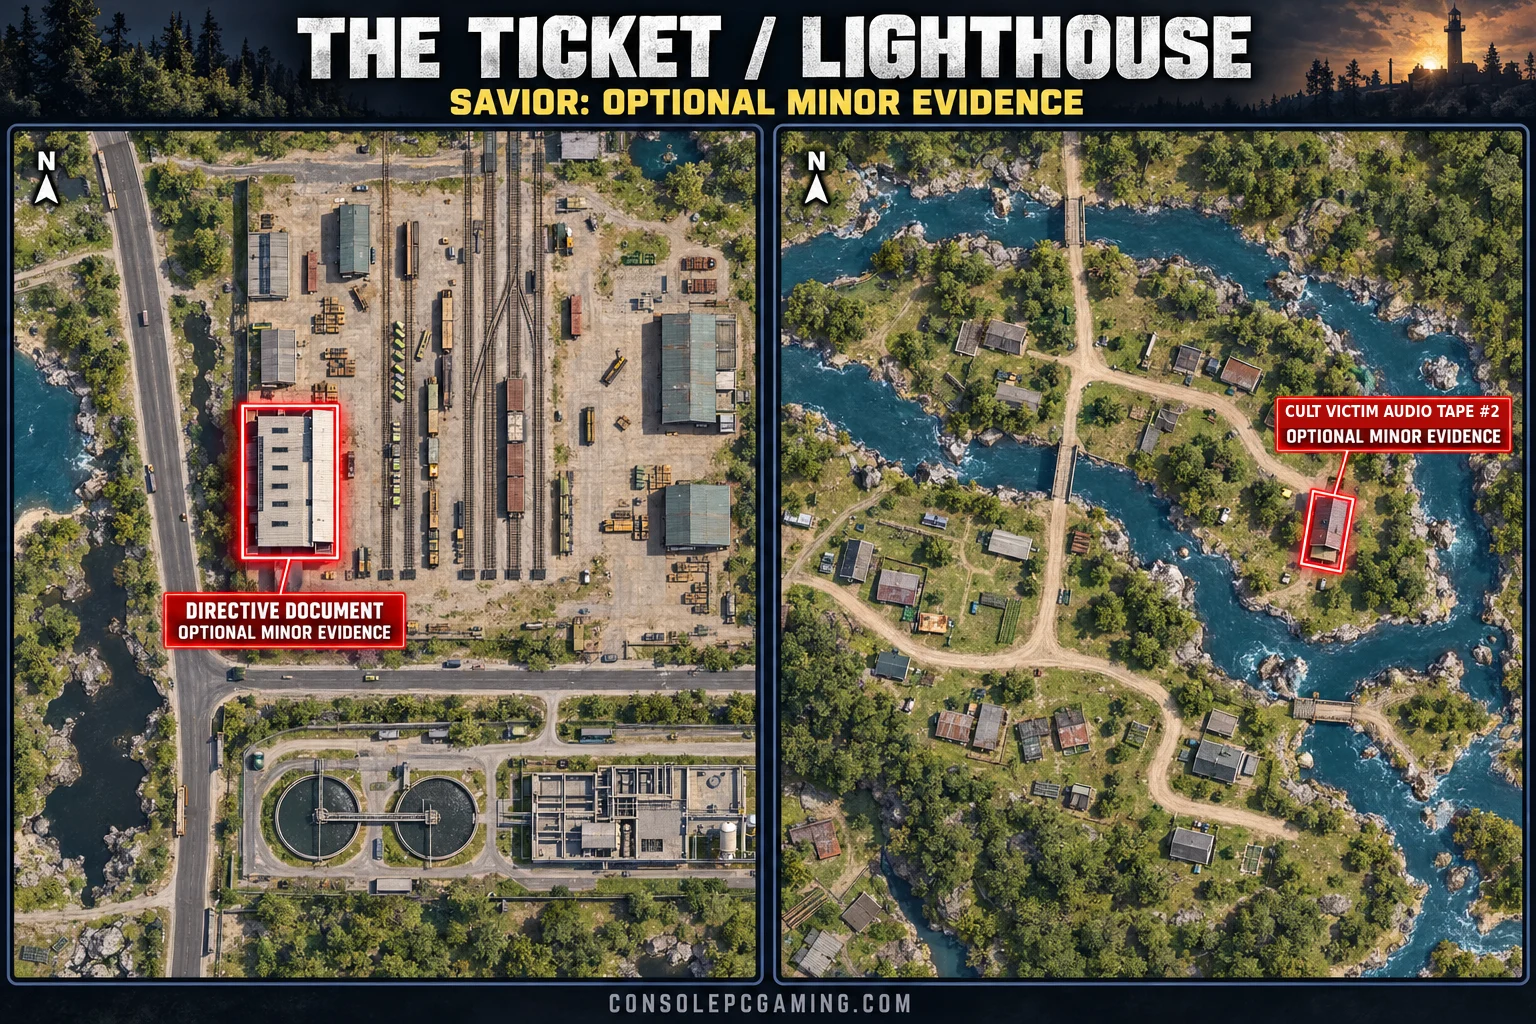
Do not confirm that all evidence is delivered if you still want to submit the optional minor evidence. The optional collection contains 36 pieces and rewards an achievement, but its hand-ins close after you confirm the major evidence. The minor collection is not a substitute for the eight major pieces.
Complete Fence’s assignments
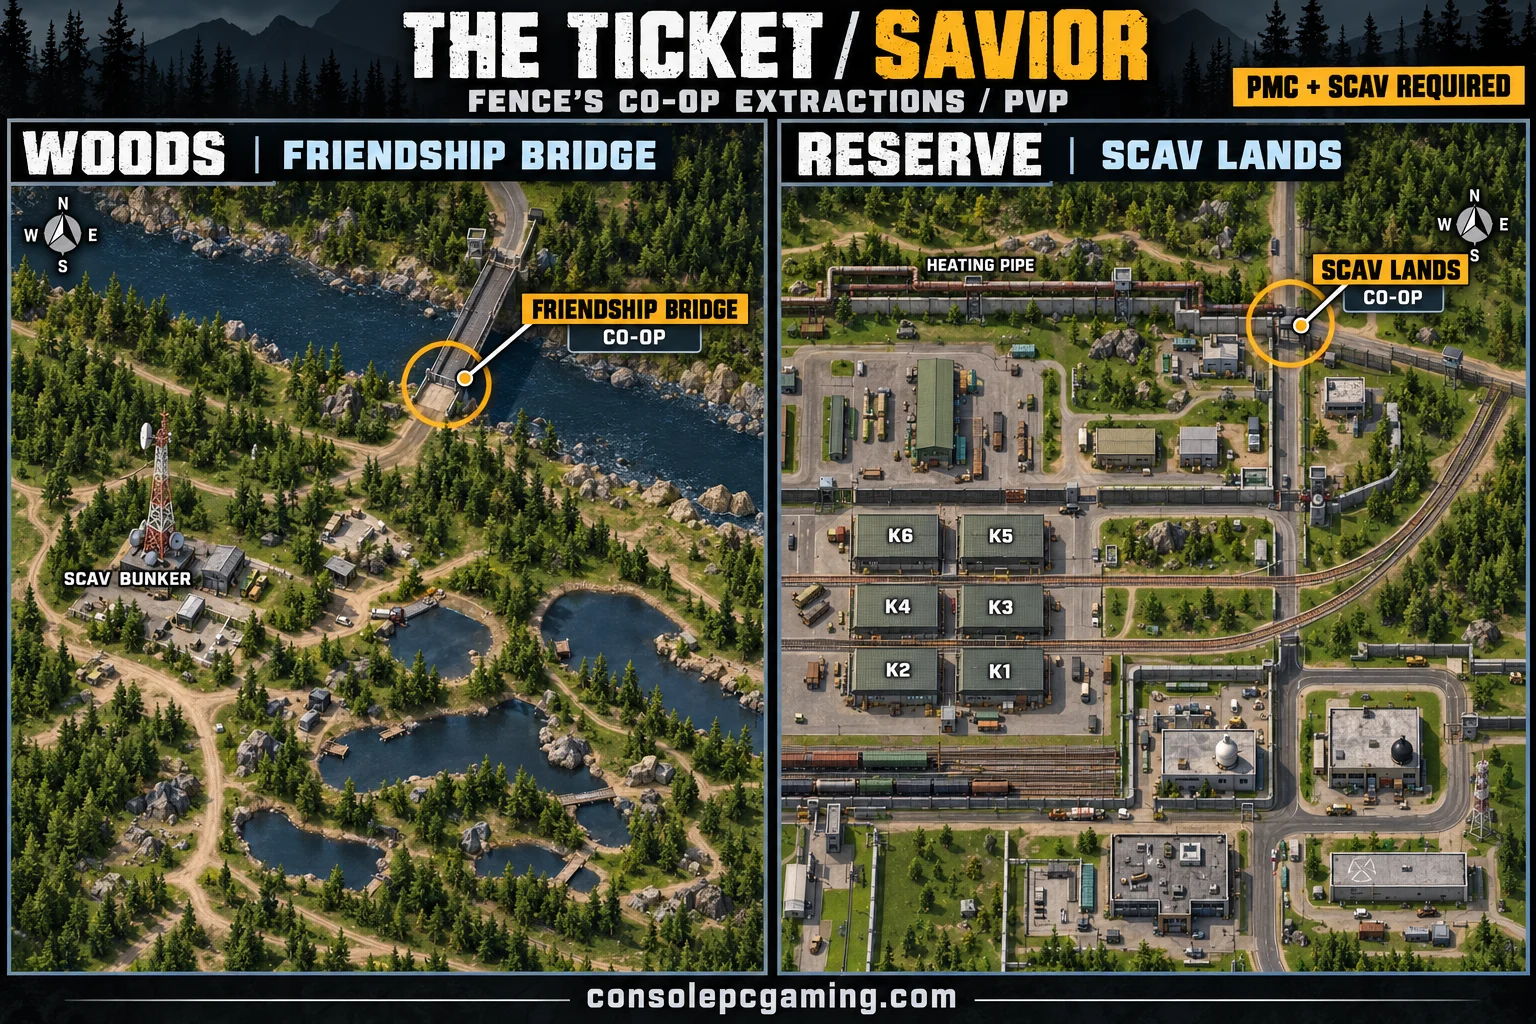
After confirming the major evidence, collect the Secure container Alpha-1 with TerraGroup evidence and wait for Kerman’s contact. Fence takes over the next assignments.
- Reach at least 4.0 Fence reputation and maintain the required standing while completing his work.
- PvP. Use Friendship Bridge on Woods and Scav Lands on Reserve for the co-op extractions. Do not kill Scavs or the Goons while completing the relevant assignments.
- PvE. Instead of those co-op objectives, eliminate five PMCs on Interchange in one raid without killing Scavs, then do the corresponding five-PMC objective on Shoreline.
- Reach 0.4 standing with the BTR Driver through his questline, including The Price of Independence.
Do not complete Choose Your Friends Wisely if you are pursuing Savior. That choice can fail the BTR requirement and close the route.
Return to Fence when his assignments are complete and collect the flash drive with Kerman’s hash codes. Build Solar Power level 1, then craft the Reprogrammed RFID keycard with Mr. Kerman’s hash codes.
For the final trip, bring both that card and the Alpha-1 evidence container in your quest inventory. The activated card from the earlier test is not the final access card.
Debtor route
Accept Kerman’s activation help and agree to investigate TerraGroup. After handing over two major evidence items, refuse to provide more when he offers the next choice. Continuing the evidence hunt keeps you on a different route.
Ask the traders about leaving Tarkov and speak to Lightkeeper last. His work has four main parts.
Compile five topographic documents
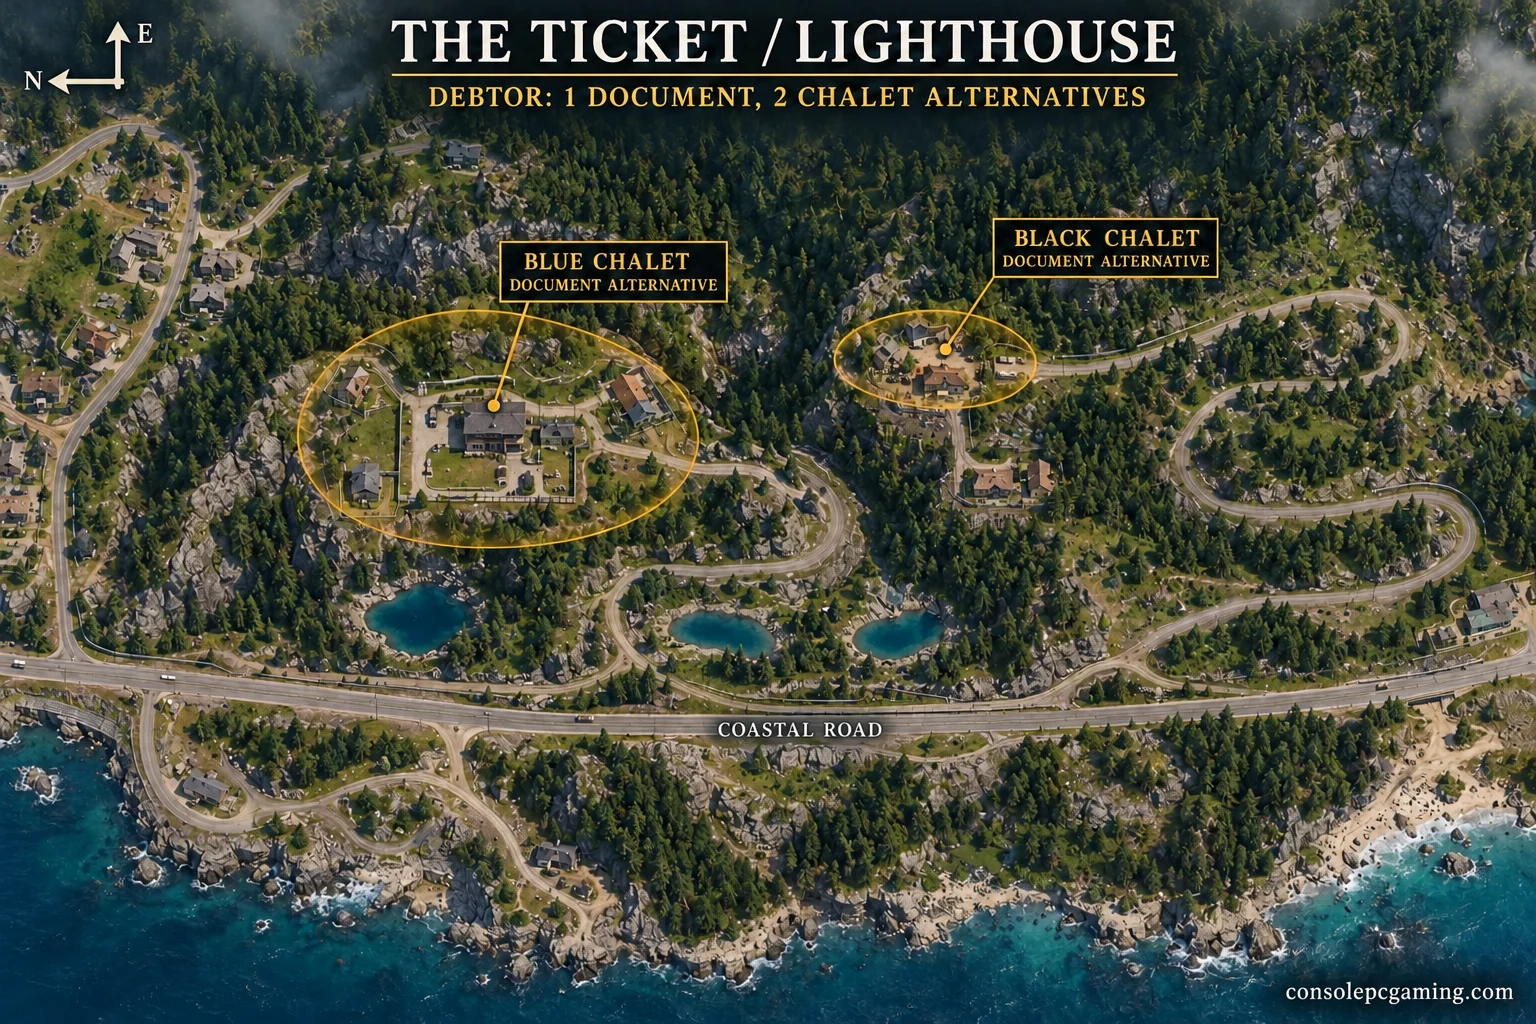
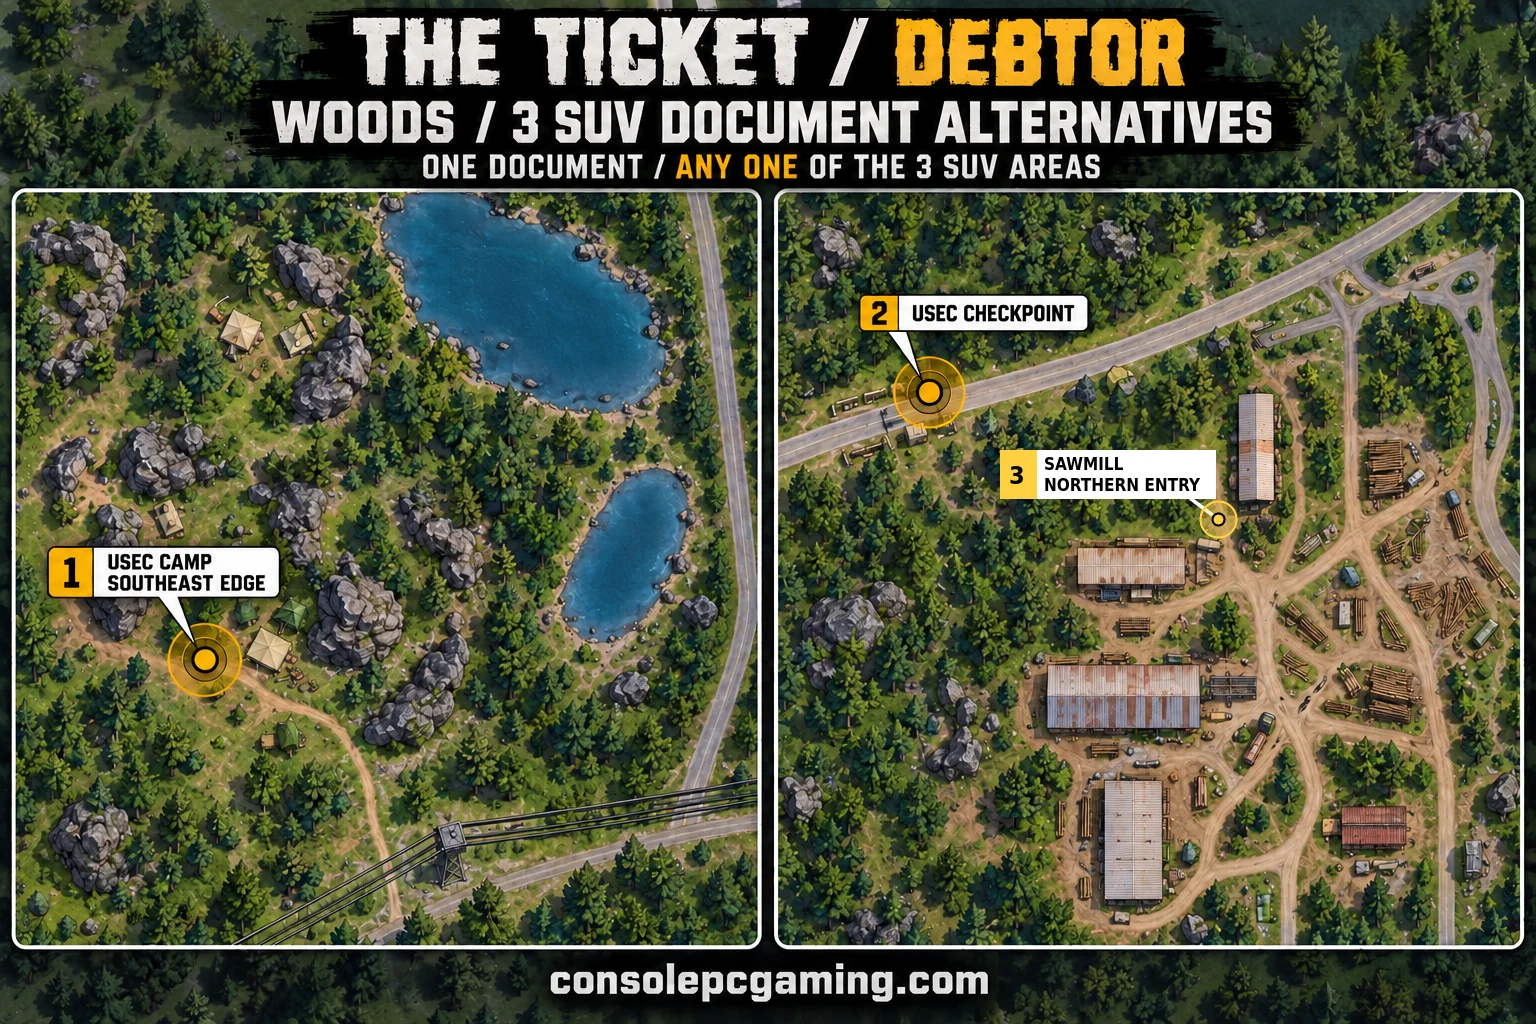
Recover the documents from the following maps, then use the Intelligence Center recipe to make the Military flash drive with topographic intel.
- Lighthouse. Search the black and blue chalets. Possible positions include the black chalet’s basement chair or bedroom and the blue chalet’s bedrooms.
- Factory. Search the TerraGroup storage room. Its keycard is required; check the shelves behind the door and the table.
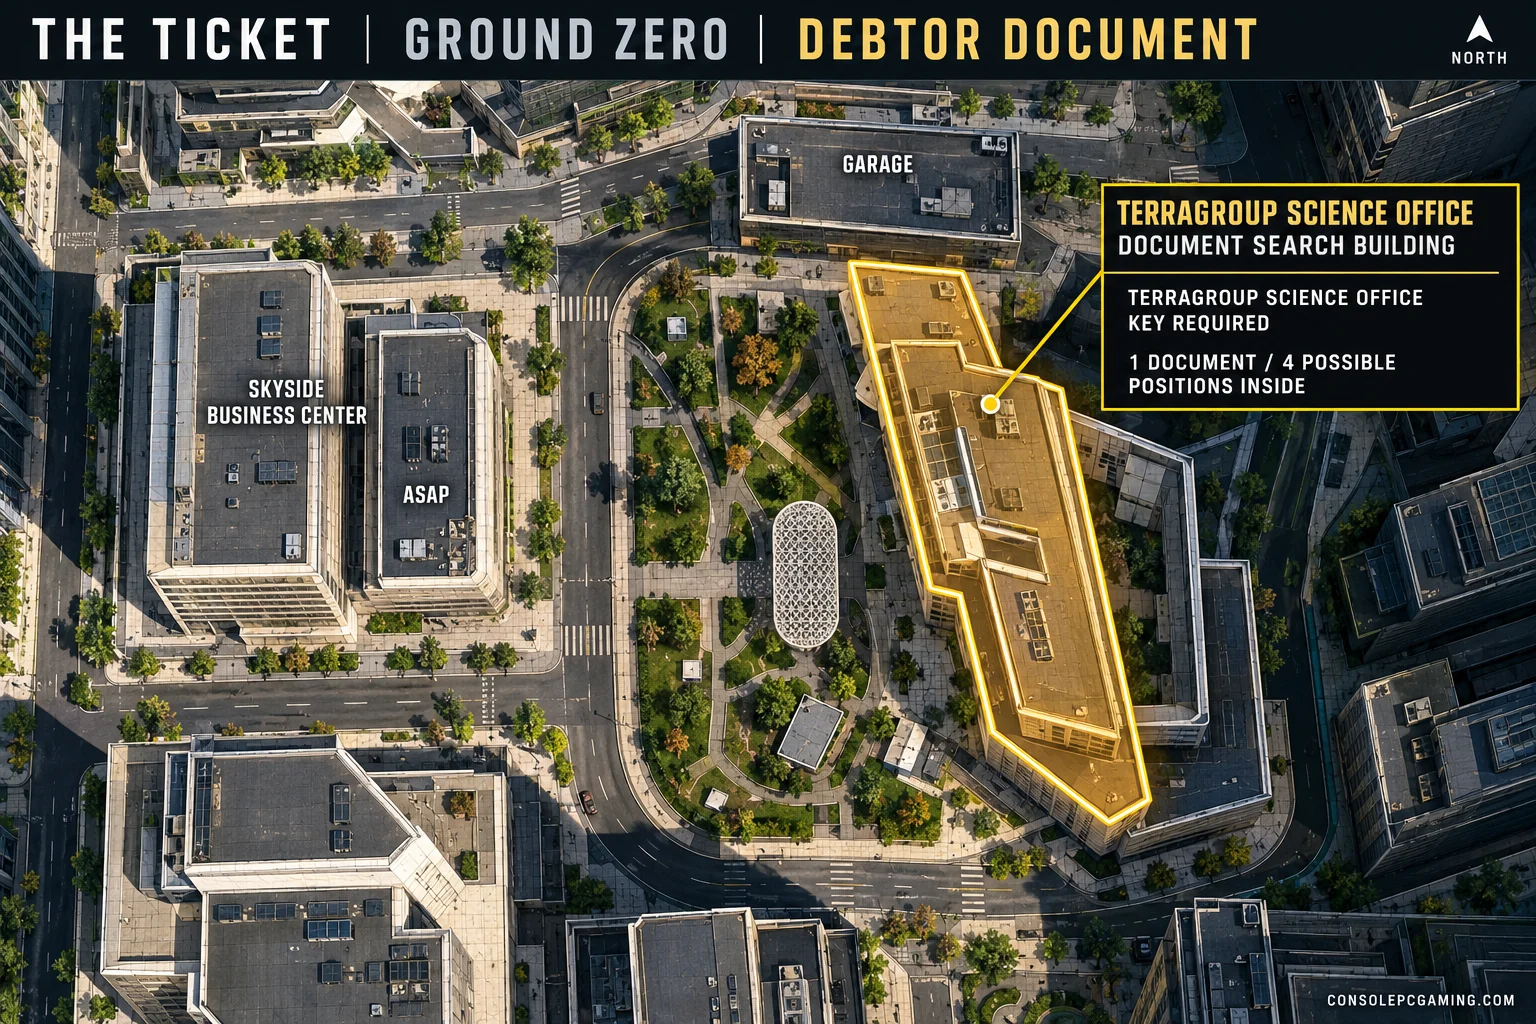
- Ground Zero. Search the TerraGroup science office with the science office key, including the desks, overturned shelving, and the area behind the printer.
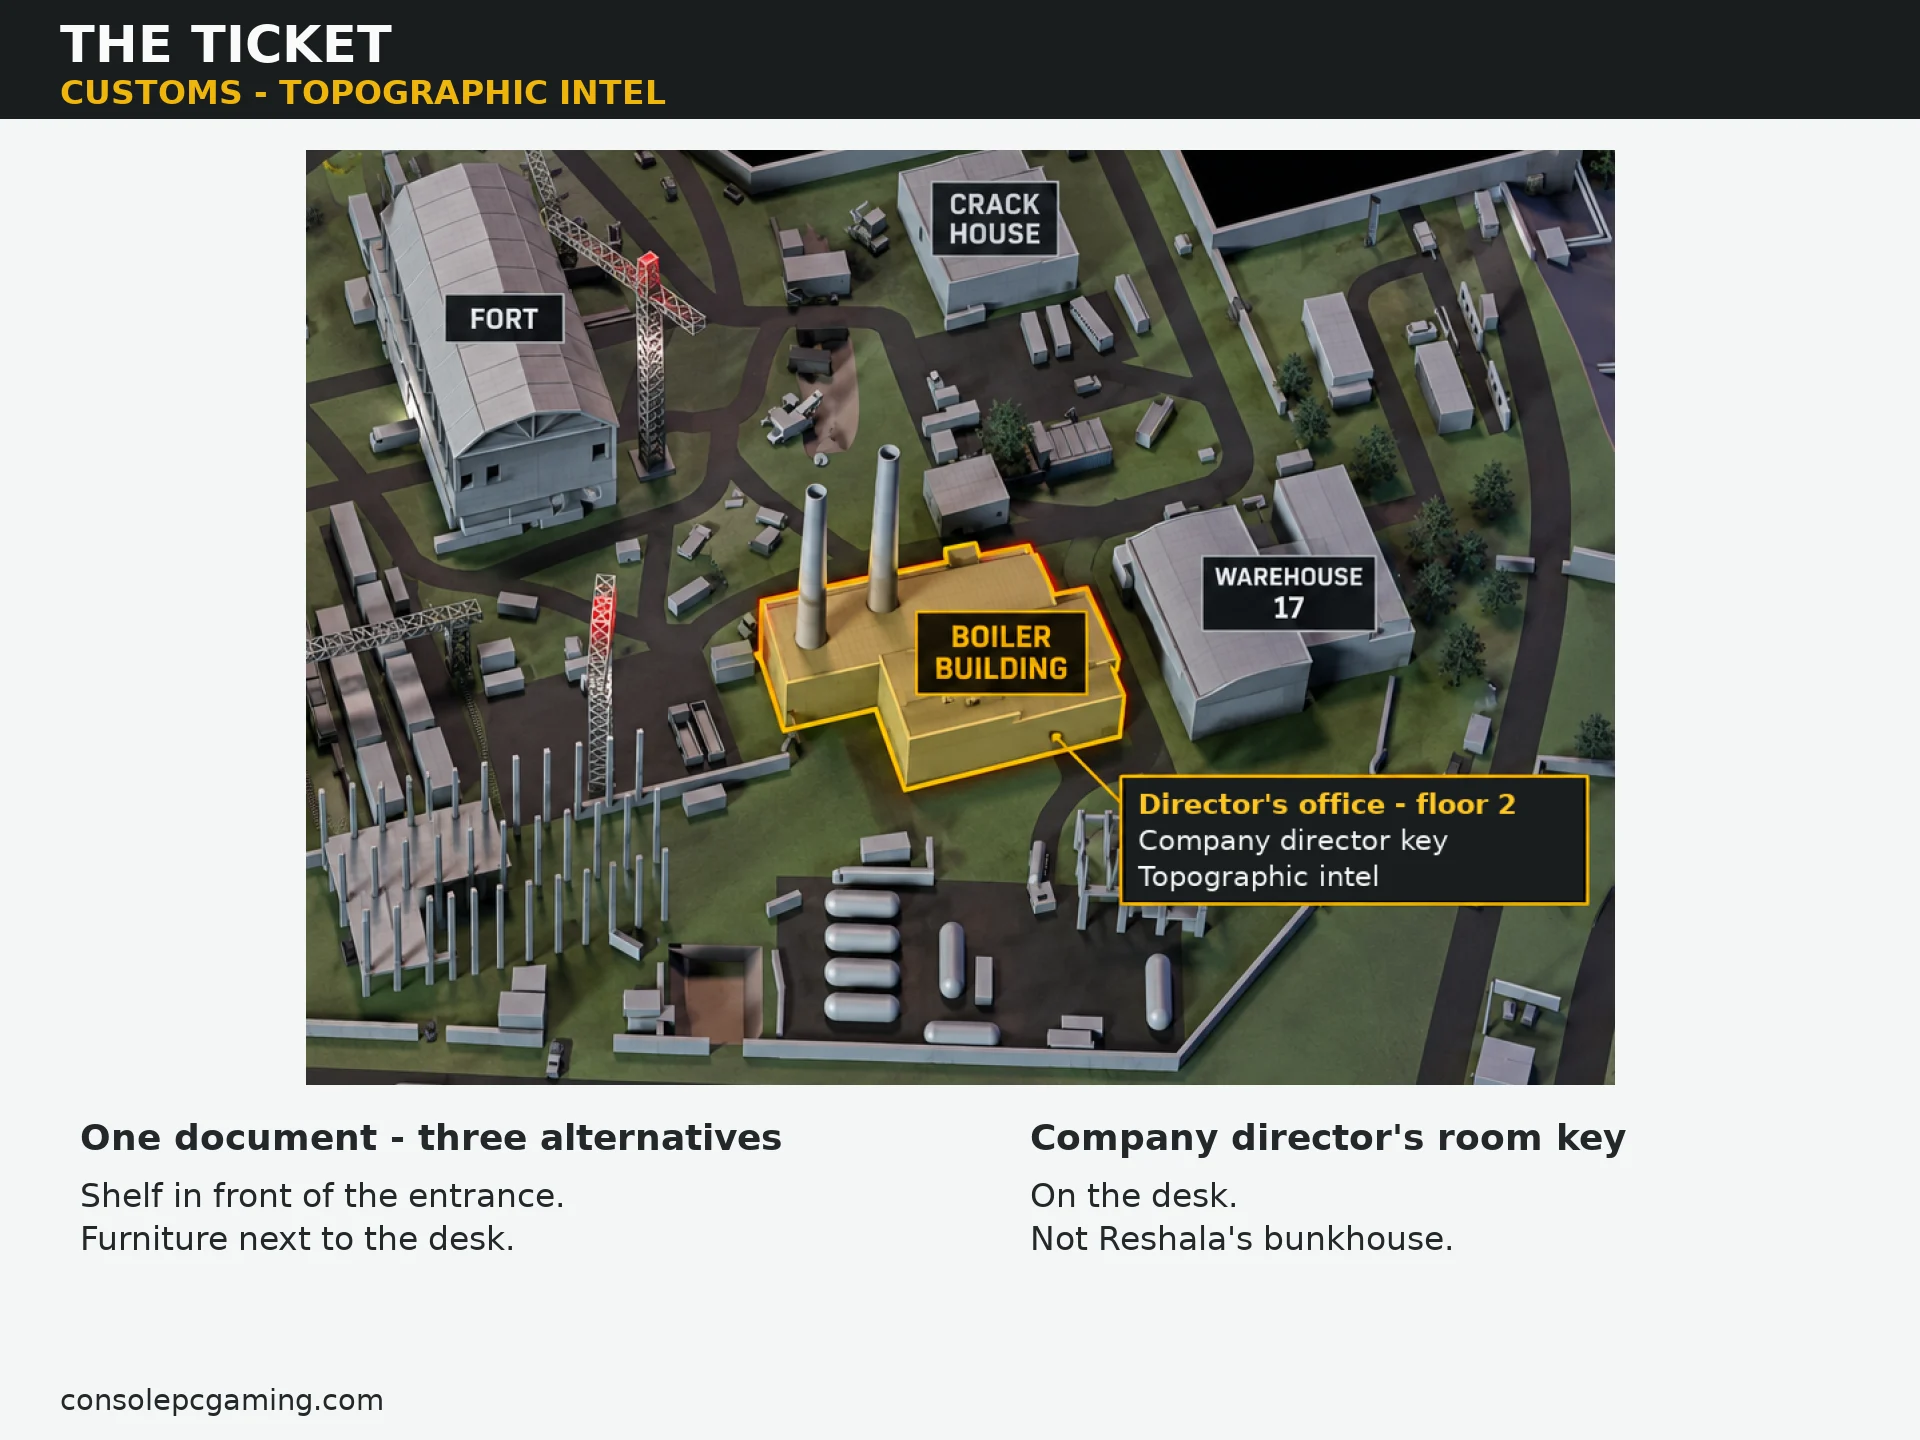
- Customs. Search the company director’s room in the boiler building. Bring the Company director’s room key.
- Woods. Check the black SUVs at the USEC checkpoint, sawmill, and USEC camp.
Deliver the crafted drive to Lightkeeper. Dying with it before the delivery means crafting another one.
Finish the kills, dogtags, and amulets
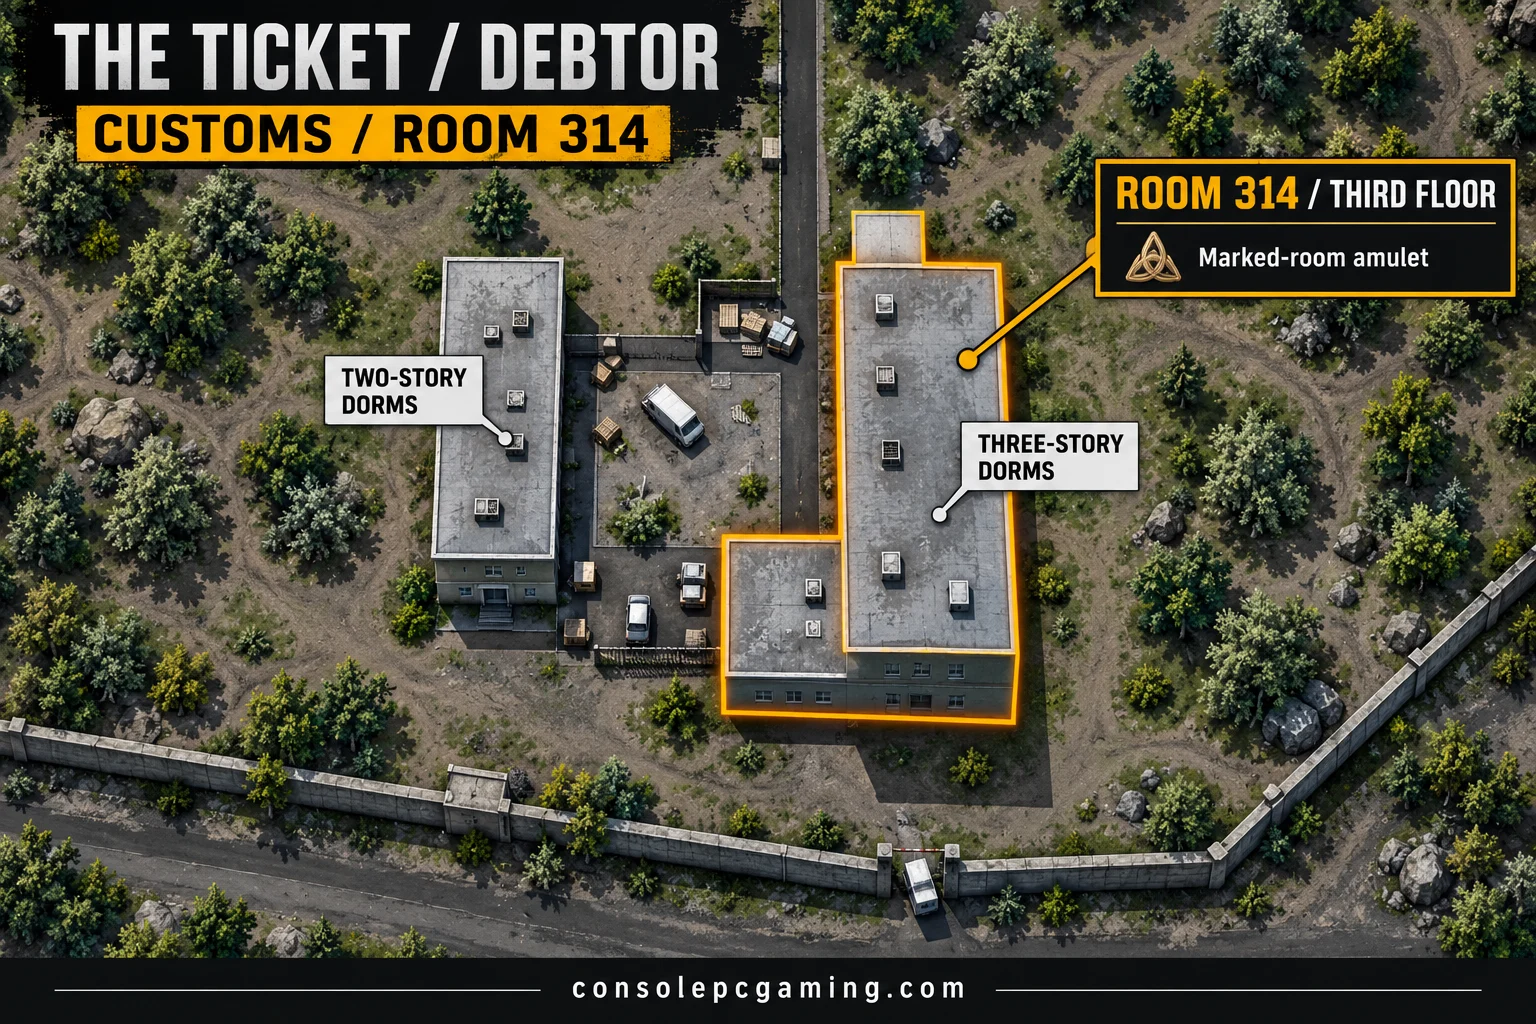
Eliminate 30 PMCs on Woods and bring 100 PMC dogtags to Lightkeeper. The dogtags do not need Found in Raid status.
Next, collect the six distinct quest amulets from these marked rooms.
- Dorm room 314 on Customs.
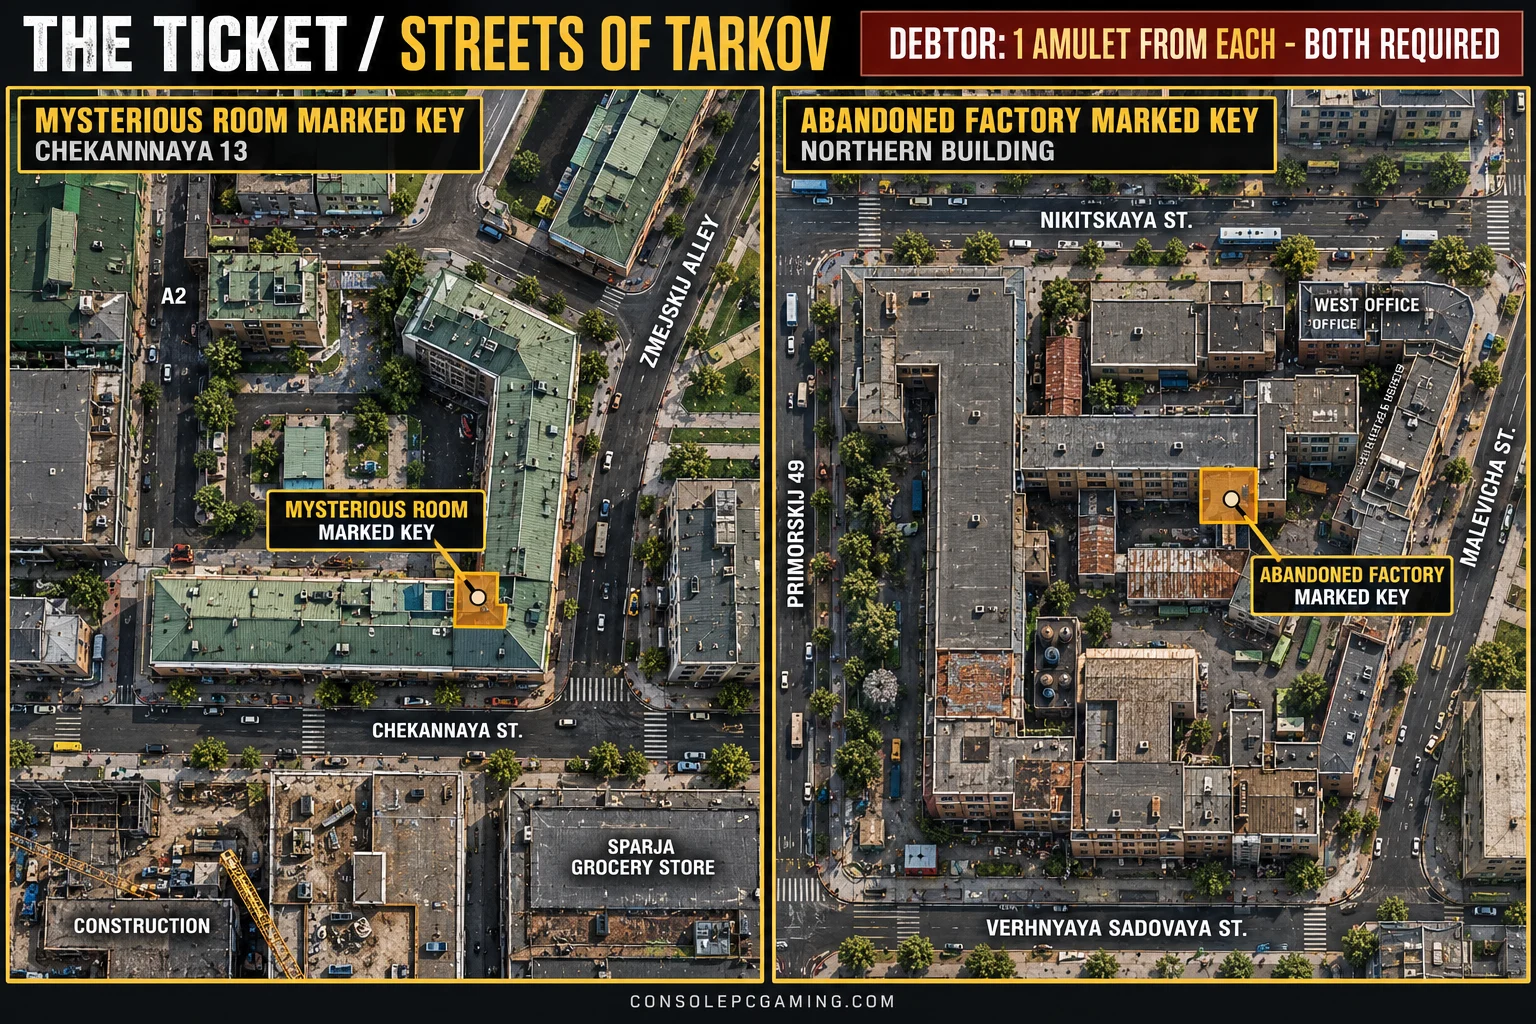
- The Abandoned factory marked-key room on Streets of Tarkov.
- The Mysterious room marked-key room on Streets of Tarkov.
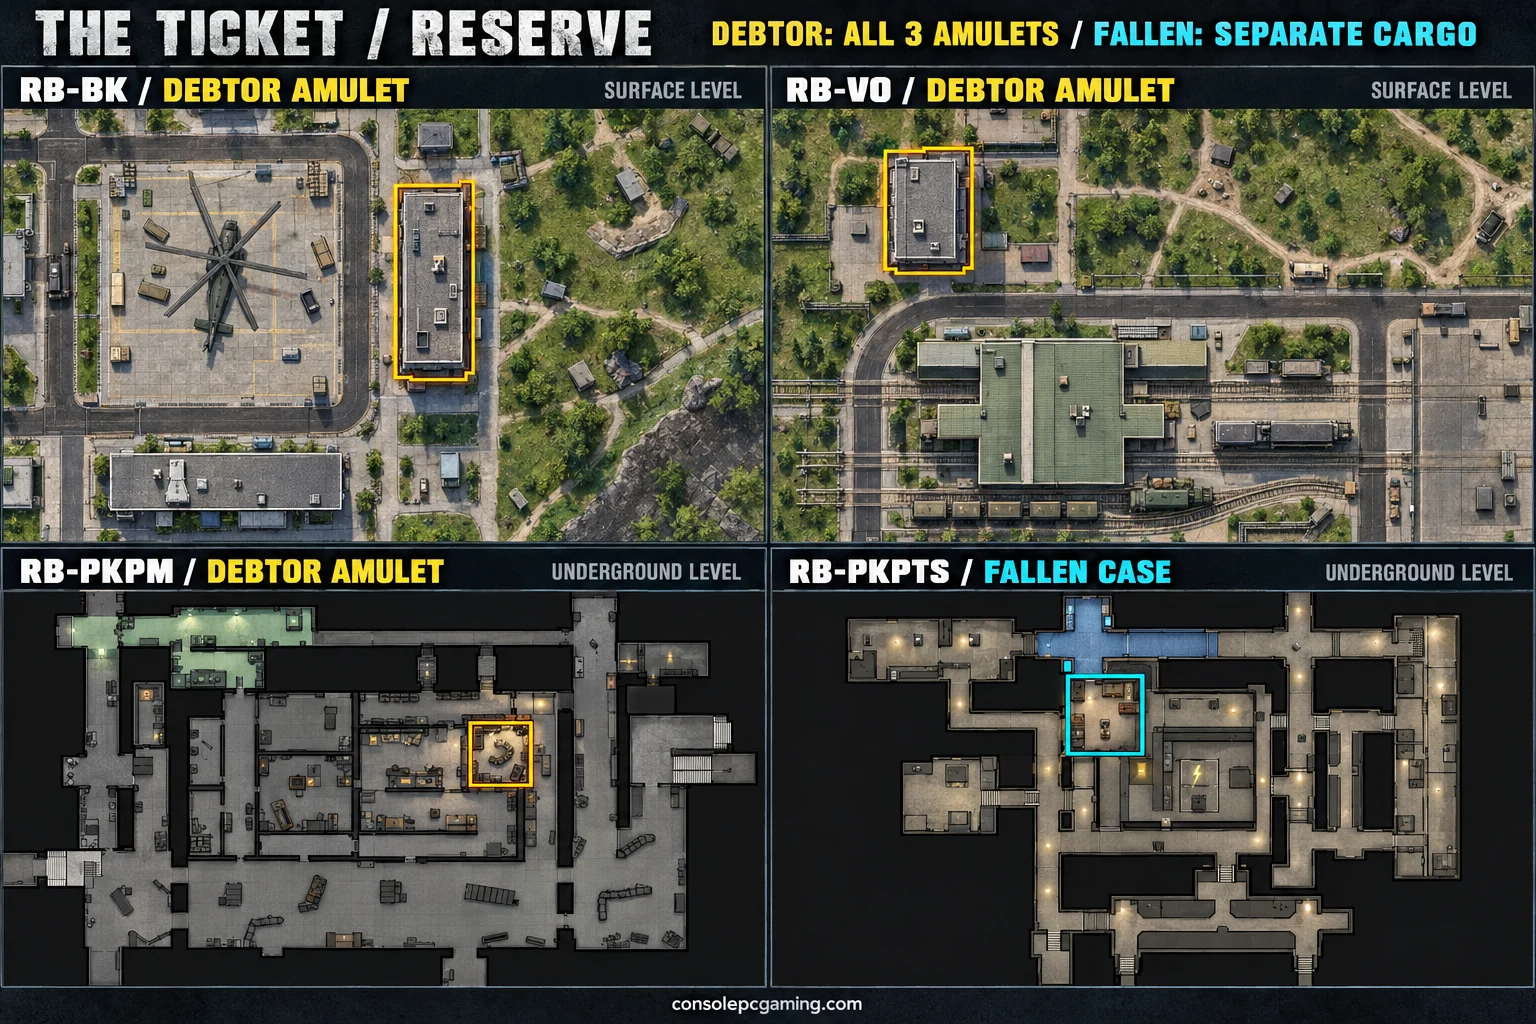
- RB-VO on Reserve.
- RB-PKPM on Reserve.
- RB-BK on Reserve.
These are the separate quest amulets, not six interchangeable purchases. Carry each one to the Lighthouse island stash room and complete its stash objective. Bring the Lighthouse island stash key for access to the room.
Report back to Lightkeeper after all six are stashed. He gives you the RFID keycard with unknown name for the Terminal approach.
Survivor route
Refuse Kerman’s initial activation offer after opening the case. Take the card to the Terminal intercom for the unsuccessful entry attempt, then return to Prapor for his arrangement.
The payment depends on your earlier Falling Skies choice.
- 300,000,000 Roubles if you gave Prapor the armored case.
- 500,000,000 Roubles if you kept it.
If you kept the case, you also need to finish Prapor’s timed assignments in order, within 72 hours.
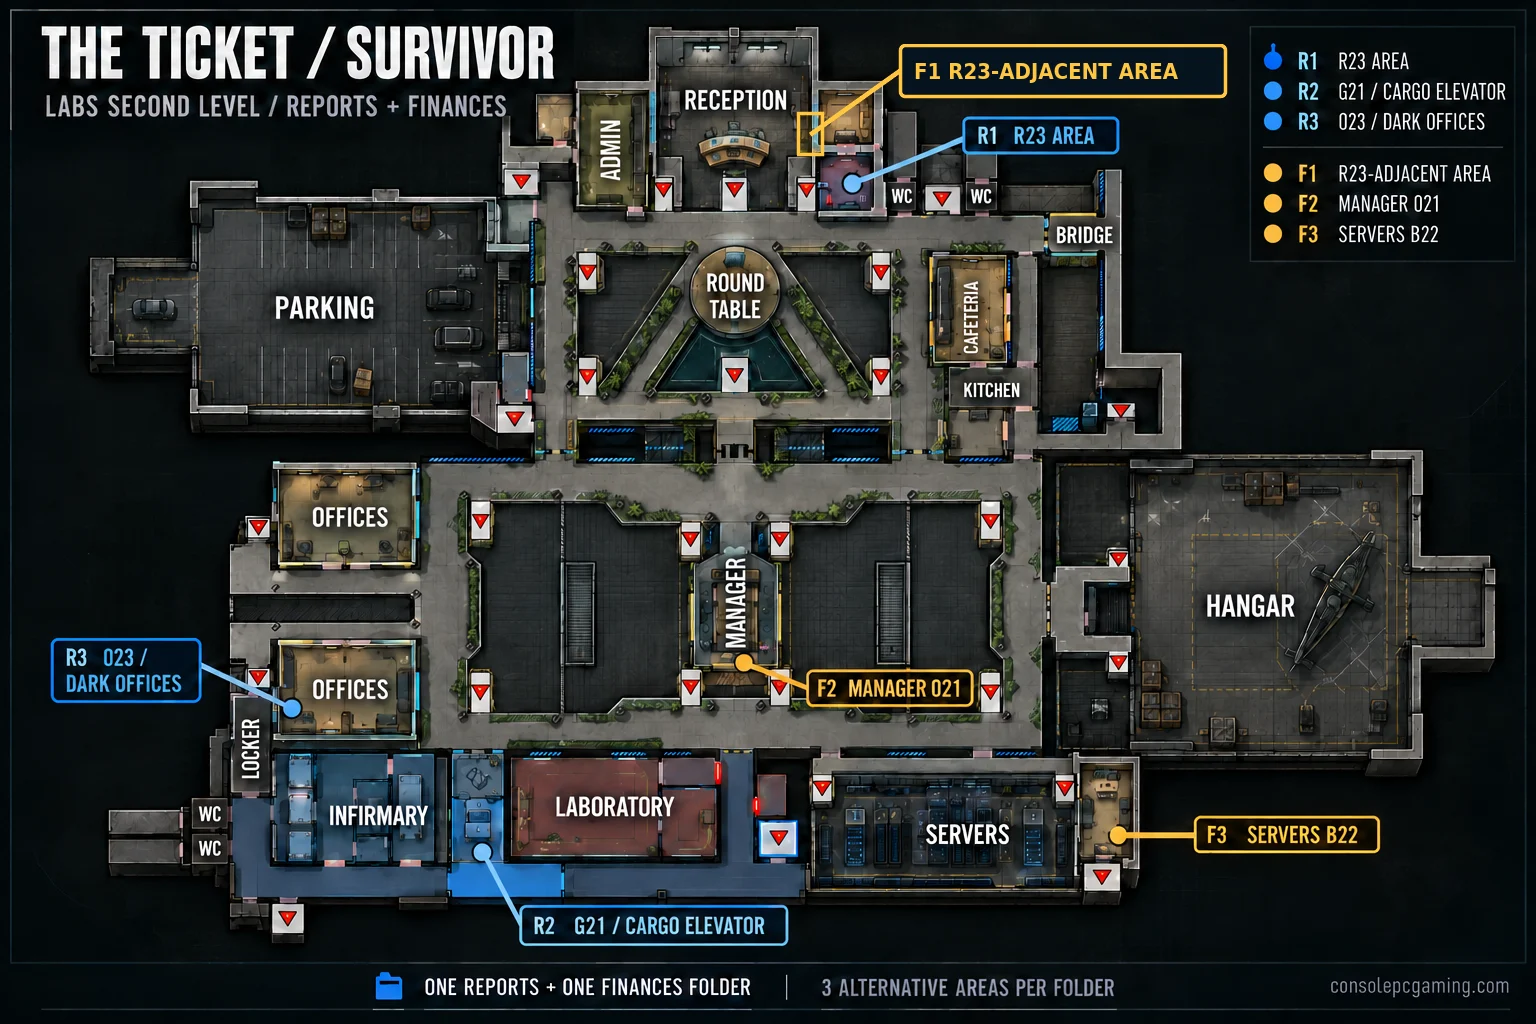
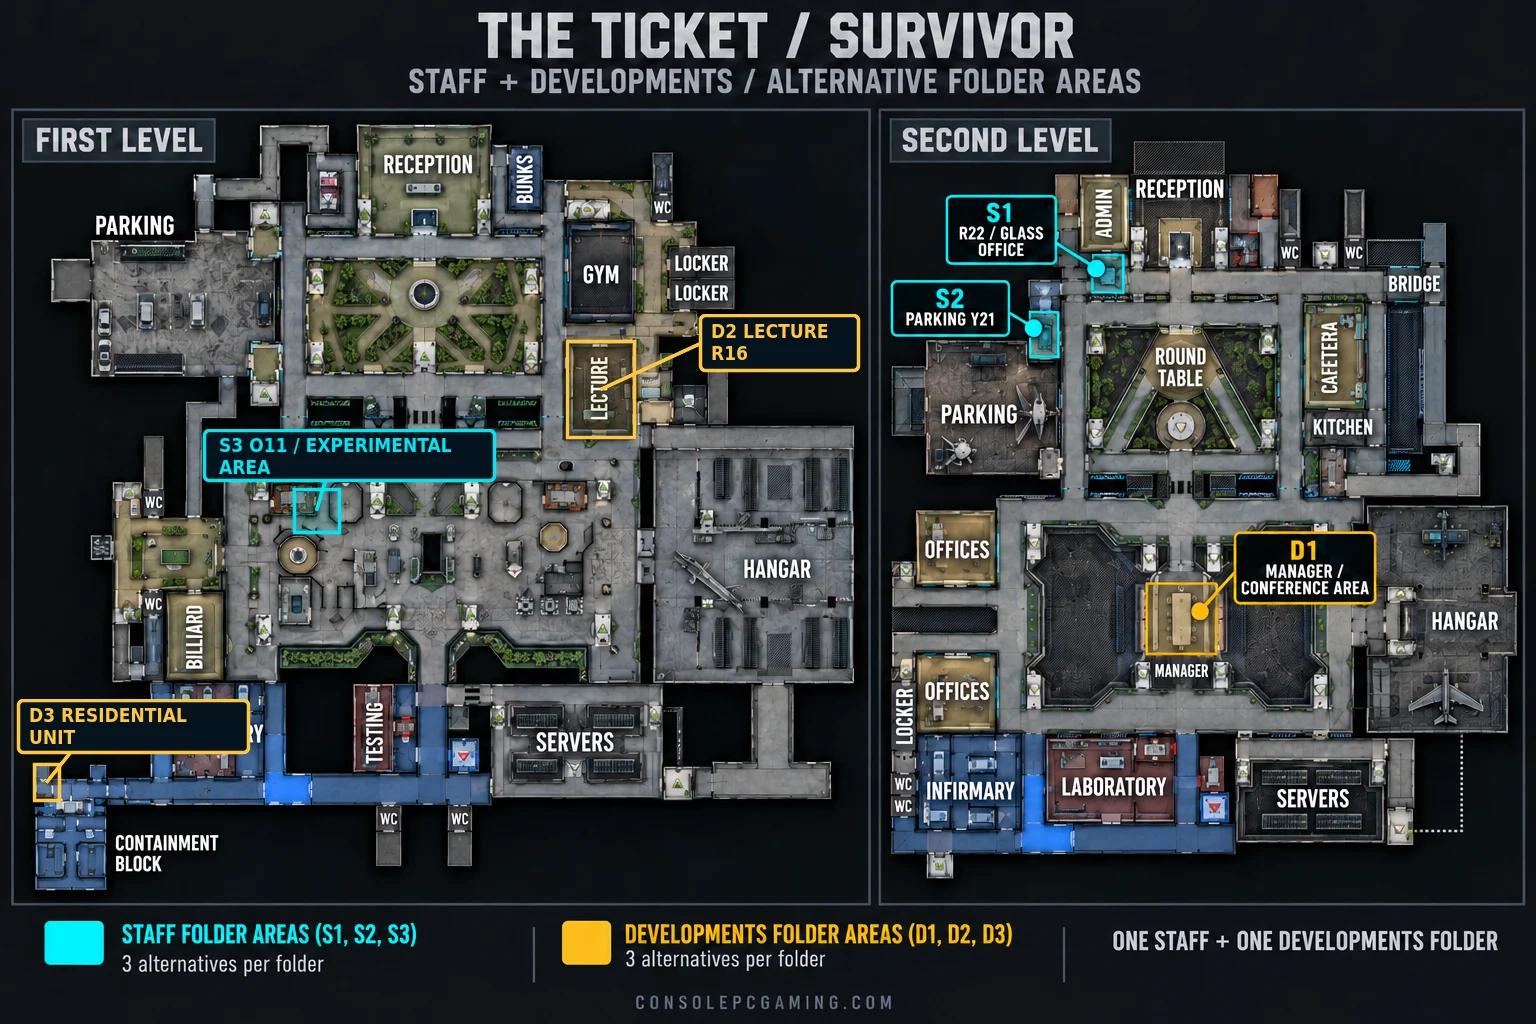
- Recover the Reports, Staff, Developments, and Finances evidence folders from The Lab and craft the SSD with TerraGroup evidence at Intelligence Center level 1.
- Eliminate 50 targets on Streets of Tarkov. These kills can be spread across raids.
- Eliminate four PMCs in one raid.
For the folders, check the G21 office near Cargo Elevator for Reports, the Parking Gates control room for Staff, the lecture hall for Developments, and the server-room desk for Finances. Each folder also has alternative spawn positions, so an empty spot does not mean the entire objective has failed.
Missing the deadline adds a Secure container Kappa handover. Do not start the timed work assuming you can ignore its timer without a significant cost.
Report to Prapor when the required work is finished and collect Prapor’s letter for the port checkpoint. This letter is your final access document, not a replacement RFID card.
Fallen route
Accept Kerman’s initial help and complete the card activation, but refuse his later request to find evidence against TerraGroup. Speak to Prapor afterward.
If you kept the case during Falling Skies, Prapor first requires the following handovers.
- 50 military or advanced electronic items.
- A Secure container Theta, Epsilon, or Kappa.
- 40 weapon and armor repair kits.
Giving Prapor the case earlier skips this extra set of demands. Both versions of the route then require the Case with dangerous cargo and 1,000,000 Dollars.
Find the dangerous cargo in the RB-PKPTS key room on Reserve. Check the shelving and the chair inside, recover the case, and deliver it to Prapor. Gather the full Dollar payment for the separate cash handover.
After Prapor’s response, collect his updated hash codes. Build Solar Power level 1 and craft the Reprogrammed RFID keycard with Prapor’s hash codes for Terminal.
Enter Terminal from Shoreline
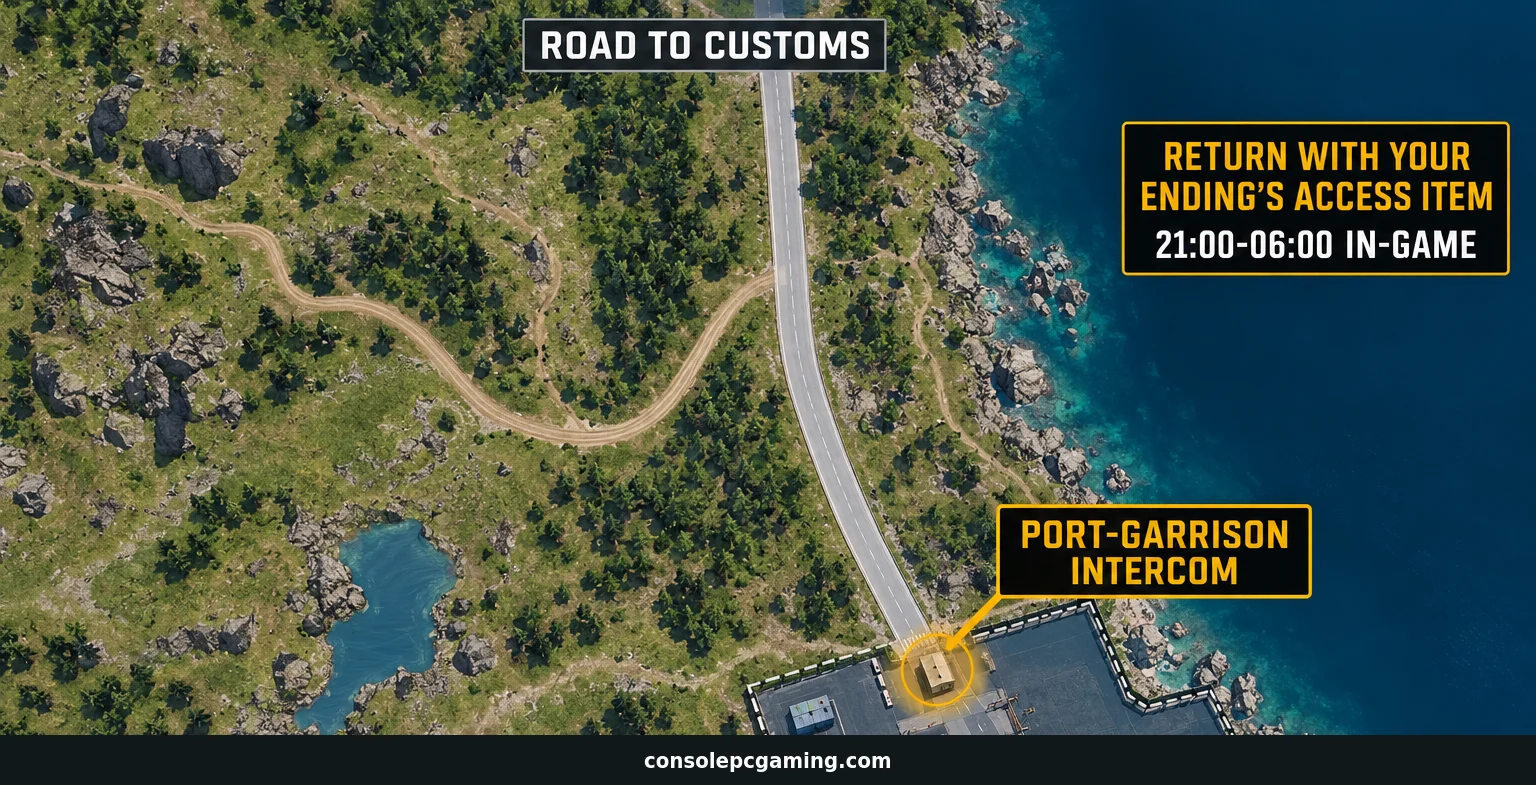
Once your ending route has produced its final access item, return to the port-garrison intercom in southeastern Shoreline between 21:00 and 06:00 in-game time.
Use the appropriate final RFID card for Savior, Debtor, or Fallen. For Survivor, carry Prapor’s letter and use the intercom’s call interaction. Wait for the guard to authorize your approach.
For Savior, the Alpha-1 evidence container must also be in your quest inventory. Leaving it in the off-raid quest storage will prevent that route’s transit.
Follow the left road toward the transit area after receiving permission. Stay inside the permitted approach, let your weapon lower, and do not draw it again. Moving beyond the barriers without authorization or threatening the garrison can get you killed.
Recover your equipment inside Terminal
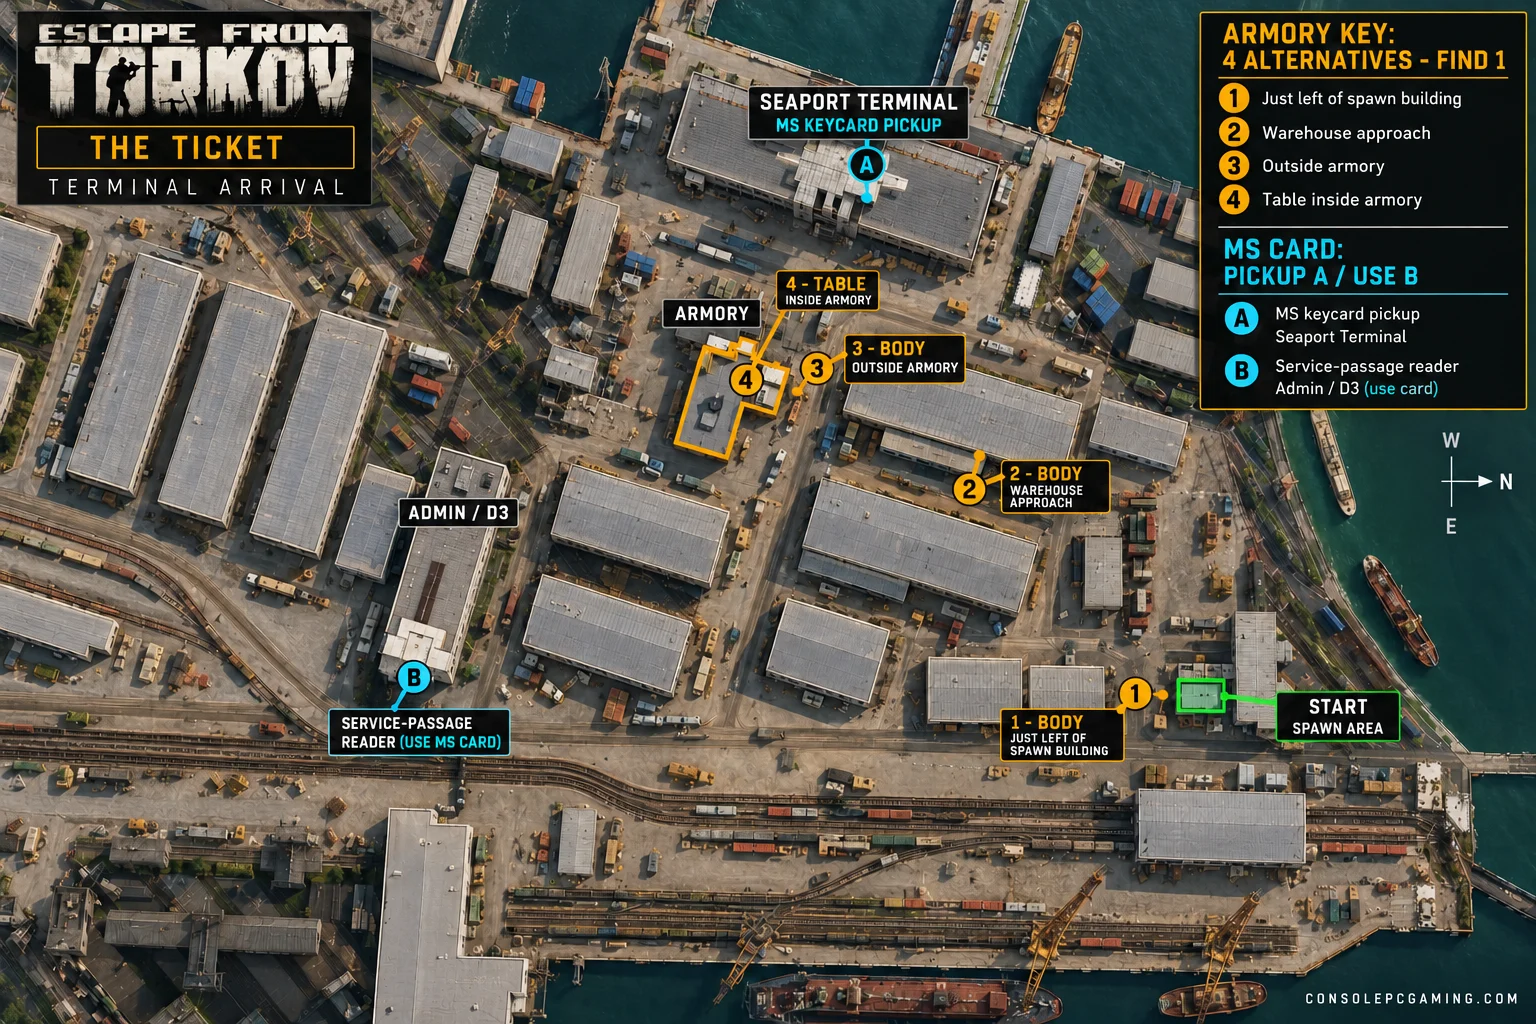
The security check takes your equipment before the final raid begins. Find an Armory key on the way to the armory. Check the dead RUAF soldiers near the starting building and along the route, plus the table inside the armory building.
Unlock the armory and recover your equipment from a locker. On the Savior route, also retrieve the Alpha-1 evidence container from the desk under the window. Be ready for Black Division operatives as you leave the armory area.
Open the service passage and fuel-depot gate
Go to the MS seaport-terminal building west of the armory. Find the Black Division keycard in the weapon box on a tipped-over ATM inside. Clear the operatives guarding the building before searching it.
Continue to the D3 administration building and swipe that card at the service-passage reader. The corridor gives you a route into the loading area, but enemies can still push into it.
The next metal gate can be forced open with Elite Strength or help from another player. Otherwise, find an SZ-1 explosive charge in the surrounding area and use it to open the gate.
Restore power and drain the pumping station
Repair the required electrical panels to restore power to the pumping station. A solo player has one panel to repair near the fuel-depot end of the route. Groups may need up to five panels.
Use a Toolset for a reliable repair. Bare-handed attempts can fail and damage your arms. After the metal gate, check the concrete barrier in front of the BRDM or the barrels near the fuel pumps for a Toolset.
With power restored, press the pumping-station button to drain the water. Search the safe inside the station afterward for the Pier door key.
Reach the pier and escape
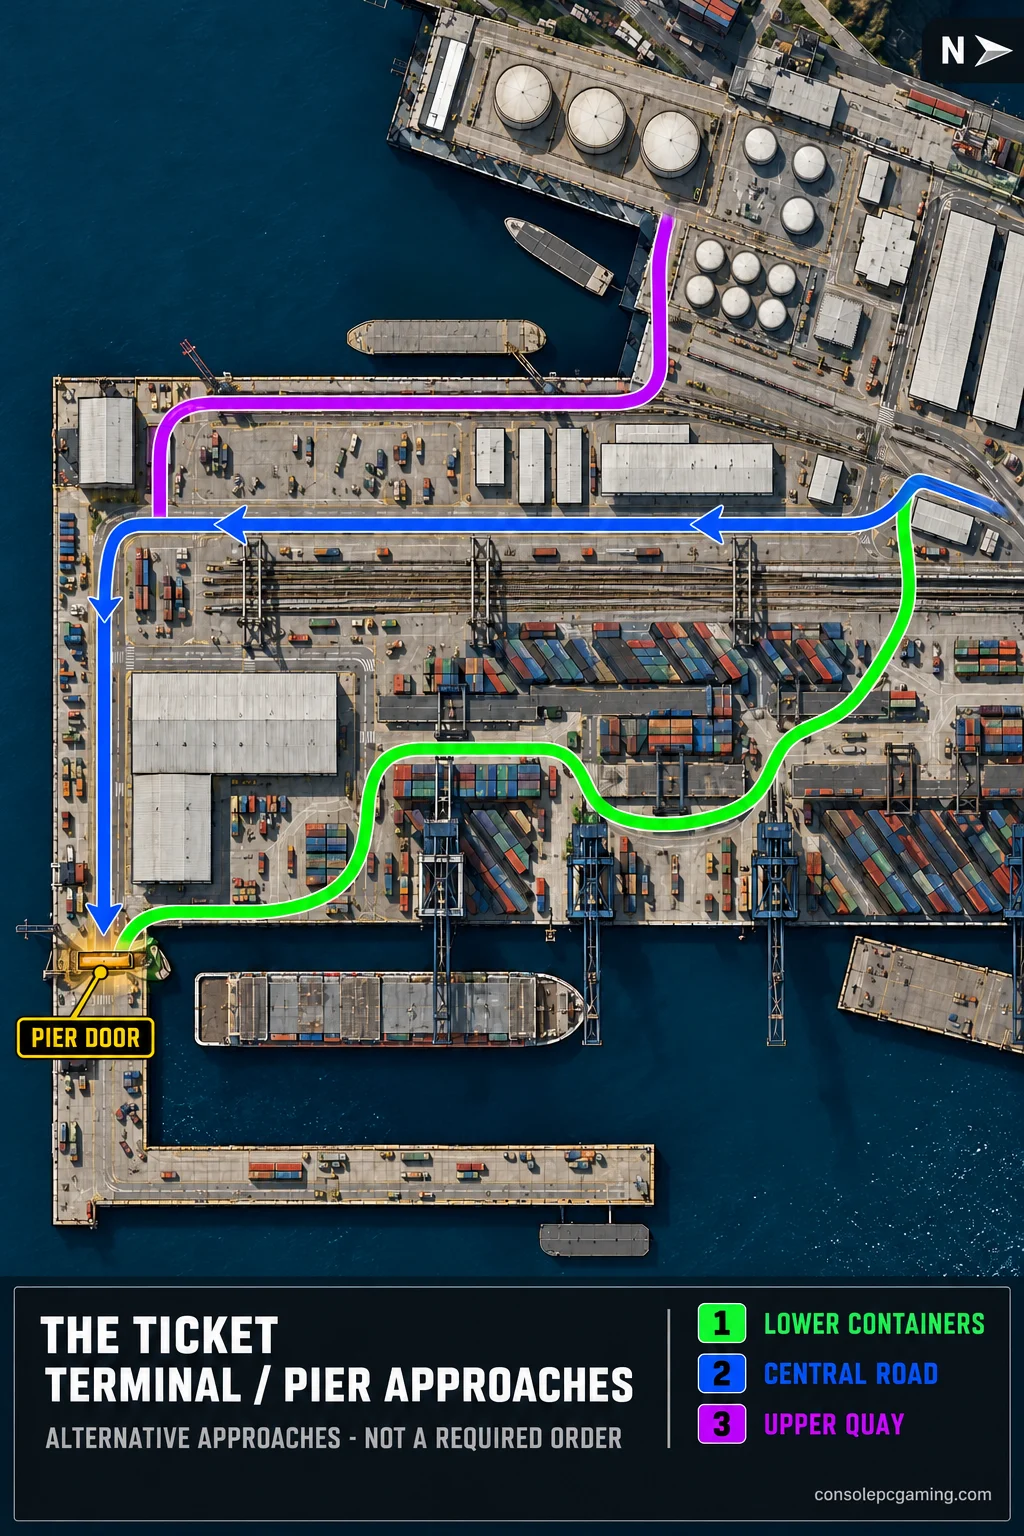
Use the loading-yard routes to reach the pier door. The eastern route is longer and can avoid the boss position, while the central and waterside approaches have their own exposed fights. None of them removes the Black Division threat before the pier.
Opening the pier door starts a three-minute evacuation countdown. Get through the final operatives and reach the Zubr Boat extraction before the window closes. Do not use the remaining overall raid time as your deadline once that door is open.
Your ending cinematic follows a successful escape. After dying or extracting from Terminal, your character returns to its pre-Terminal state apart from the consumed access item, so another attempt needs another valid entry item.
Main ending rewards
Each ending awards its own achievement, dogtag, armband, and visual customizations. The larger reward packages differ as well.
- Savior. 200,000 Dollars in PvP or 40,000 in PvE, alongside cases, equipment, and the For Humanity cosmetics.
- Debtor. 120,000 Euros in PvP or 30,000 in PvE, alongside cases, equipment, and the Lighthouse cosmetics.
- Survivor. The Survivor achievement and its associated cosmetics.
- Fallen. 10,000,000 Roubles in PvP or 3,000,000 in PvE, a Money case, and its ending cosmetics.
Escape from Tarkov
Developed by Battlestate Games