Recently, most popular streamers are opting into using stretched resolution ahead of events. Even if the Stream quality depends on it, they still tend to go with their personal performance, and that’s getting as much as an advantage as they possibly could. That’s where opting into stretched resolution in Fortnite takes place. We will also help you to set up a stretched resolution in Fortnite.
Most of the games nowadays are played on 1080p, which is 16:9 resolution. Fortnite is meant to be played on that very same resolution, but dating since the CS 1.6 era, we’re used to seeing professionals adopting personal resolutions, among which stretched is a common option.
Nowadays, the same occurs in Fortnite, which allows personal tweaks to grant maximum benefits. Disorienting the game to 4:3 resolution (1600x1080, 1520x1080, 1444x1080 and 1440x1080) surely gives a performance boost but also a better gameplay perspective. There are people going far beyond 1440, which is a bit too extreme and without a sincere benefit.
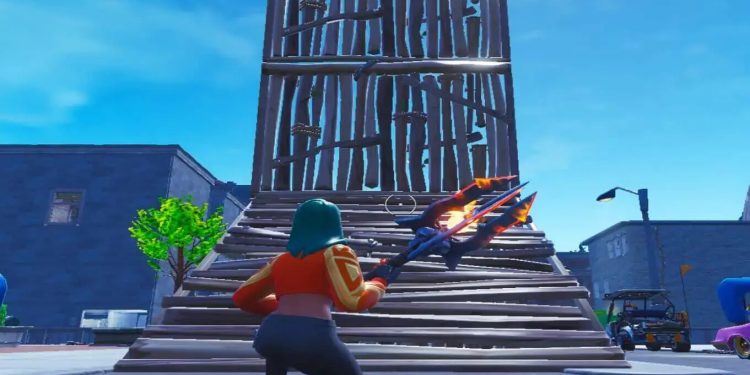
Being stretched it grants players and builders a lot more advantage in the late game. It is nothing about stretched models or bigger hitbox (even though it surely makes them wider). The whole benefit comes in the late game where the vertical FoV is huge because of the stretched resolution, granting much better eyesight. This is adopted only because the Build Battles in Pro Scrims or Matches is very intensive. Thus, having maximum benefits is very required.
Now let’s help you set up a stretched resolution for yourself. You’ve probably heard it is done from a config file, but you first need to create a custom resolution in your GPU control panel. Since we’re using Nvidia we’ll explain what exactly to do in it.
First of all, make sure you decide which stretched the resolution you’ll choose. Then, do the following:
- Go to Nvidia Control Panel
- Click Change Resolution on the left side menu
- Then on the right side Click on Customize
- Tick Enable Resolutions not exposed by the display
- Click Create Custom Resolution
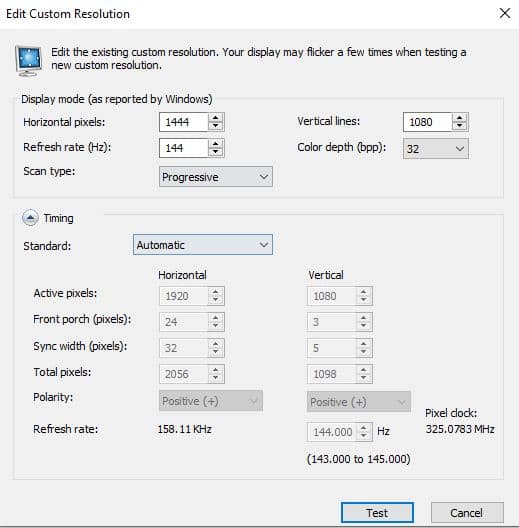
This will allow you to input your own custom resolutions, more precisely the stretched Fortnite res. Take a look at the picture below.
After getting to the image above, make sure you input your preferred stretched resolution (as shown in the image above). Caution: Make sure you leave the Refresh rate (Hz) to default. From there, just click Test and the resolution will be already written in the GPU’s Control Panel. This will allow you to have precise in-game button offset. Otherwise, it gets messy including the offset too.
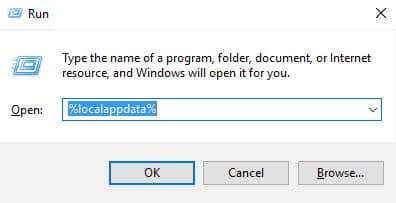
Now, let’s see where you should change the resolution in-game to fit the custom resolution. First of all, click Start then type RUN or hold the Windows Button + R. That will open the RUN box, which will allow executing a command directly. Check the image below:
In order to get to the folder where Fortnite stores all the configs and save files, you need to type %localappdata%, just as in the image above. That will ease your job without altering to show the hidden folders, etc. After that, you will be taken to the Local AppData, which contains the FortniteGame folder.
The Exact Location of the .ini file is FortniteGame\Saved\Config\WindowsClient\GameUserSettings.ini
By using any text editor, you can open the .ini file and seek for the following lines:
ResolutionSizeX=1920
ResolutionSizeY=1080
LastUserConfirmedResolutionSizeX=1920
LastUserConfirmedResolutionSizeY=1080
They are usually in that particular order. By using the search function it will be easier to find the exact lines. Just make sure you change the ResolutionSizeX and LastUserConfirmedResolutionSizeX to one of the stretched resolutions.
We honestly hope we eased your job quite a lot. Having opted into stretched resolution should grant you benefit in Build Battles by quite a lot.


